Getting started with Odoo iSuite Payroll app
Getting started with Odoo iSuite Payroll app
Payroll management is an important task for every company. However, this task is time-consuming and requires extra effort. The iSuite payroll management software was built to minimize costs, risks, and optimize payroll management for companies.
iSuite payroll management is one of the key features in the Human Resources (HR) feature cluster. iSuite payroll app is configured to calculate salary automatically, based on data taken from related modules such as:
Attendances (hr_attendance);
Time Off (hr_holidays);
Employees (hr);
Payroll Accounting (to_hr_payroll_account);
etc.
Requirements
This tutorial requires the installation of the following applications/modules:
Payroll
Install Payroll app
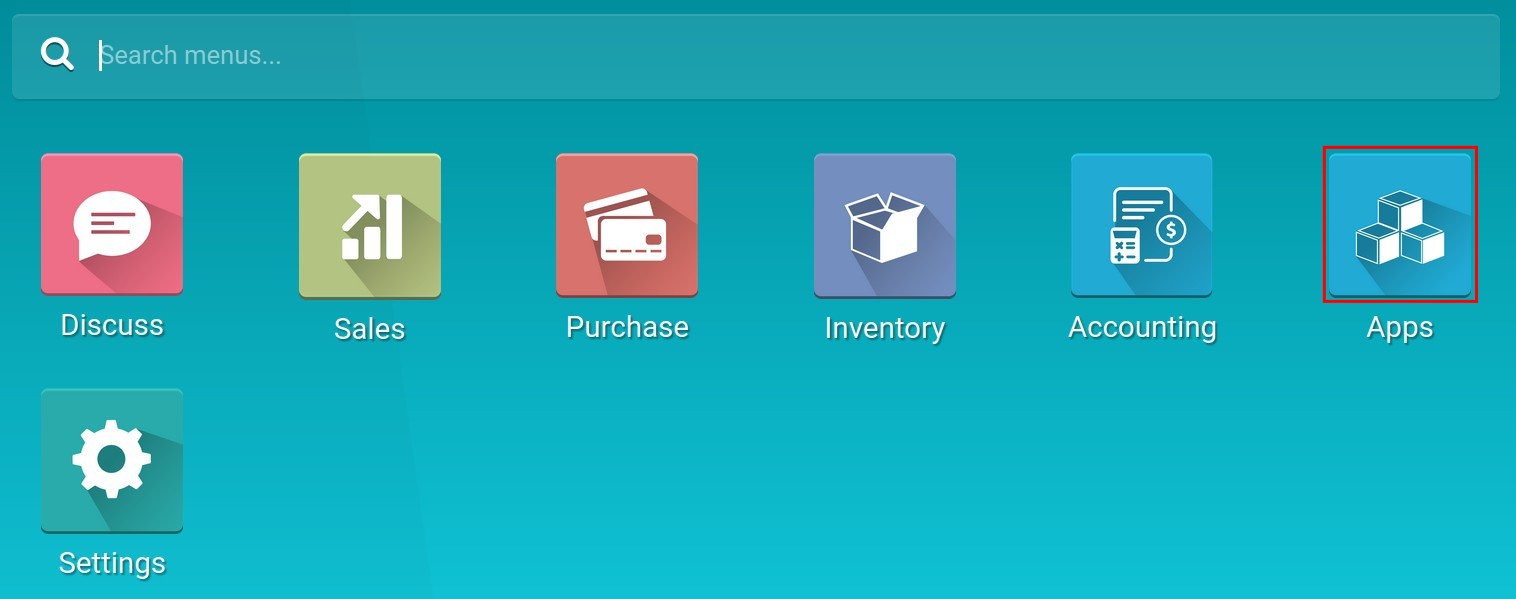
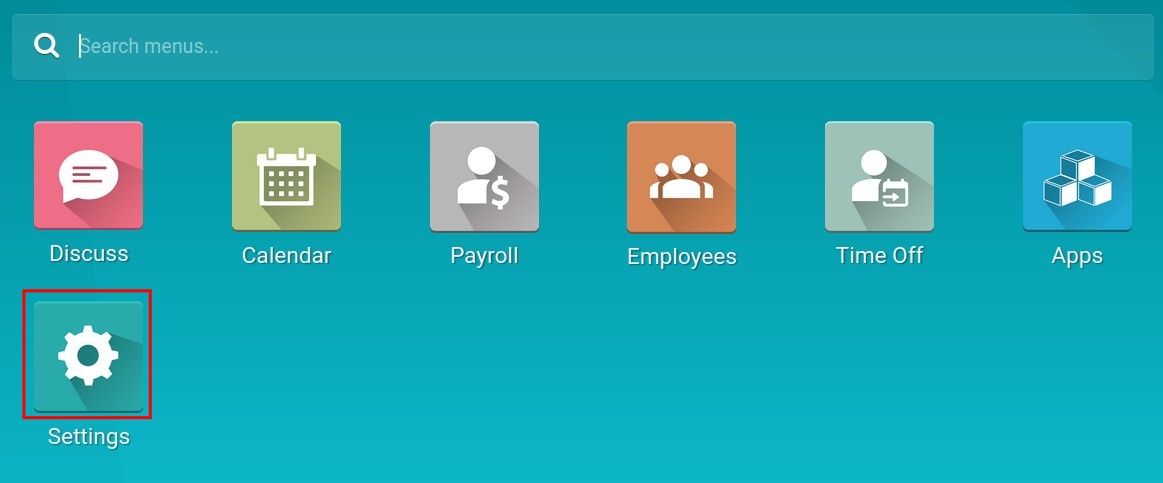
To install the Payroll app, on the main view, navigate to the Apps store:
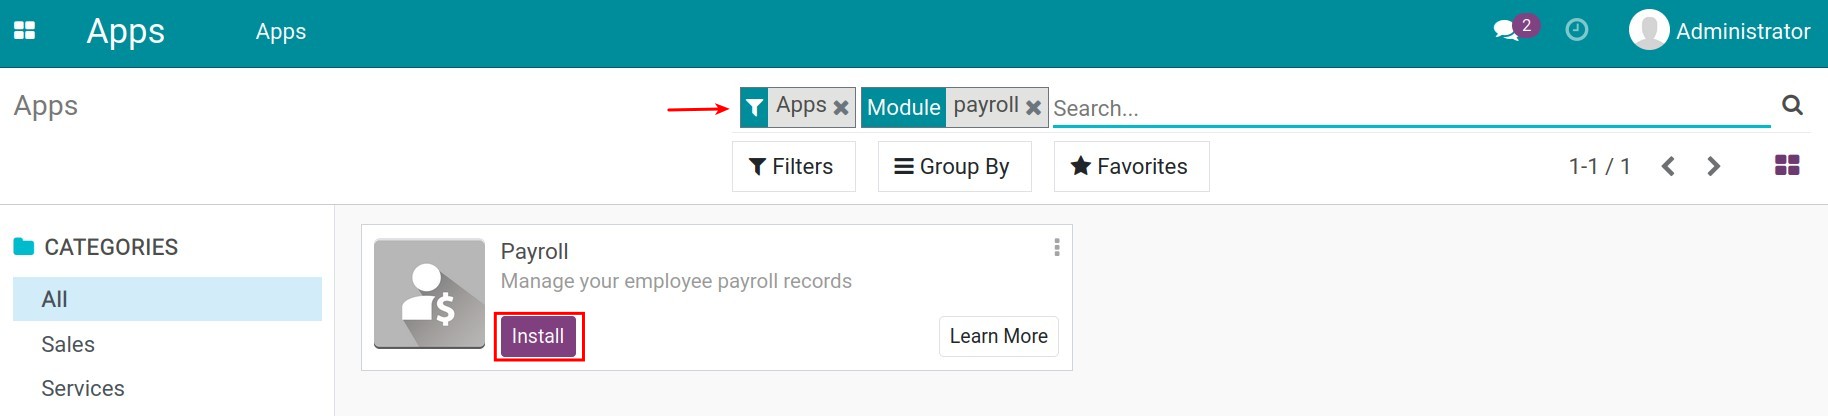
Use the Filters feature to search for module Payroll and select Install:
Once the installation is done, go back to the main interface and you will see the Payroll app is added there:
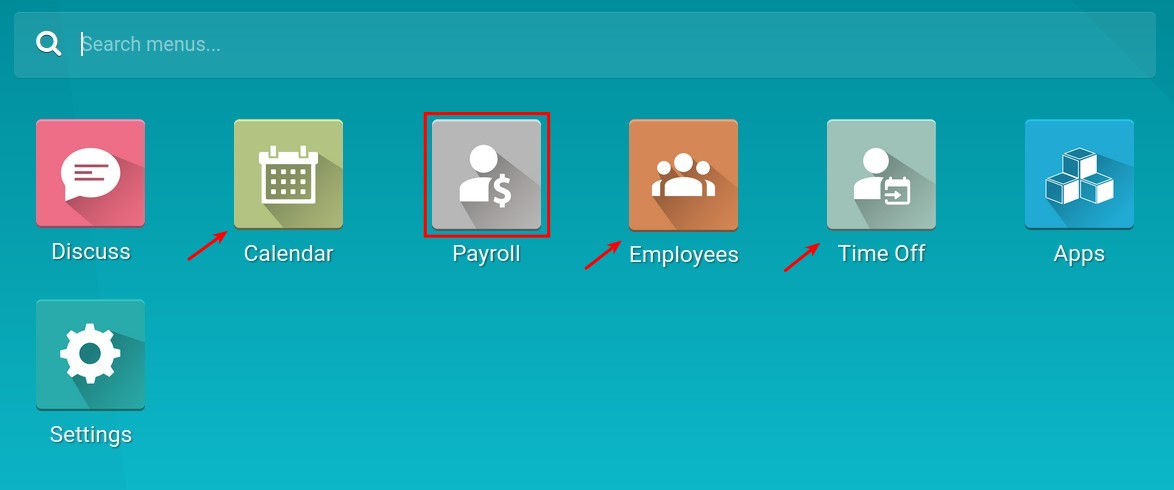
Note
When the Payroll app is installed, other applications such as Calendar, Employees, and Time Off will be installed.
Initial settings for the Payroll app
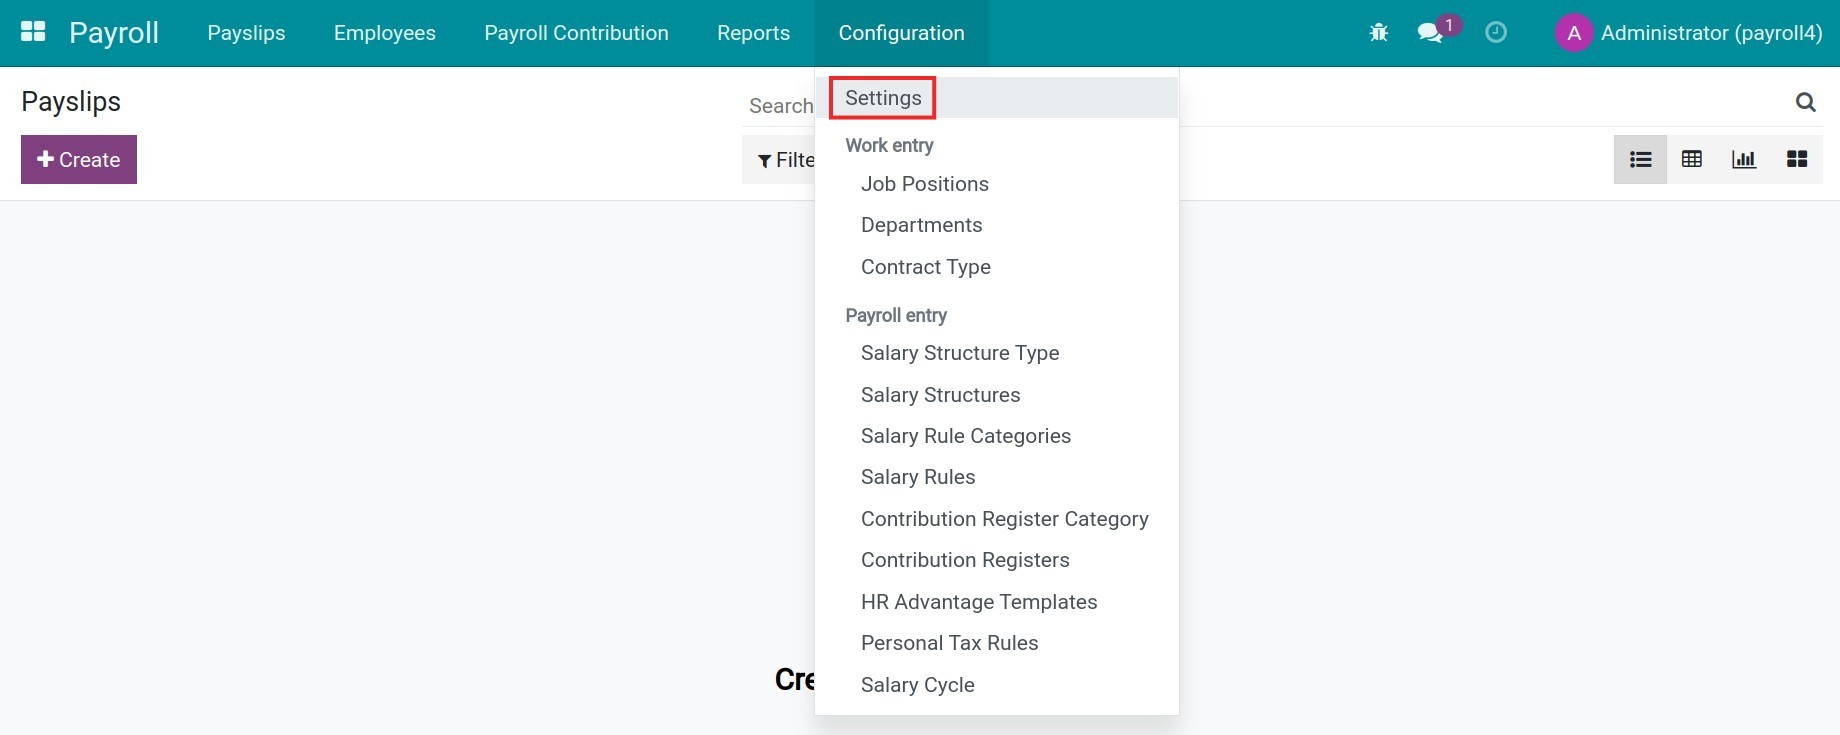
To set up basic features for the Payroll app, navigate to Payroll ‣ Configuration ‣ Settings:
In this section, you can configure basic features for the whole Payroll app:
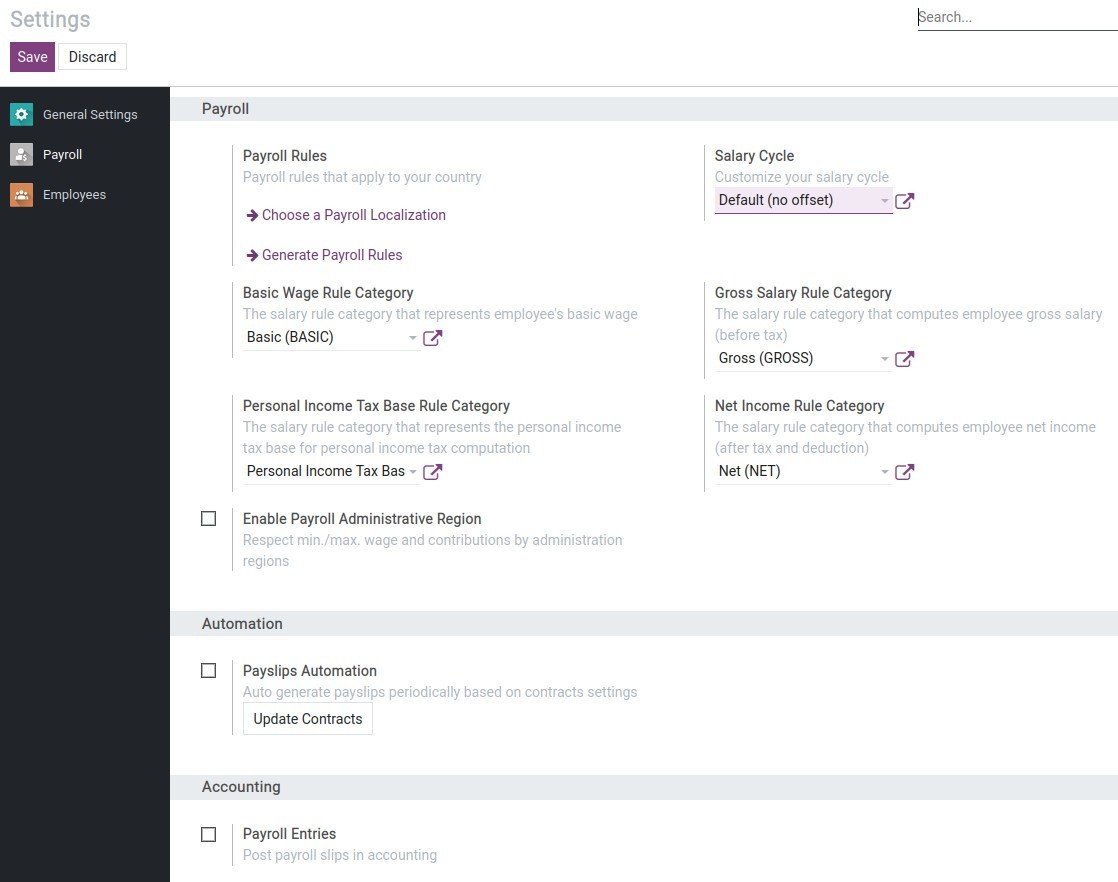
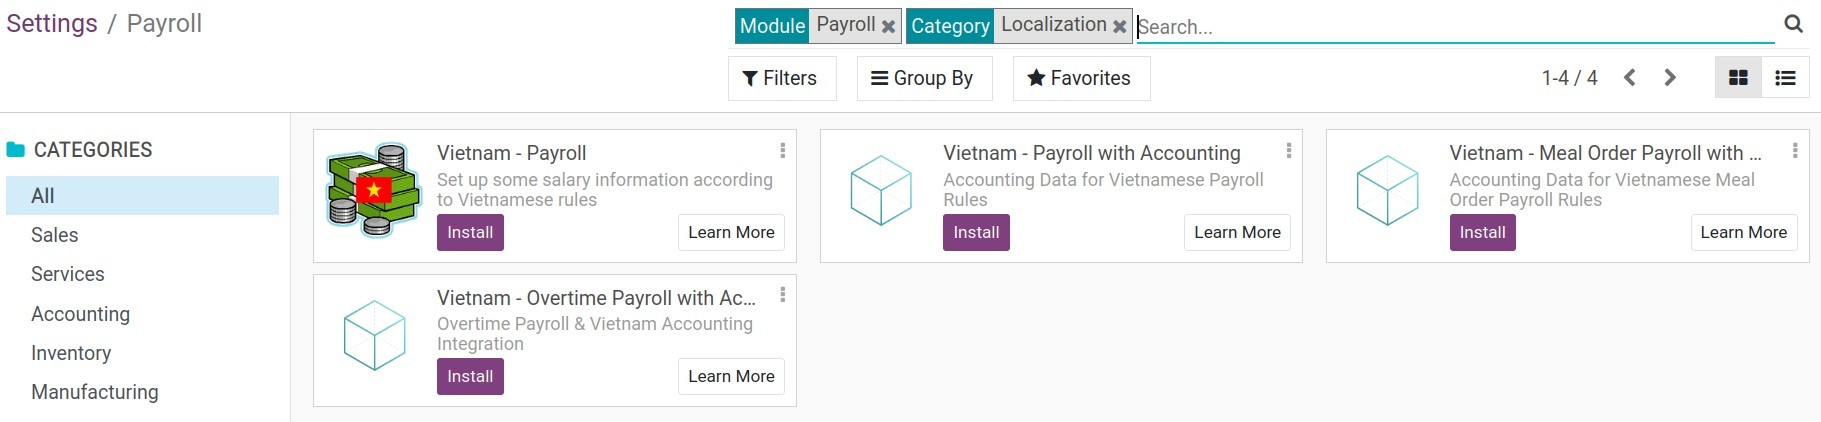
Payroll Rules: Choose and install payroll rules that apply to your country:
Choose a Payroll Localization: When chosen, the system will redirect you to the Apps store interface where you can select and install the suitable payroll localization rules.
- Generate Payroll Rules: Pressing on this option will automatically generate default payroll rules based on your company’s country. (Your chosen country when you created an iSuite instance.)
Salary Cycle : Select a default salary cycle for the system.
Basic Wage Rule Category: Declare the salary rule category that contains the basic salary rules for the payroll.
Gross Salary Rule Category: Declare the salary rule category that contains the salary rules used for employee gross salary computation.
Personal Income Tax Base Rule Category: Declare the salary rule category that contains the personal tax rules in the payroll.
Net Income Rule Category: Declare the salary rule category that contains the salary rules used to compute employee net income.
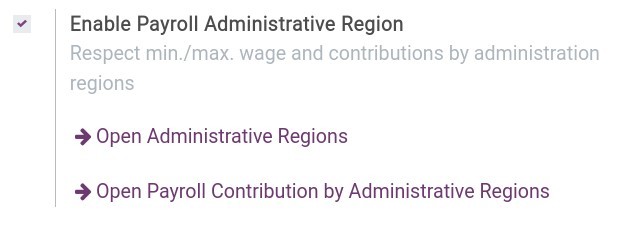
Enable Payroll Administrative Region: When enabled, you can declare the minimum wage and payroll contributions by each administrative region for the salary computation.
Payslips Automation: When enabled, the system will also activate the auto-generated payslip periodically feature based on contract settings. Using information configured on the contract, the system automatically computes and generates periodic payslips according to the salary cycle for employees. (Refer to Create Paylips Automation for more information).
Payroll Entries: If activated, when a payslip or a payroll is confirmed, the system will automatically generate payroll entries.
Configure access rights for the Payroll app
To configure access rights, from the main Viindoo view, navigate to Settings ‣ Users & Companies ‣ Users:
Select the user account that needs to set the access rights and navigate to the menu Payroll:
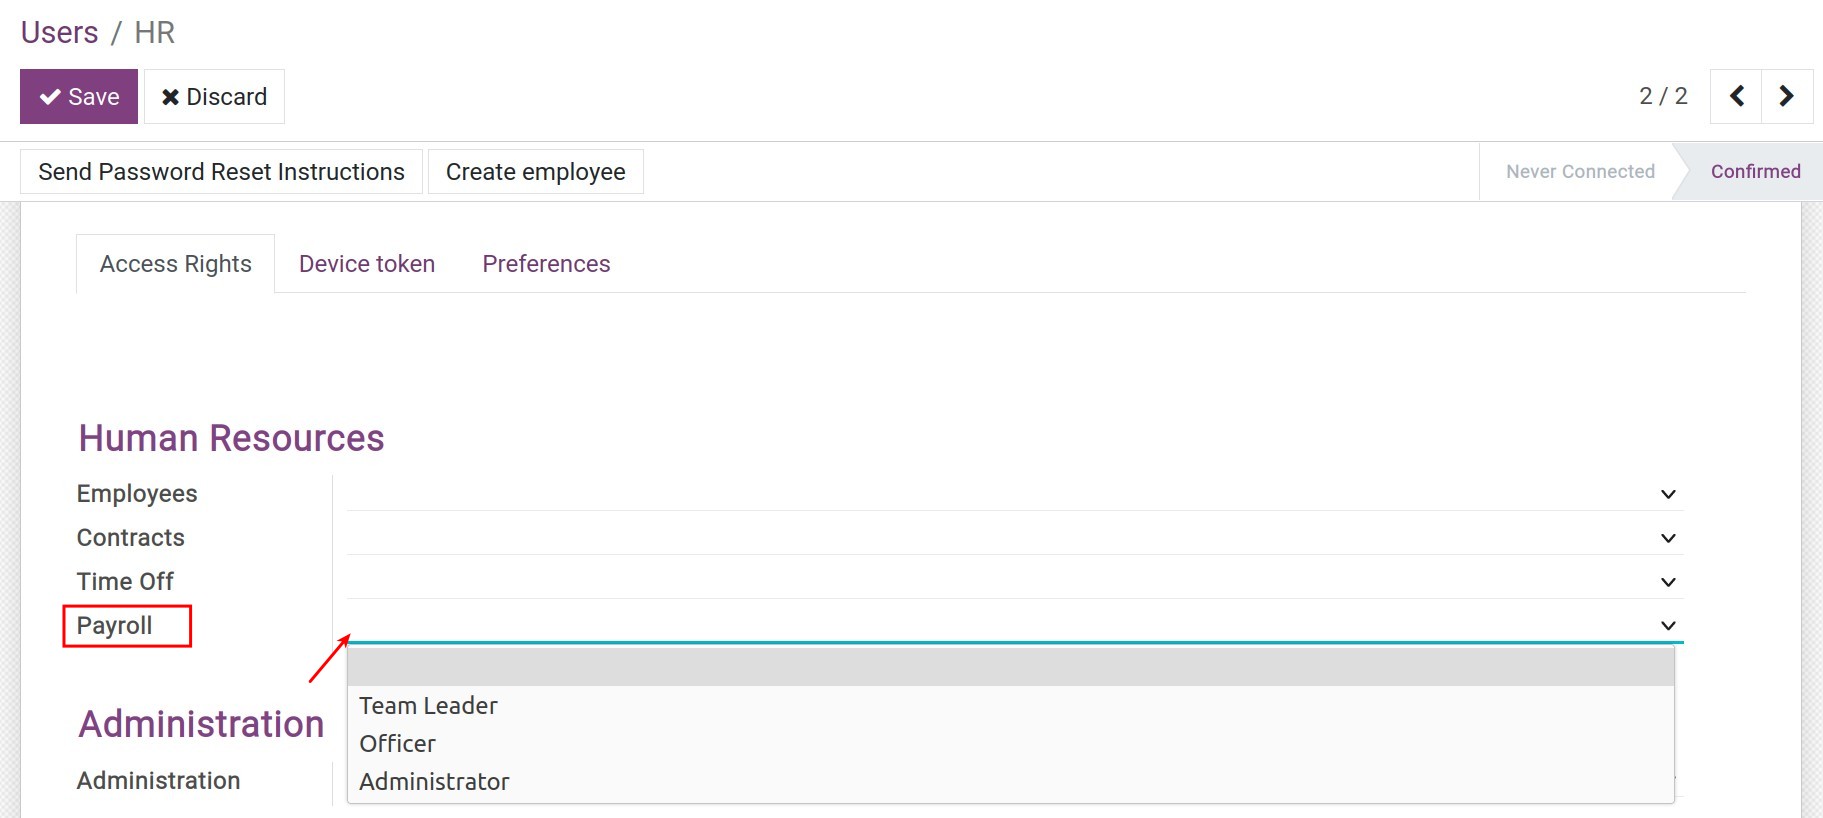
Through the Access Rights configuration for each user account participating in the Payroll app, Viindoo assists you in defining the rights and responsibilities of each employee with four levels of access rights:
Empty: Only see their own payslips and personal income tax analysis report.
Team Leader: See the payslips, payroll analysis report and personal income tax analysis report of the employees they are in charge of.
Officer: With this set of rights, the user will be able to perform the following actions:
Create payslips and payroll;
Create and manage employees;
Create and see payroll contributions;
See payroll analysis.
Note
With the Officer access right in the Payroll app, you will also have the same right for the Employees app by default and be able to see all the information on Contracts to ensure that you have the authority to do your job.
Administrator: Have full access rights to the Payroll app.
See also
Optional module
HR Payroll Accounting
Salary Rules and Salary Rule Categories
Salary Rules and Salary Rule Categories
In the iSuite Payroll app, the salary rules are defined as formulas for calculating the norms in employee . To be able to manage employee salaries in the system, this article will show you how to set up and apply salary rules in the process of salary calculation.
Requirements
This tutorial requires the installation of the following applications/modules:
Payroll
Salary Rule Categories
Activate the developer mode to view Salary Rule Categories.
Salary rules will be allocated to the respective categories. Navigate to Payroll ‣ Configuration ‣ Salary Rule Categories.
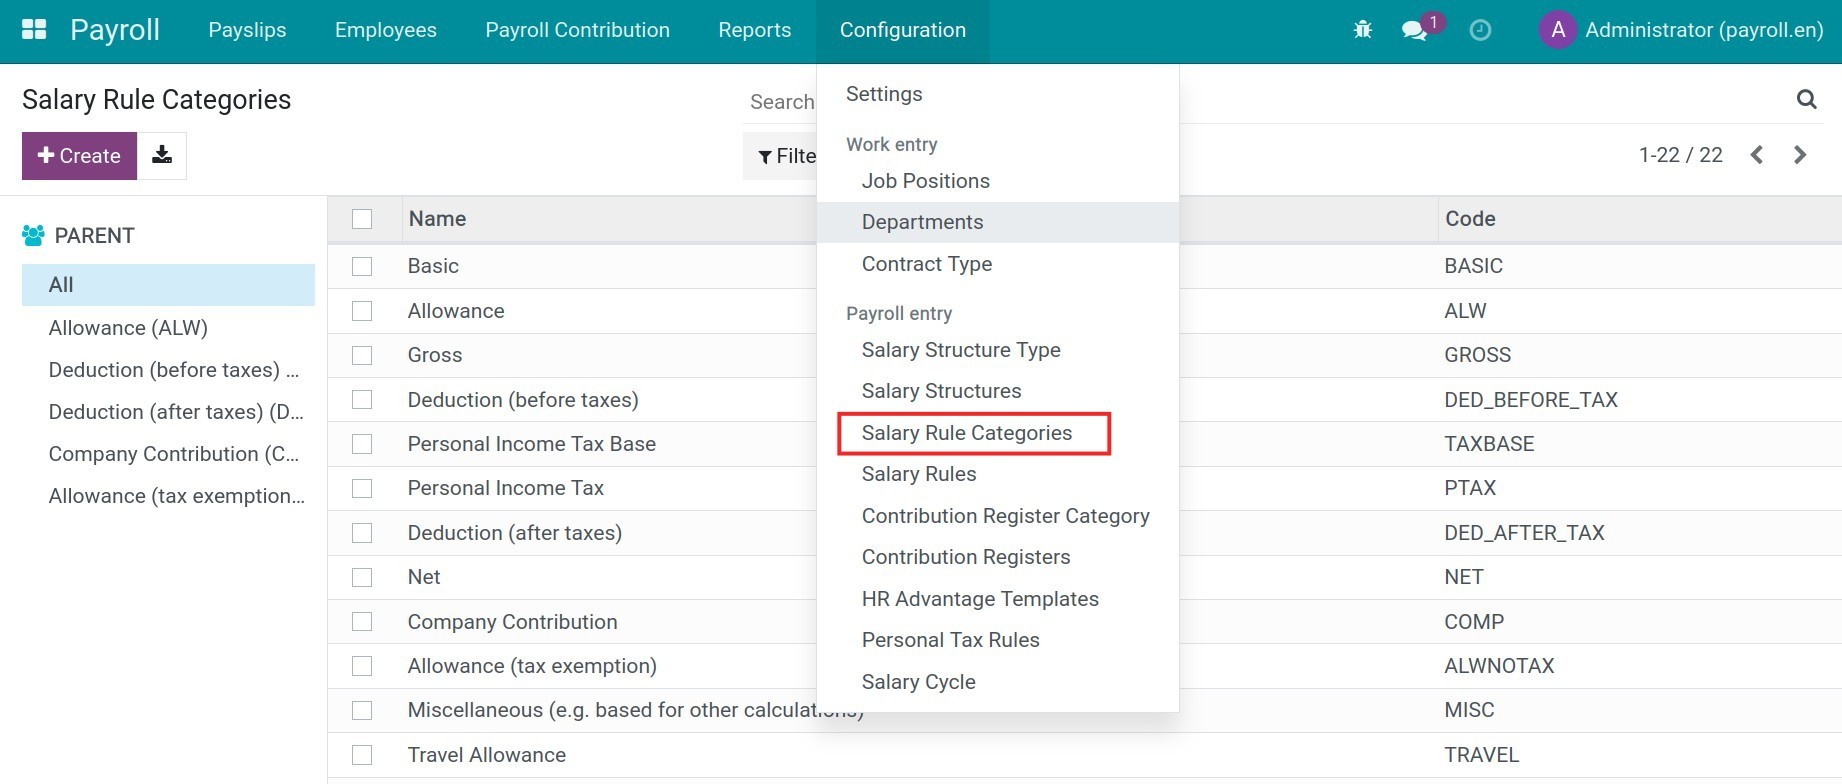
Select an existing category, you will see the following information:
Name: The name of the salary rule category.
Parent: Select a category to be the parent category of this current category. The parent one will consist of the salary rules of all the children.
Code: The code can be used to include the calculation formula for the salary rule.
Paid by Company: When enabling this option, the values generated by this category will be included in the company’s expenses.

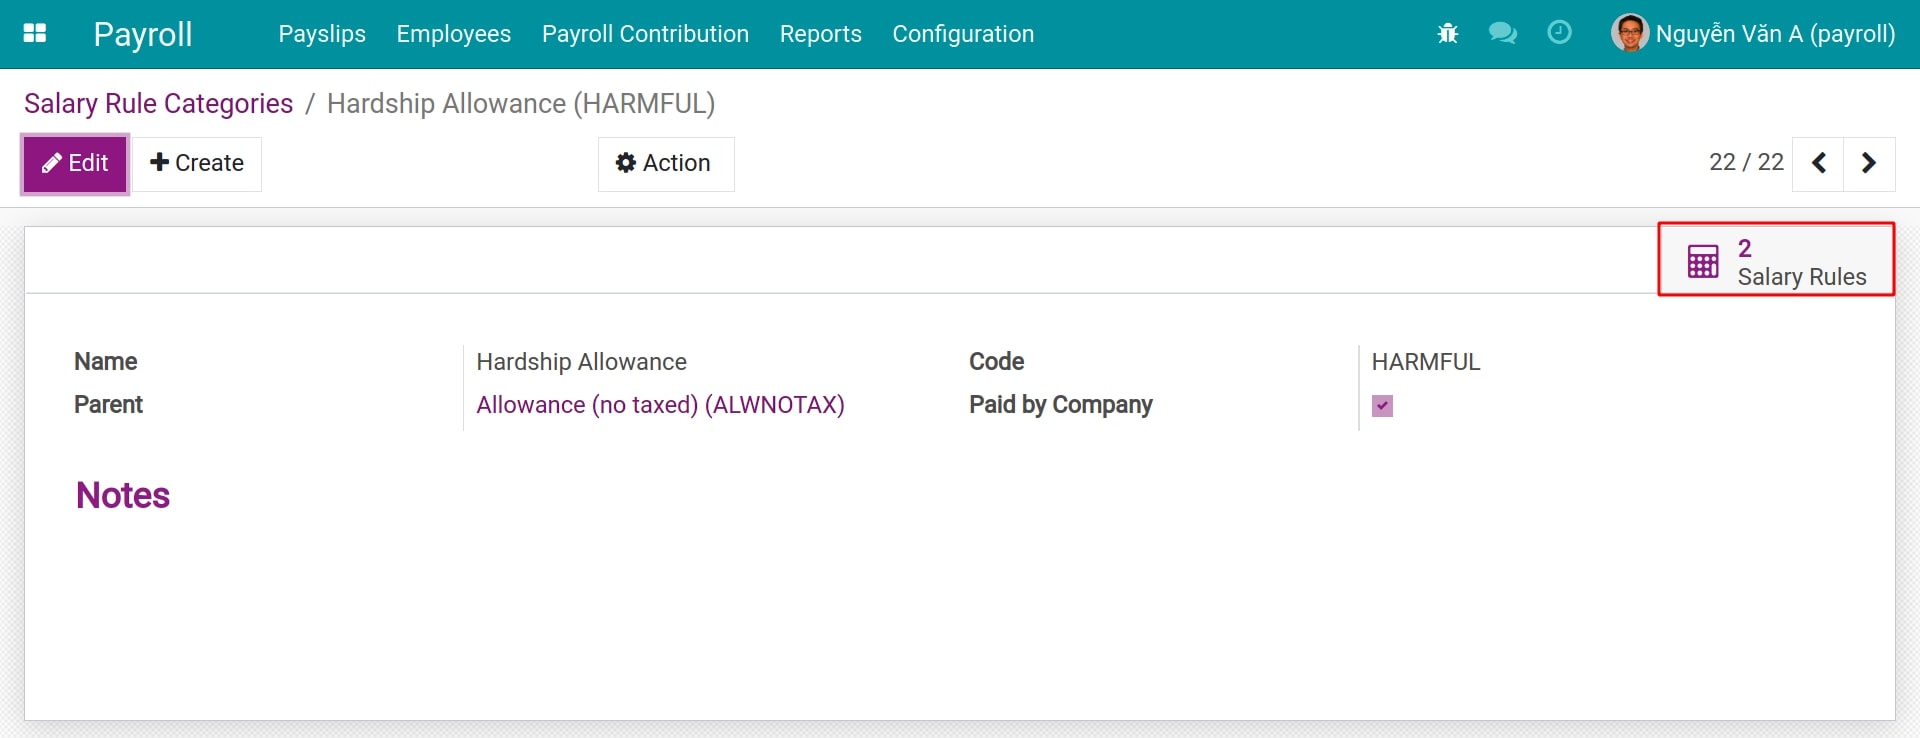
You can view how many salary rules there are in this salary rule category by pressing the button in the upper-right corner of the record.
Salary rule configuration
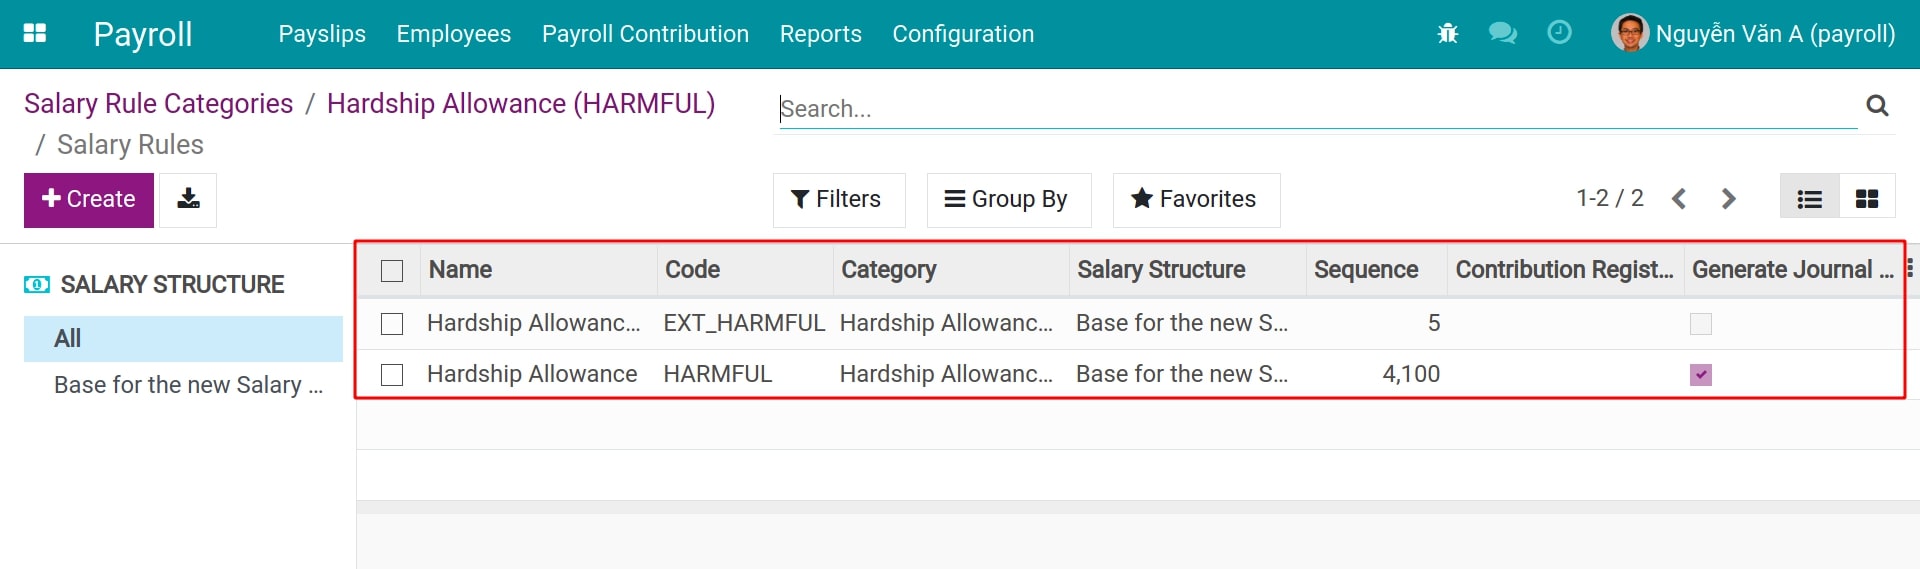
Navigate to Payroll ‣ Configuration ‣ Salary Rules to view the list of salary rules. You will see the following information:

- Salary structure directory tree:This directory tree contains all the salary structure folders that the enterprise has set up on the Viindoo payroll app. You can select a salary structure to see whether the salary rules belong to itself or sub-structures.
- Salary structure grouping:When you open this view, by default, the salary rules are all grouped by the categories of salary structures in the All folder.
See also
Salary Structures and Salary Structure Type
Basic fields on Salary Rule record
Select an existing salary rule and hit the Edit button to edit the configuration:
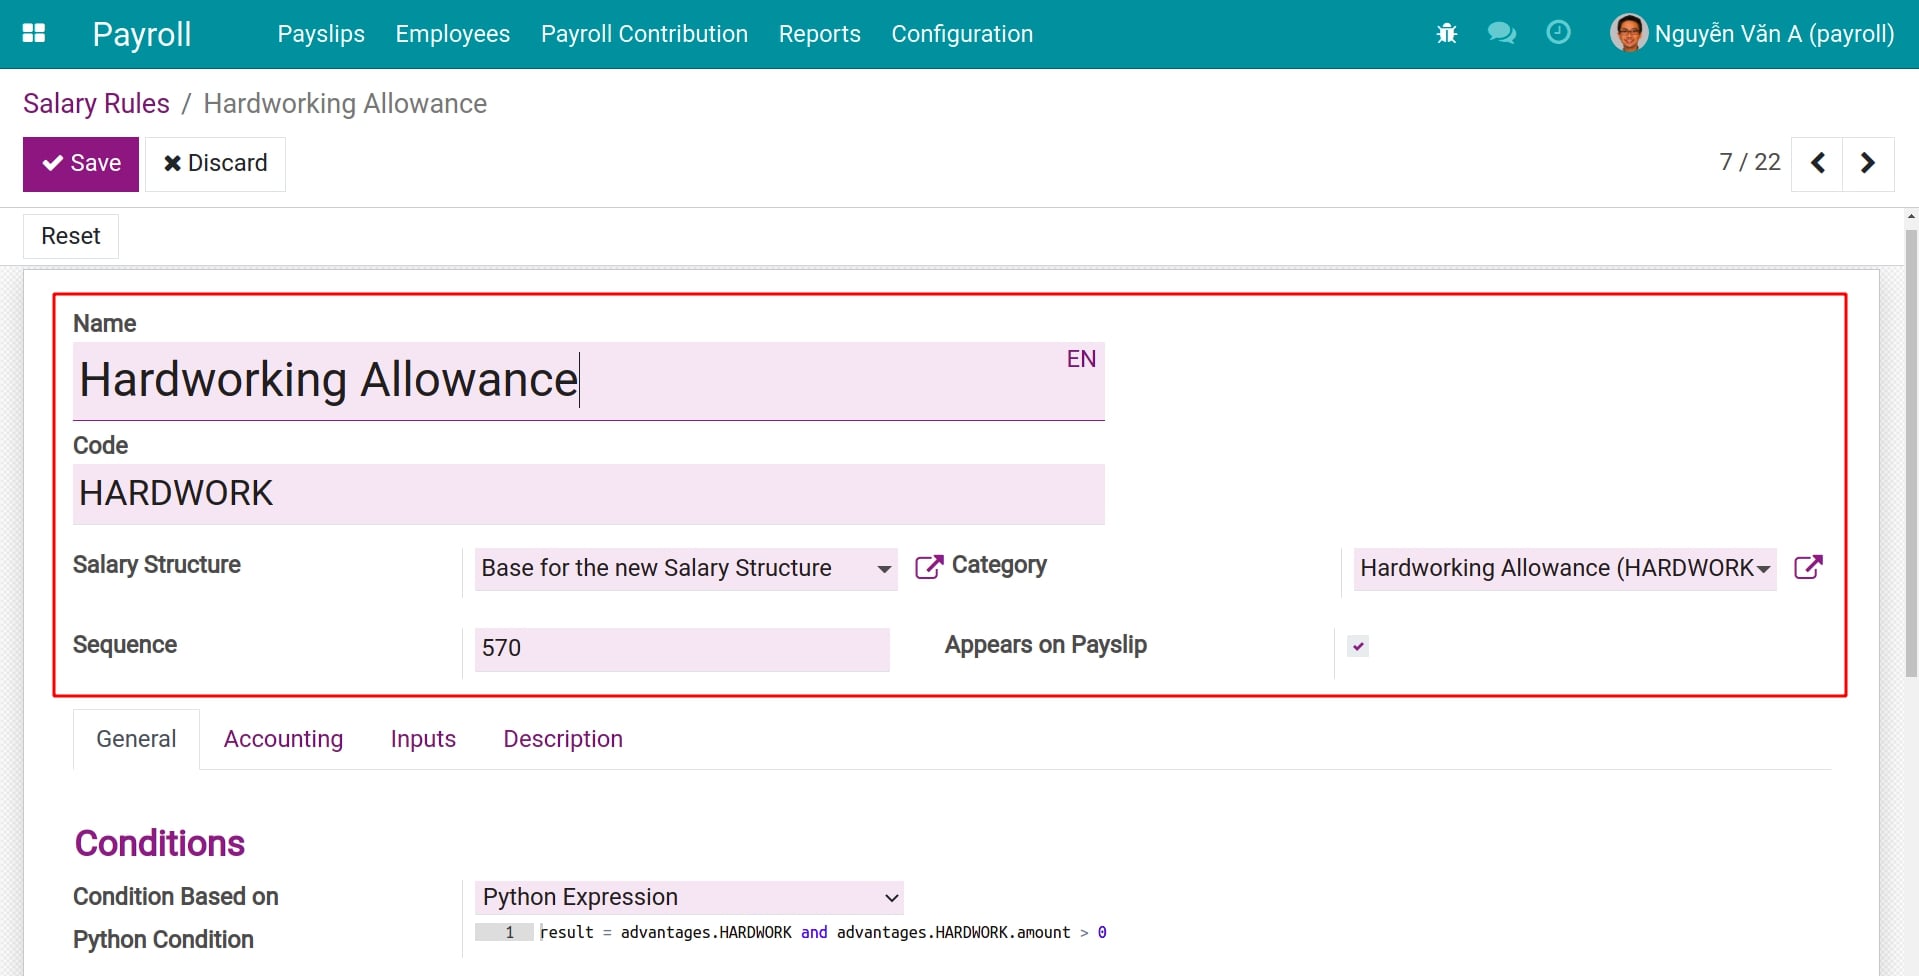
- Name:The name of the salary rule. For instance, Base Salary, Health Insurance, Telephone Allowance, etc. Name the salary rule exactly for the job you want to do with it.
- Code:The unique identifier for this salary rule. This code will be used to write calculation formulas for other salary rules. Therefore, you need to set the correct code of the salary rule to minimize errors that cause the salary rule to work improperly.
- Salary structure:A salary rule is used to calculate One and Only One salary structure; It is impossible to reuse a salary rule for multiple salary structures at the same time.
- Category:A salary rule will only belong to one group of salary rules. Salary rule groups can also be fed into formulas, which aggregate the results of all salary rules that fall within the same group.
- Sequence:Used to arrange the calculation sequence of the salary rule (the salary rule with a smaller number will be calculated before the rule with a bigger number).
Tip
The sequence number of salary rule A is required to be less than the sequence number of salary rule B in case we want to use the value of salary rule A to calculate salary rule B.
- Appears on PayslipCheck on this option if you want to display the result of this salary rule on the corresponding payslip.
Fields in General tab
In the General tab, you will be able to set up the calculation conditions and computation formulas for the salary rule.
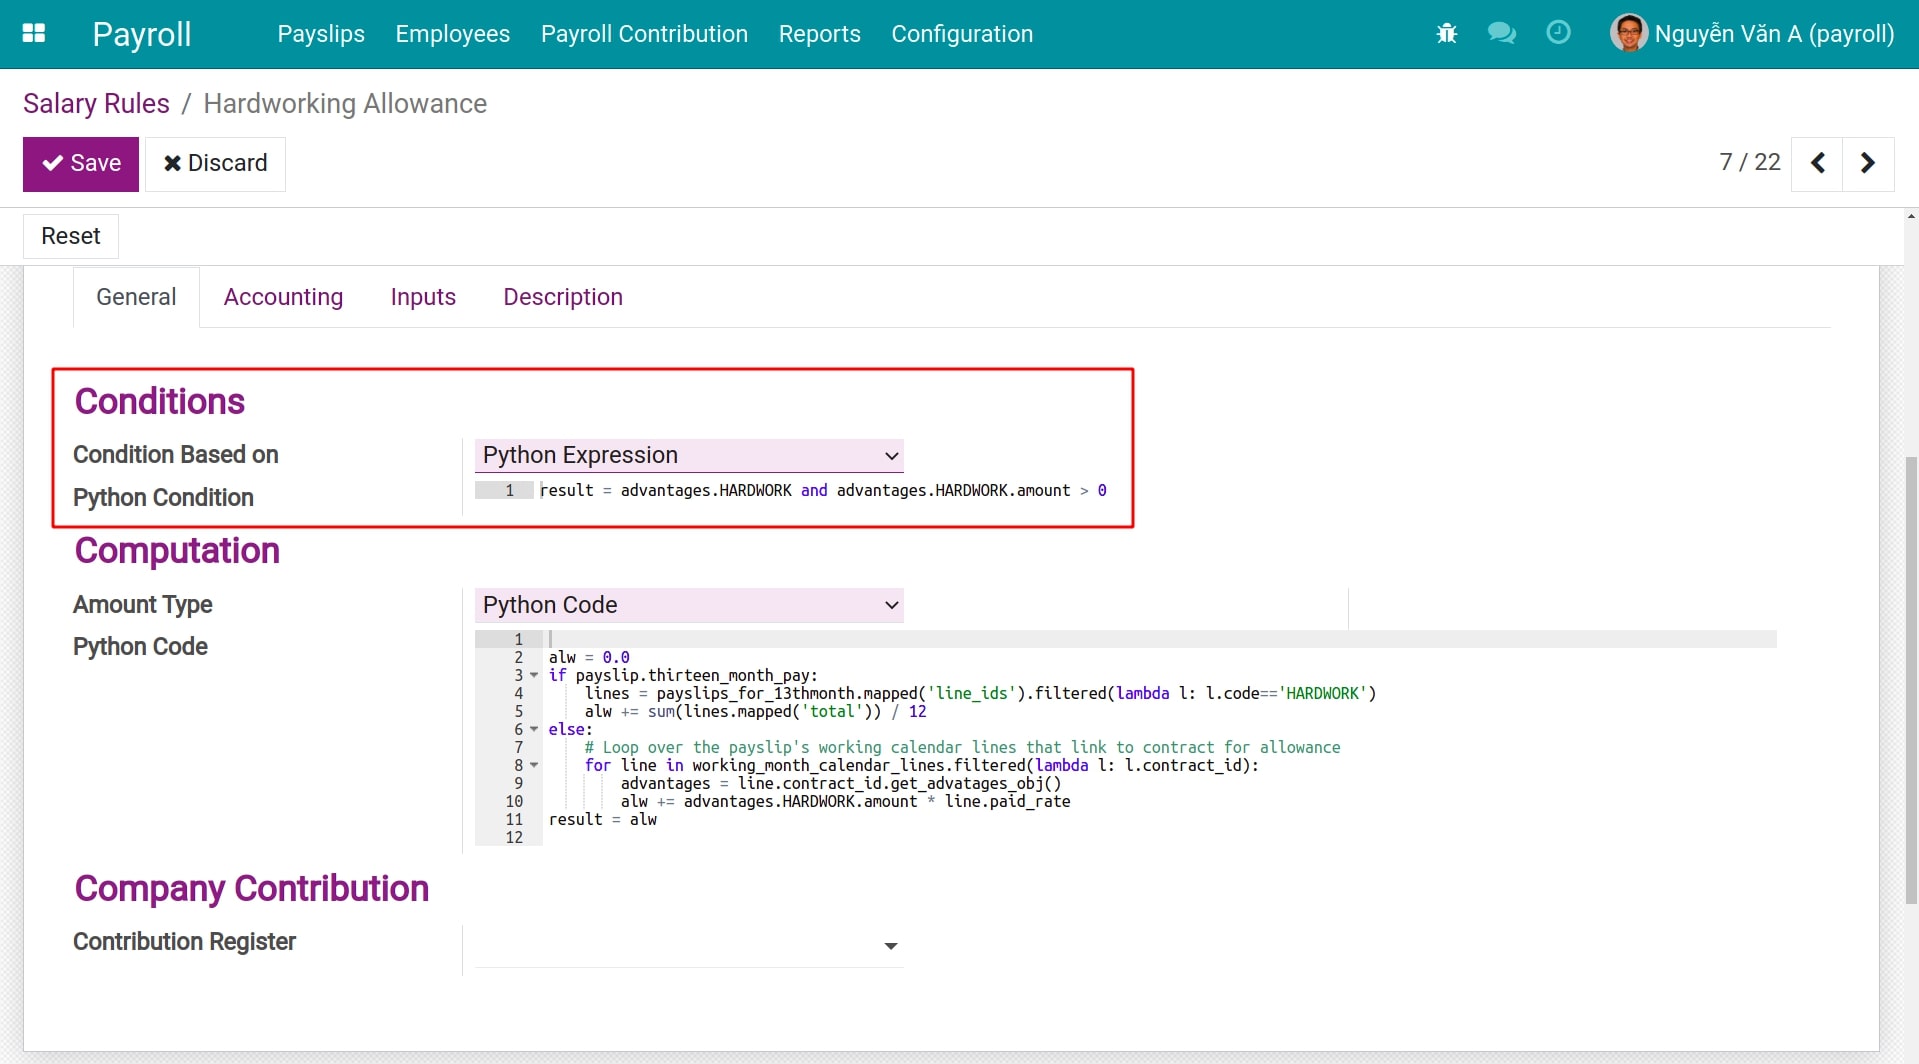
- Conditions:This is the condition for this salary rule to be enabled for calculation. For payslip records that don’t meet this condition, the pay rule will be ignored.
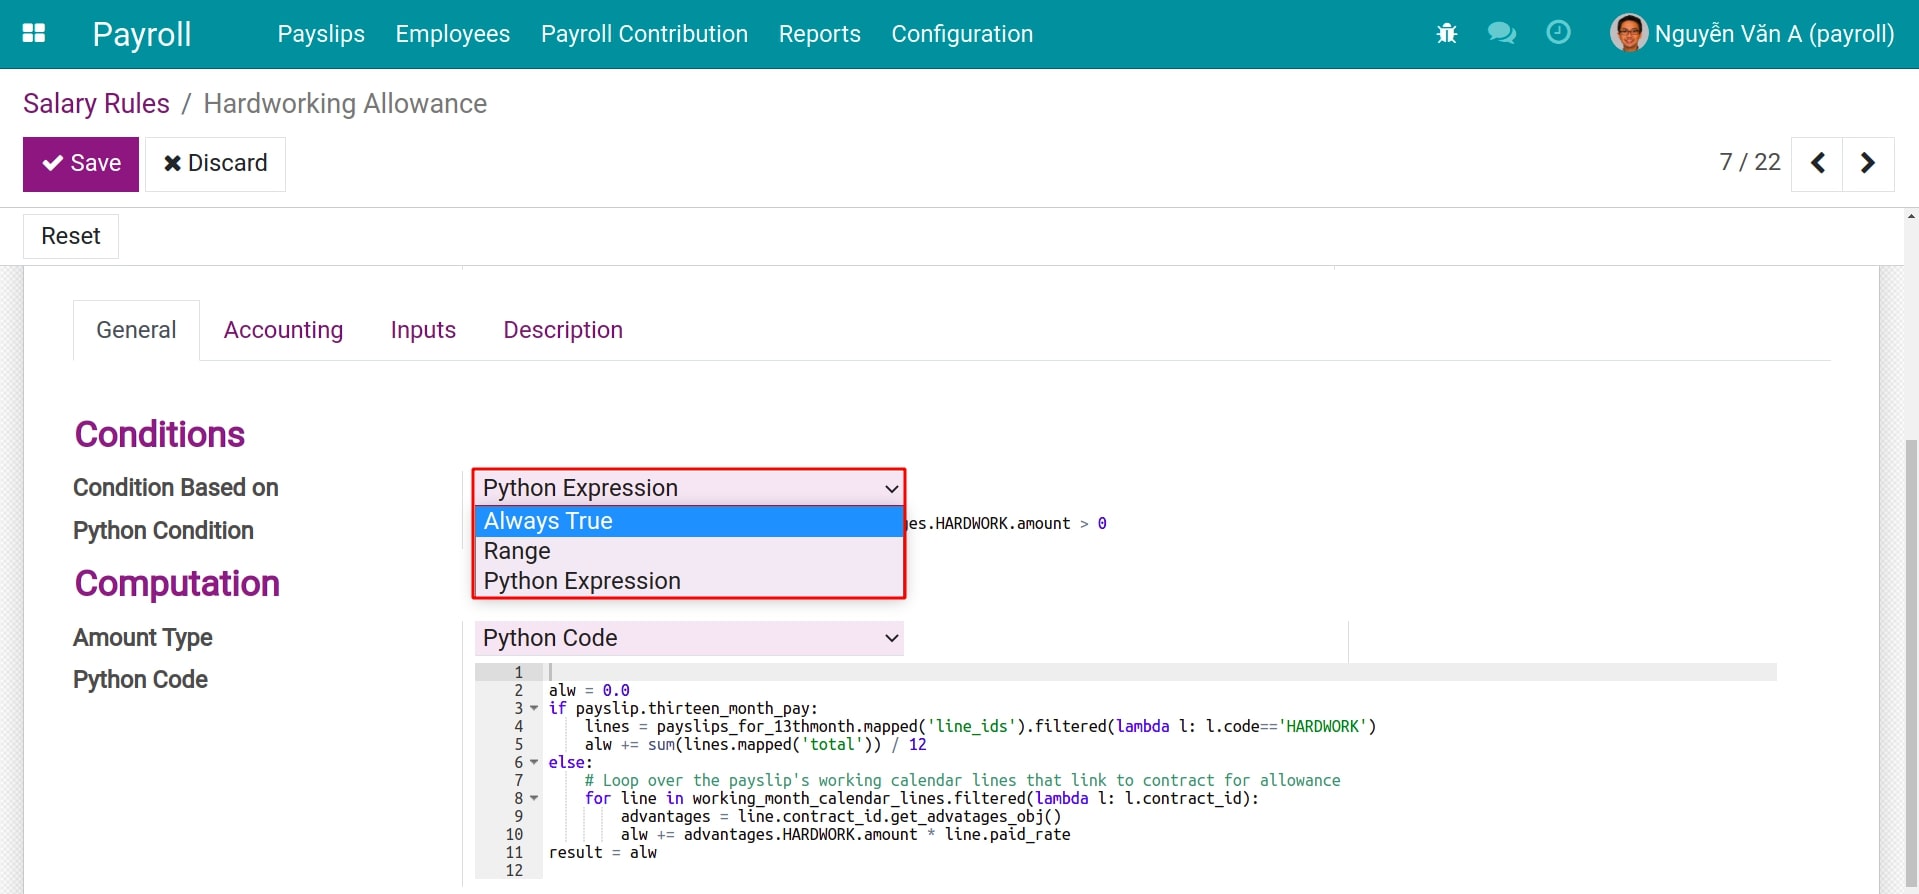
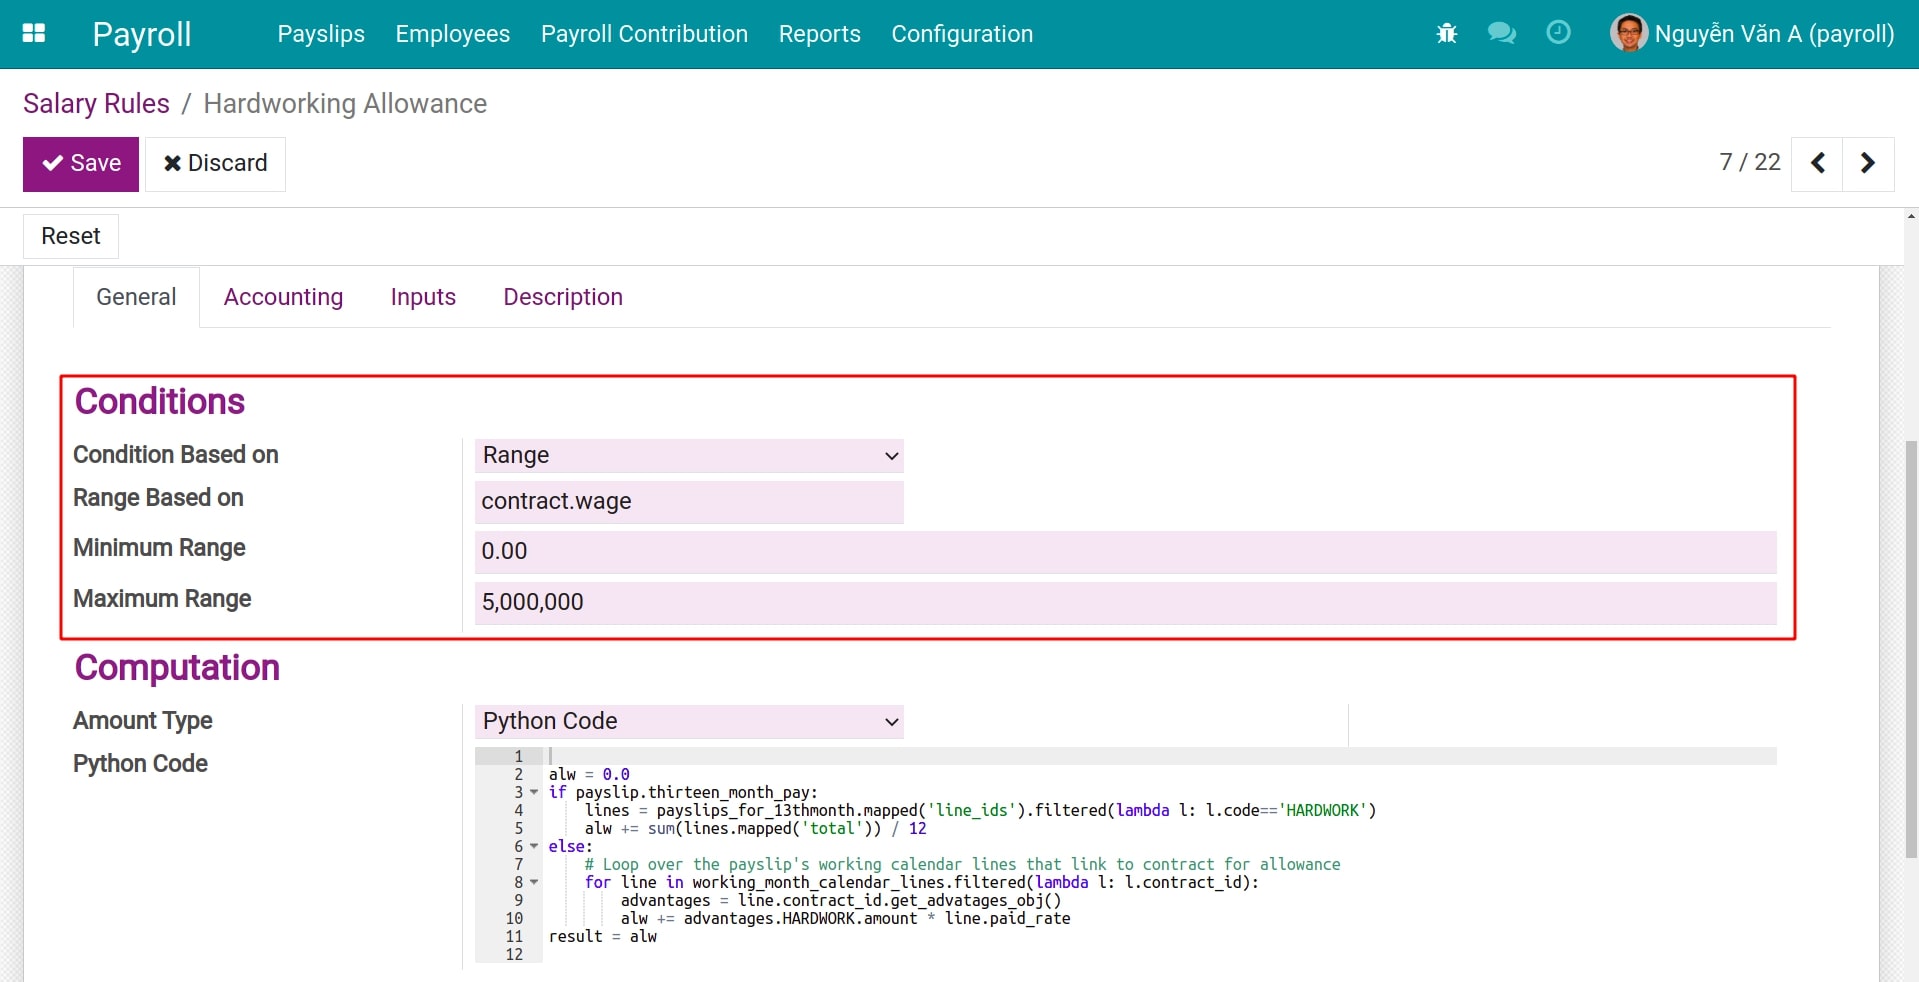
- Condition Based on:You will need to select the type of condition for the salary rule. There are 3 types of conditions you can choose from:
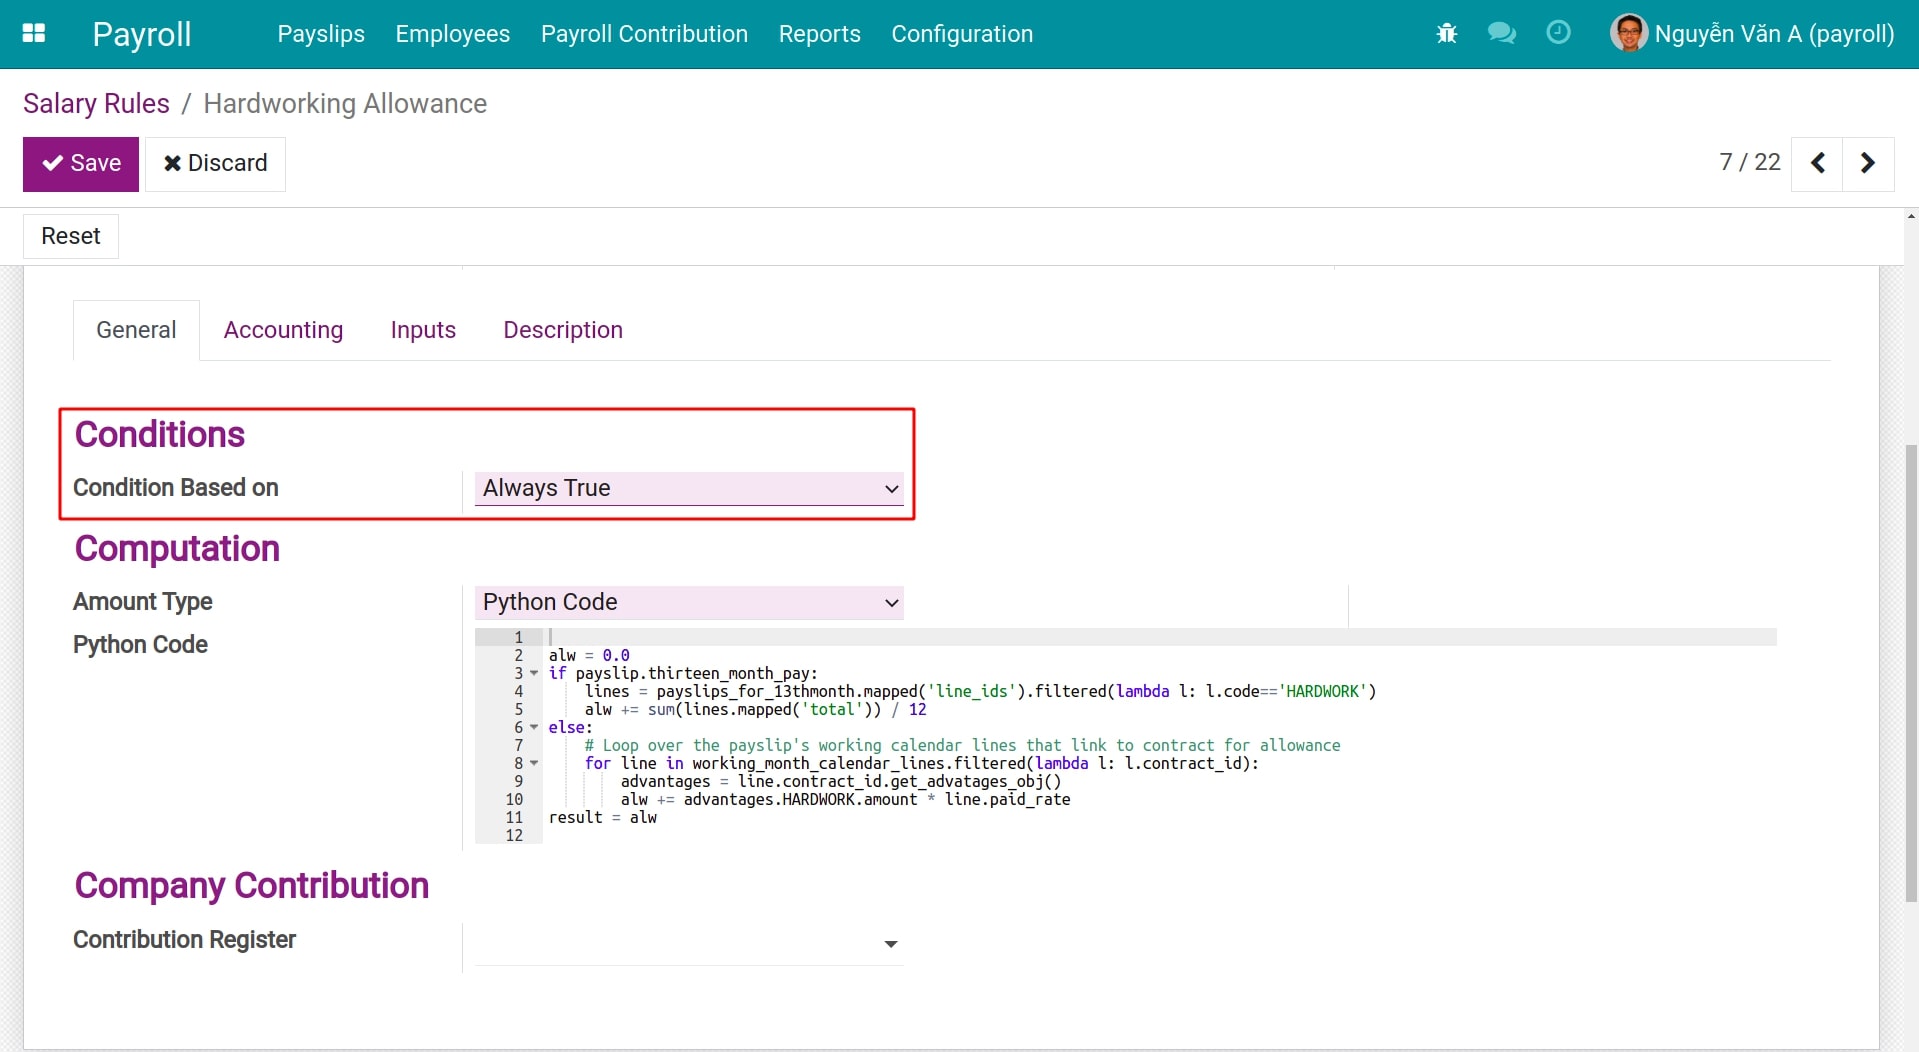
- Always True: For unconditional salary rules.
- Range: You need to select a field as the basis for the range of the condition. For example, you select the contract.wage field to get the base salary on the employee’s employment contract. If the min-max range is selected between 0 and 5,000,000, this salary rule will only apply to payslips with a base salary within the range.
- Python Expression: Setting up the condition by code using the programming language Python.
- Condition Based on:You will need to select the type of condition for the salary rule. There are 3 types of conditions you can choose from:
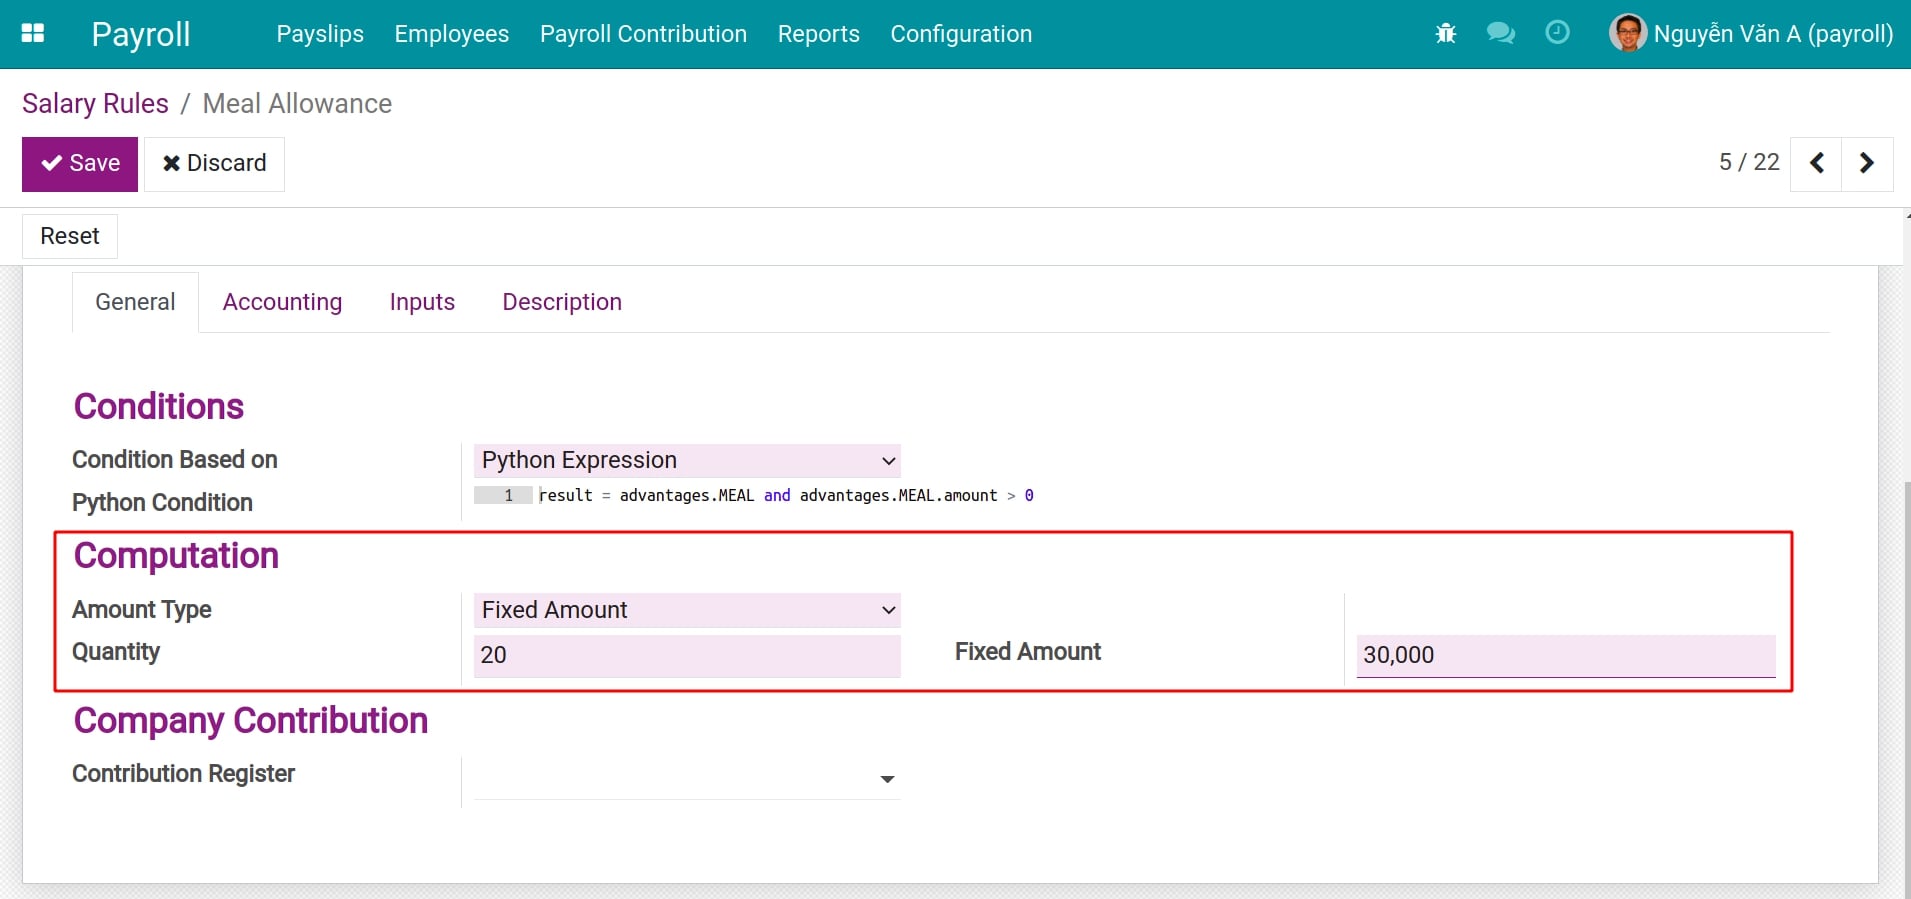
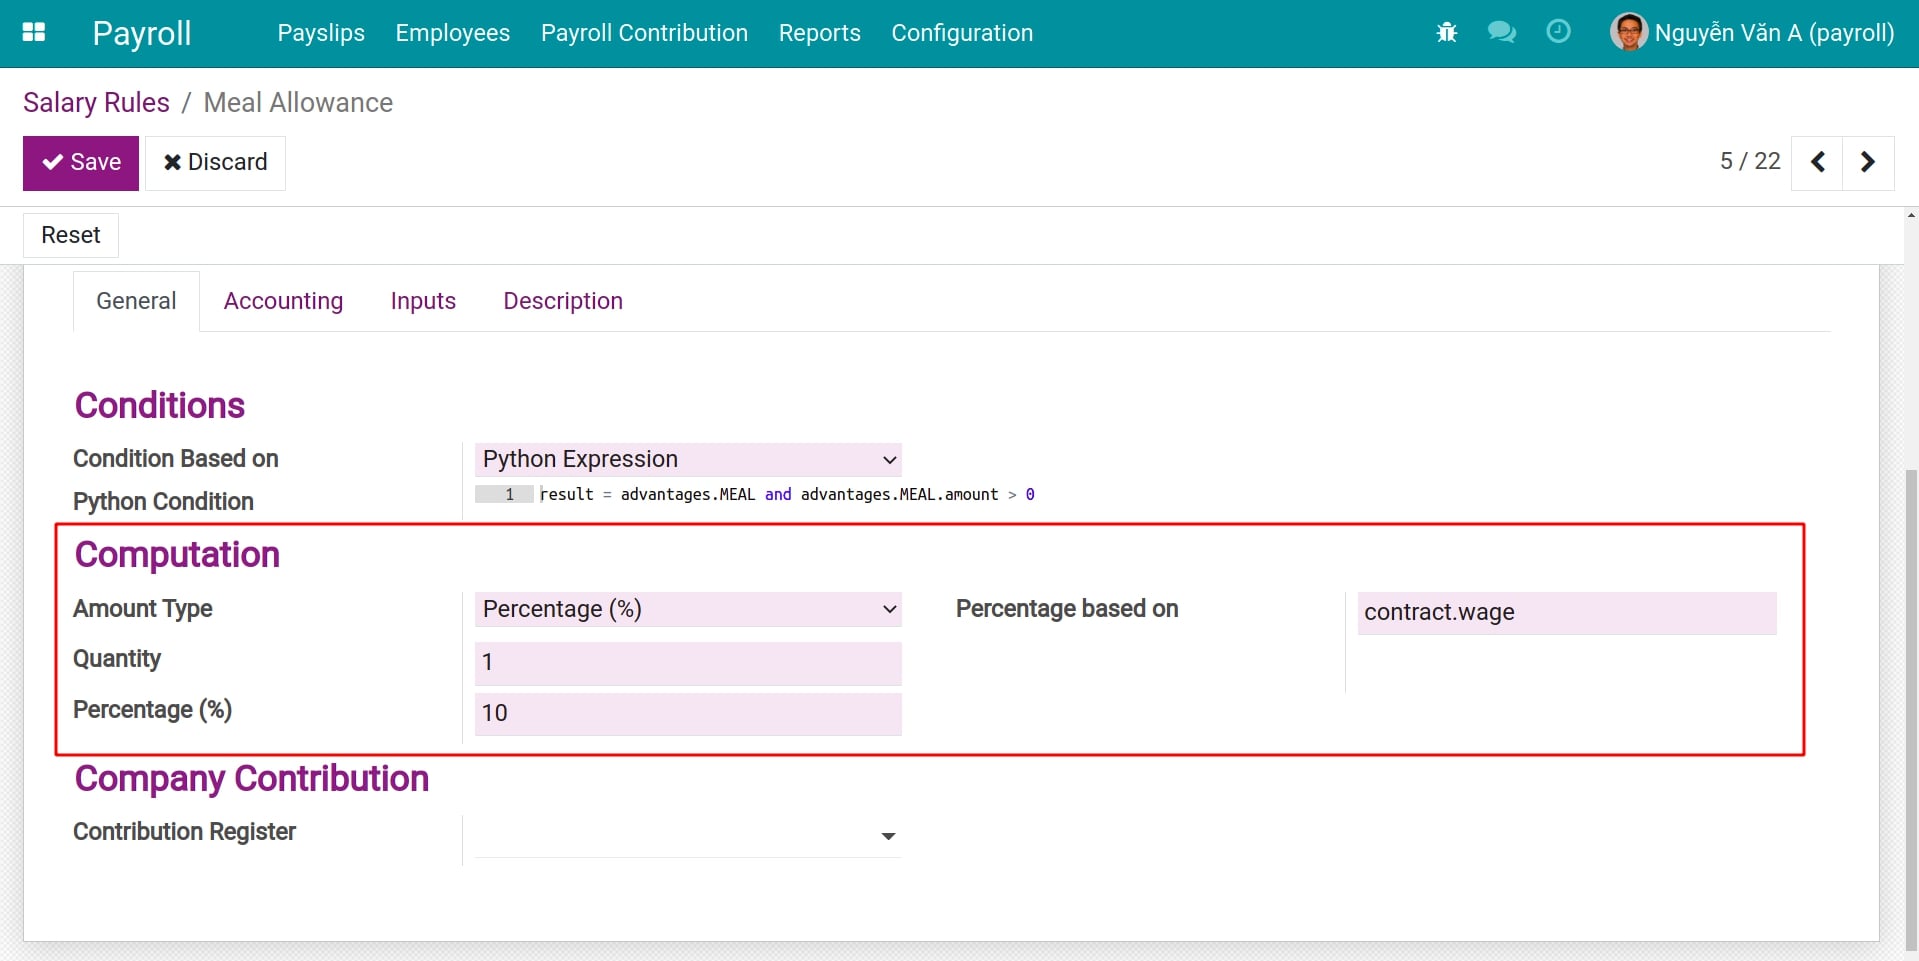
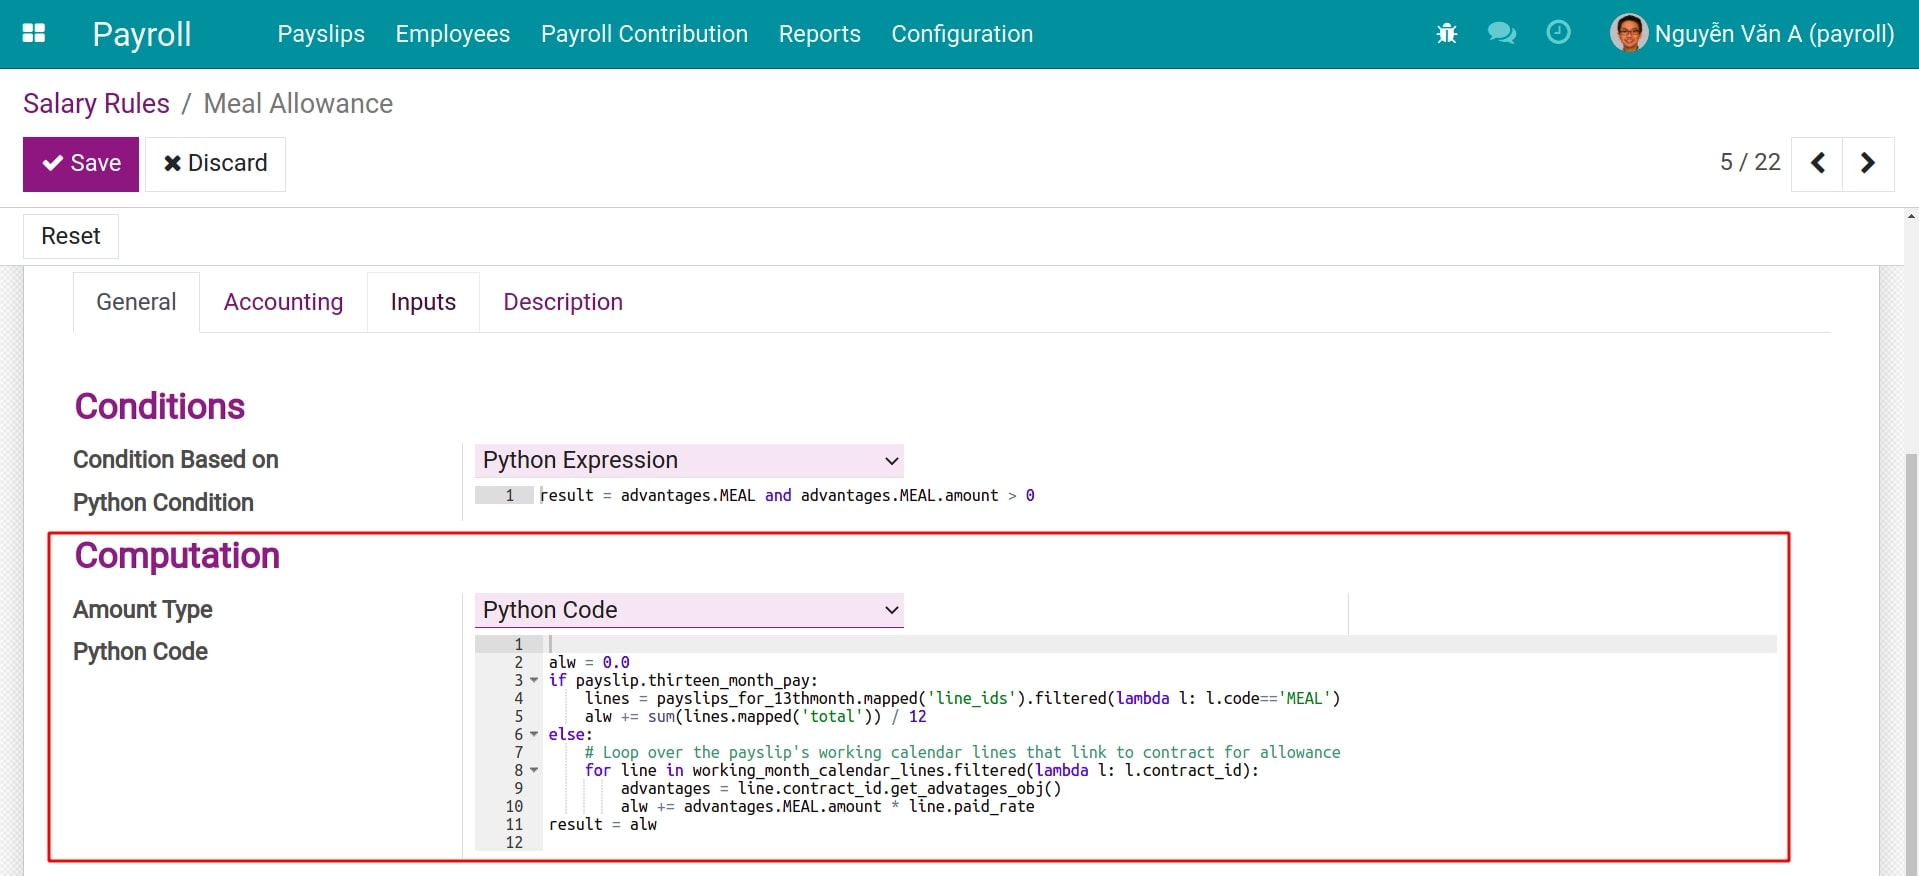
- Computation:Similar to the Conditions, you can select an option among the followings:
- Fixed Amount: Assign a fixed value to this salary rule. For instance, for the salary rule of a meal voucher, the Fixed Amount is 30,000 and the Quantity is assigned by default each month as 20.
- Percentage (%): Select a field as the basis of calculation on the field Percentage based on. The result of the salary rule will be calculated based on Percentage (%), Quantity and the result retrieved from the field Percentage based on.
- Python Code: Writing the formula using the programming language Python.
- Company Contribution:Select if the salary payment of the employees is also partly paid to a third party. (Refer to Contribution Register and Contribution Register Categories).
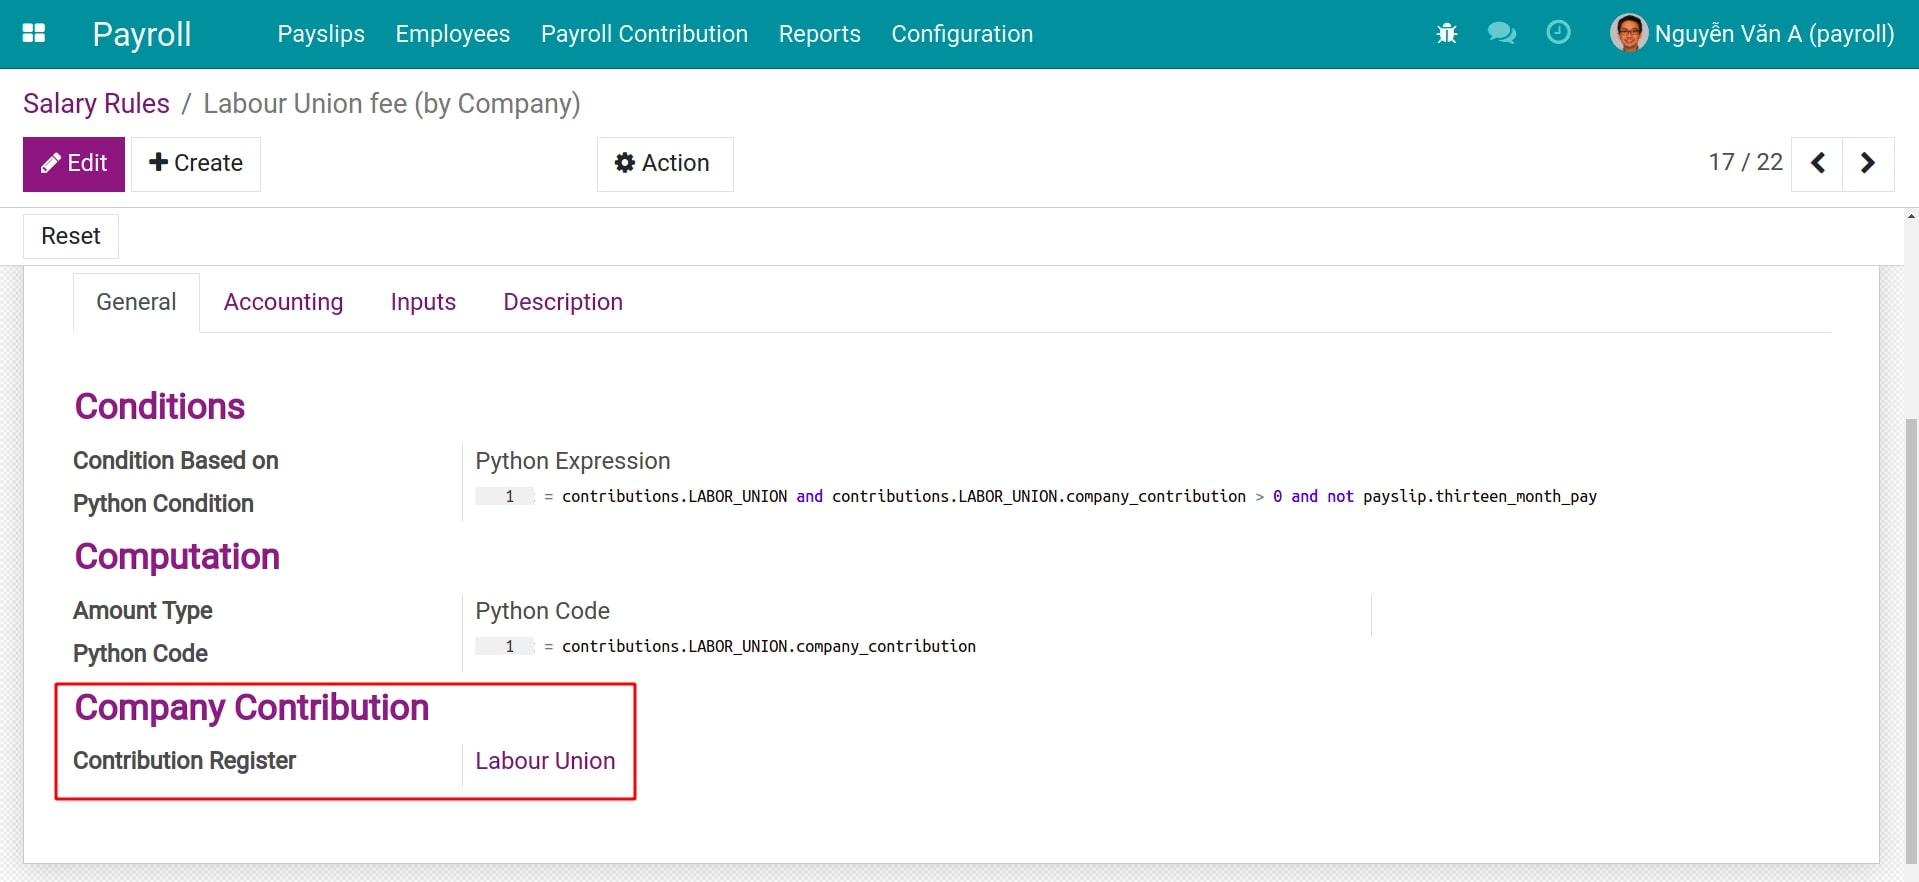
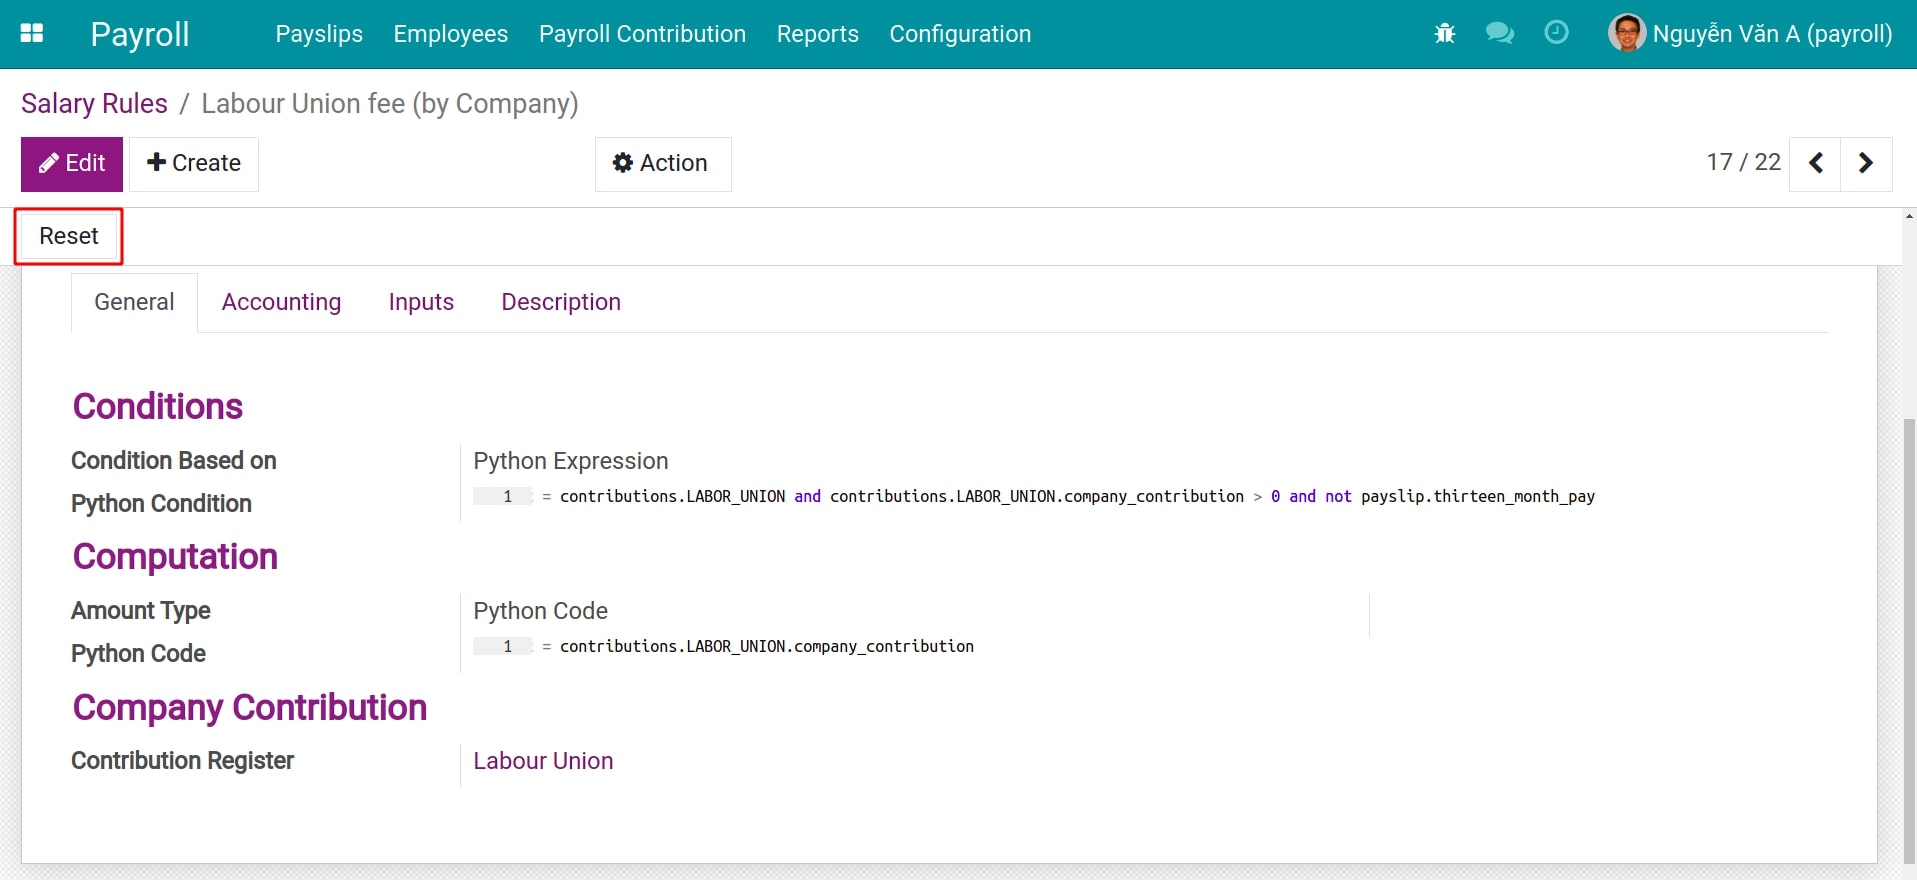
If you have adjusted the initial settings of the condition and computation formula of a base salary rule, you can press the Reset button to restore it to its original state.
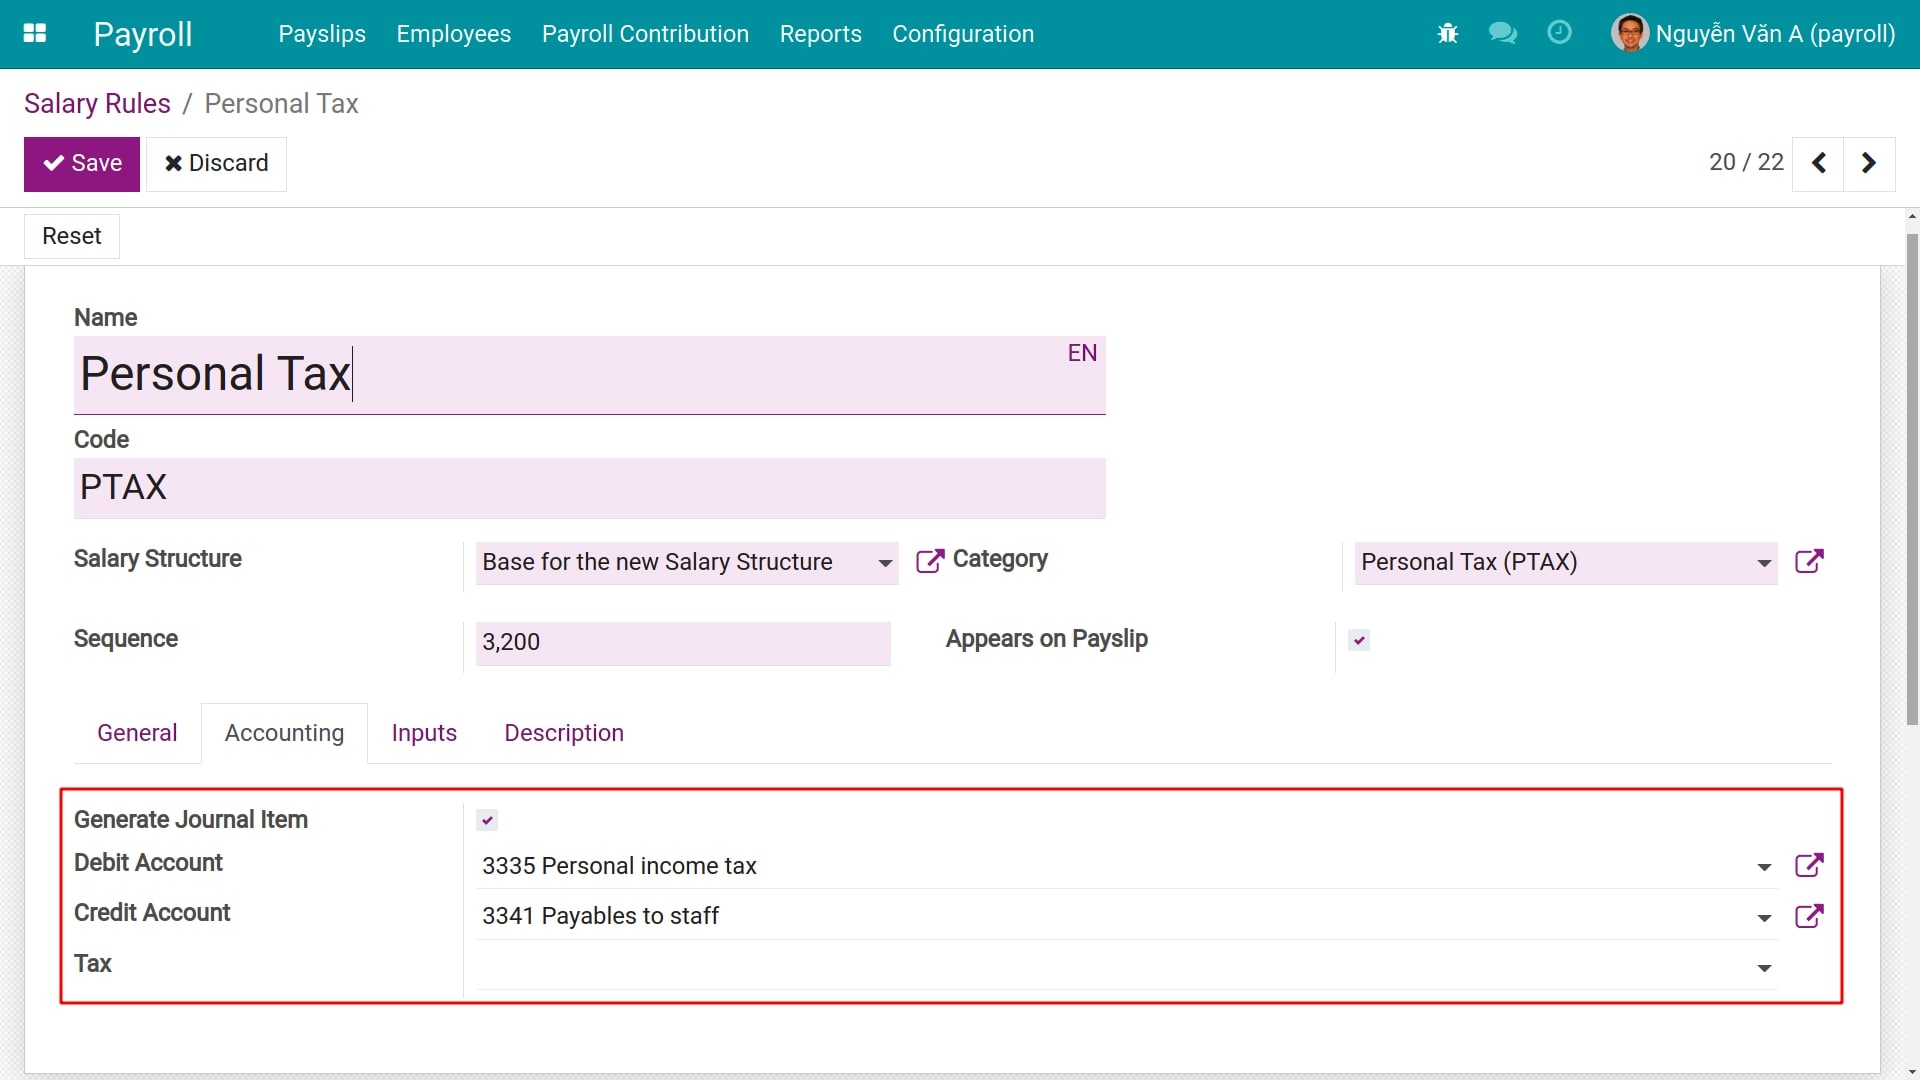
Fields on the Accounting tab
On the tab Accounting, check on the option Generate Journal Item to display the fields Debit Account and Credit Account. Select the desired accounts if you want the resulting accounting entry of this salary rule to be recorded in the respective accounting account.
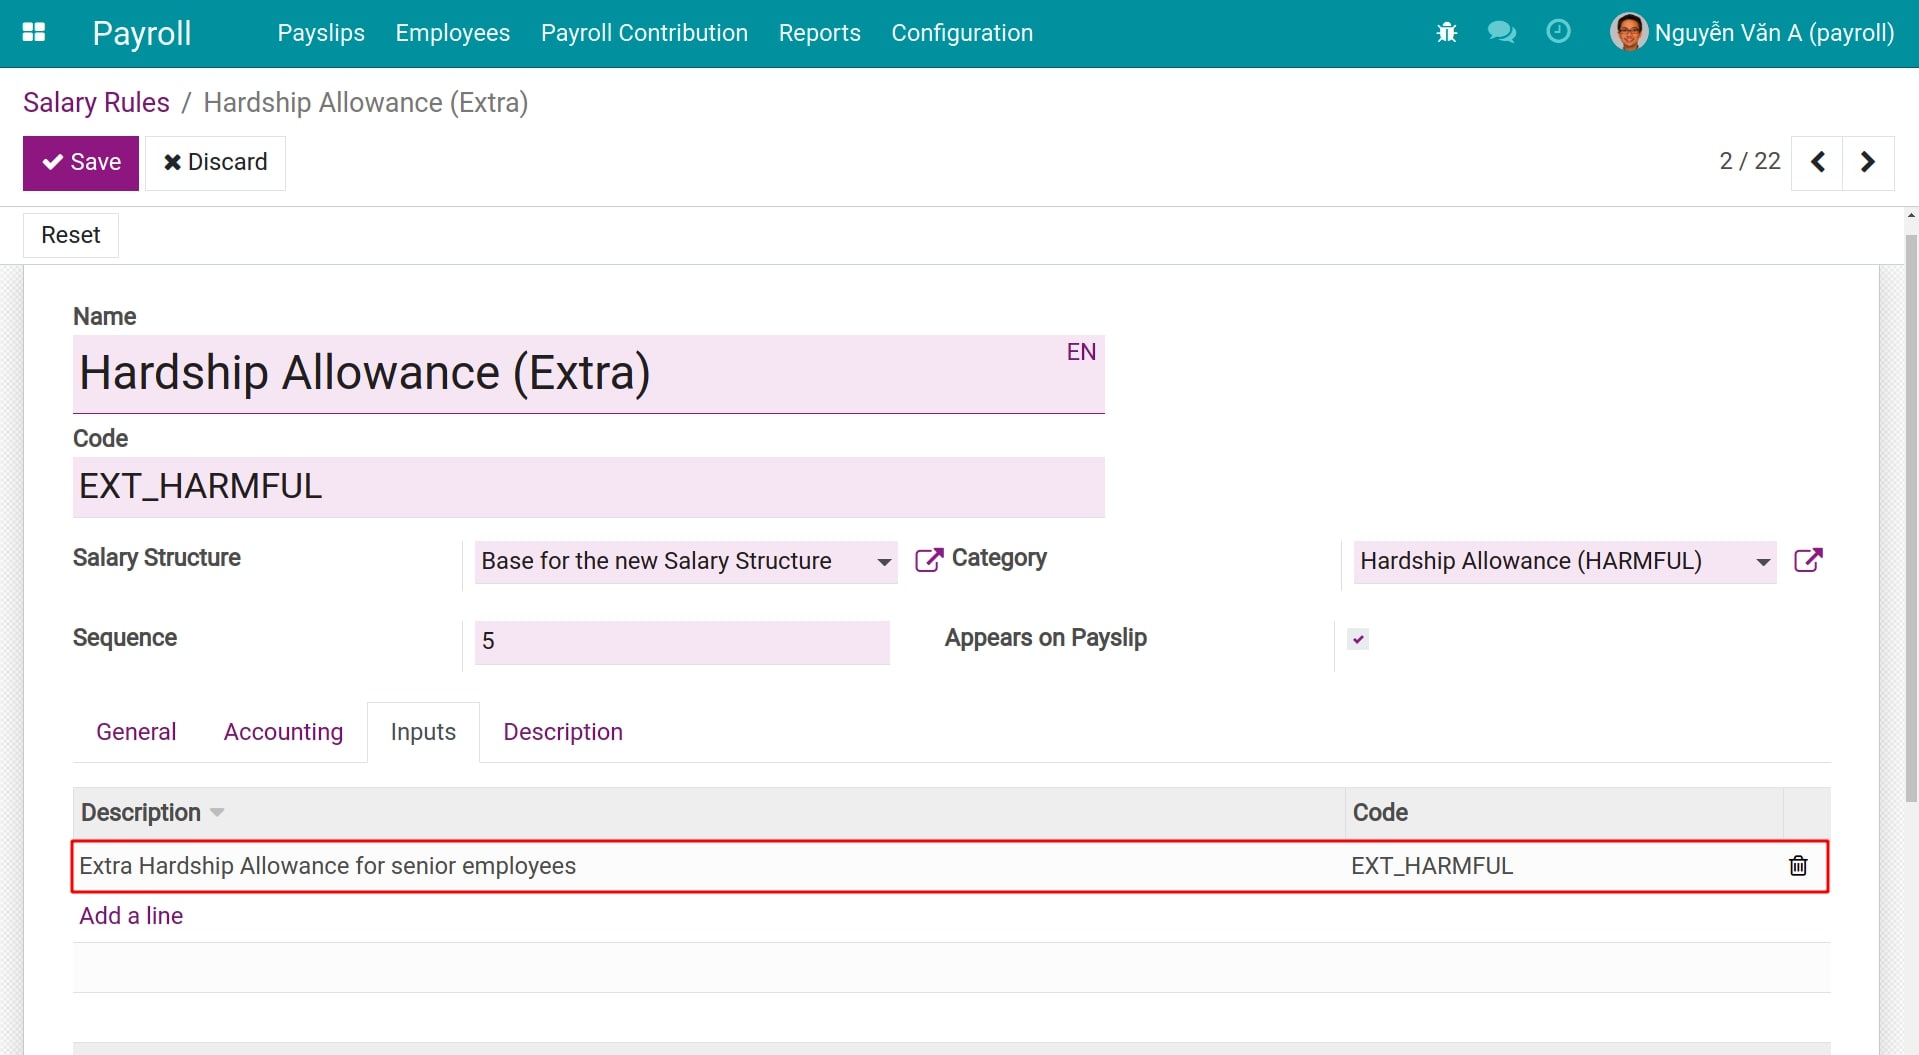
Fields on the Inputs tab
The Inputs tab allows you to specify manual entries on employee payslips. These salary rules usually apply to non-routine payments such as: Unscheduled bonuses, Holiday bonuses, etc. The Code field will be used as the calculation object in the payslip and the Description field will be used to display the name in the payslip.
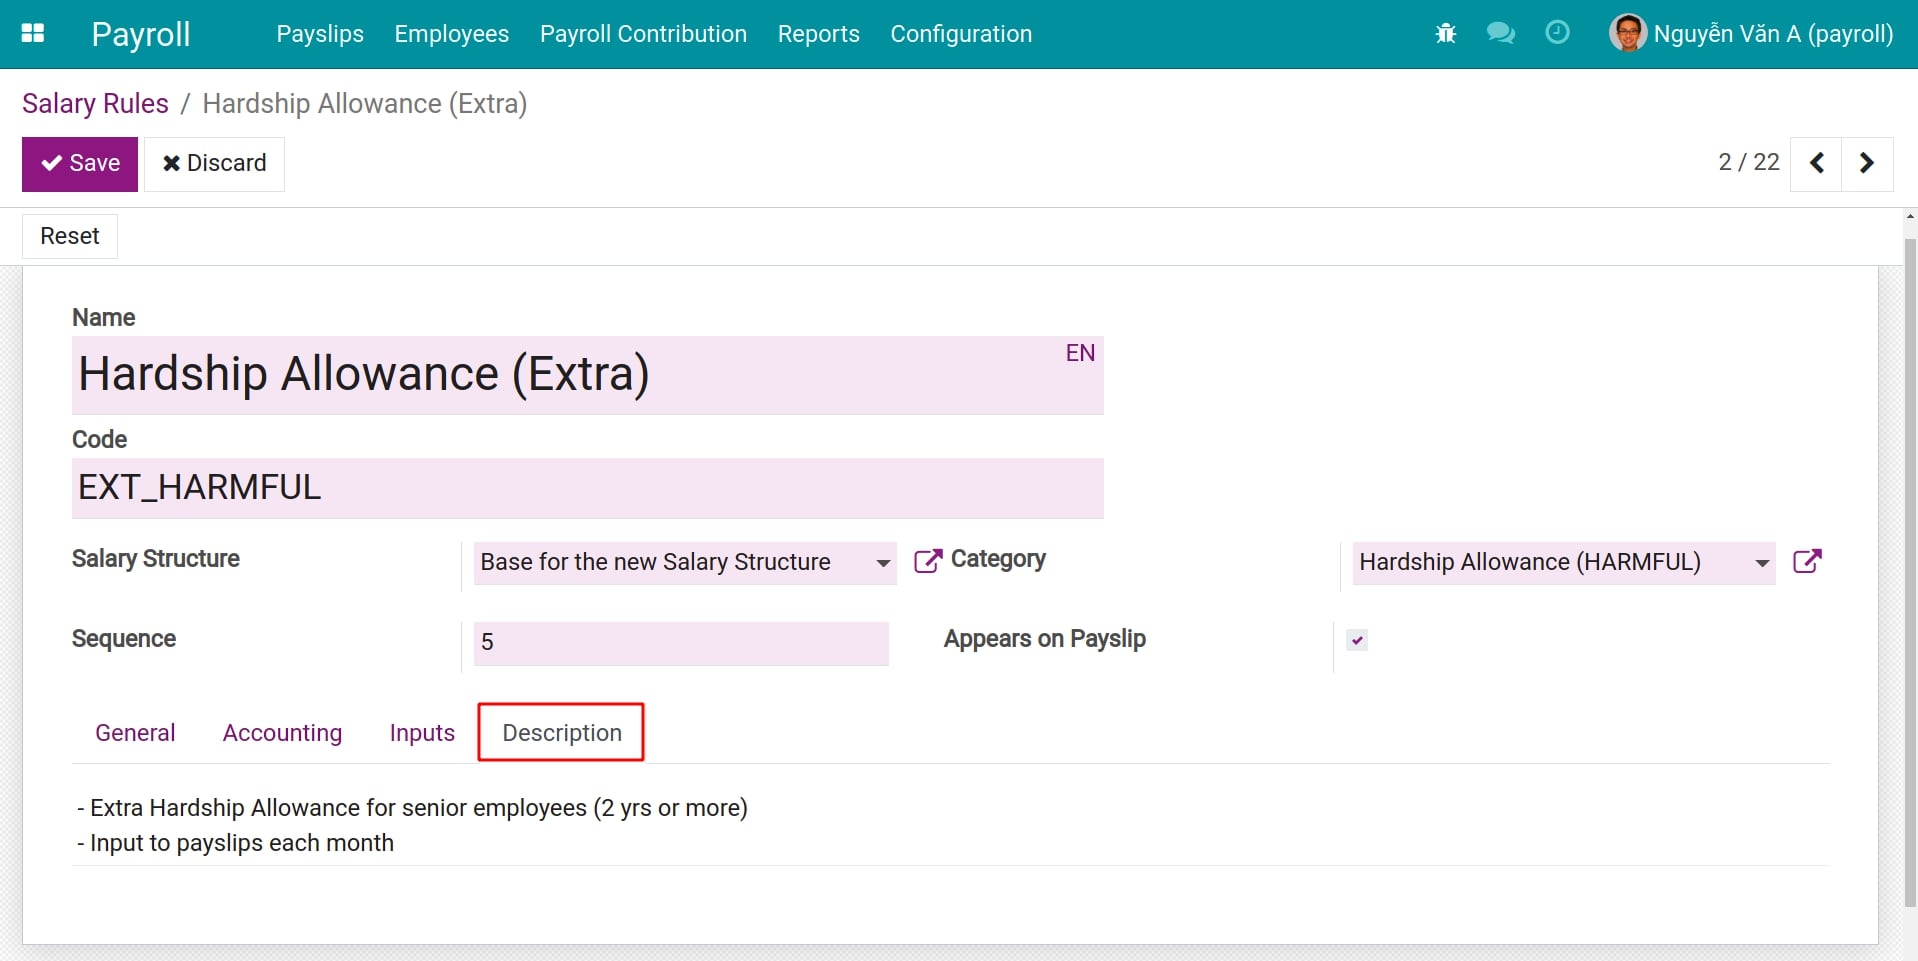
Fields on the Description tab
You can write down a detailed description of how this salary rule works so it is easy to remember and review when needed.
See also
Related article
Personal tax rules
HR Advantage Templates
Salary Cycle
Salary Structures and Salary Structure Type
Salary Structures and Salary Structure Type
A salary structure is a set of salary rules used to help the company or its board of directors to determine the salary that will be paid to the employees. With the Viindoo Salary Management app, the salary structures are built and designed according to the genealogical form (parent-child level). That means you will build them based on a basic salary structure, including all the salary rules that every employee in the company will apply.
This article will show you how to set up and apply salary structures and salary structure type in the process of salary calculation.
Requirements
This tutorial requires the installation of the following applications/modules:
Payroll
Salary Structure Type
Salary Structure Type will help you to categorize and search for a salary structure.
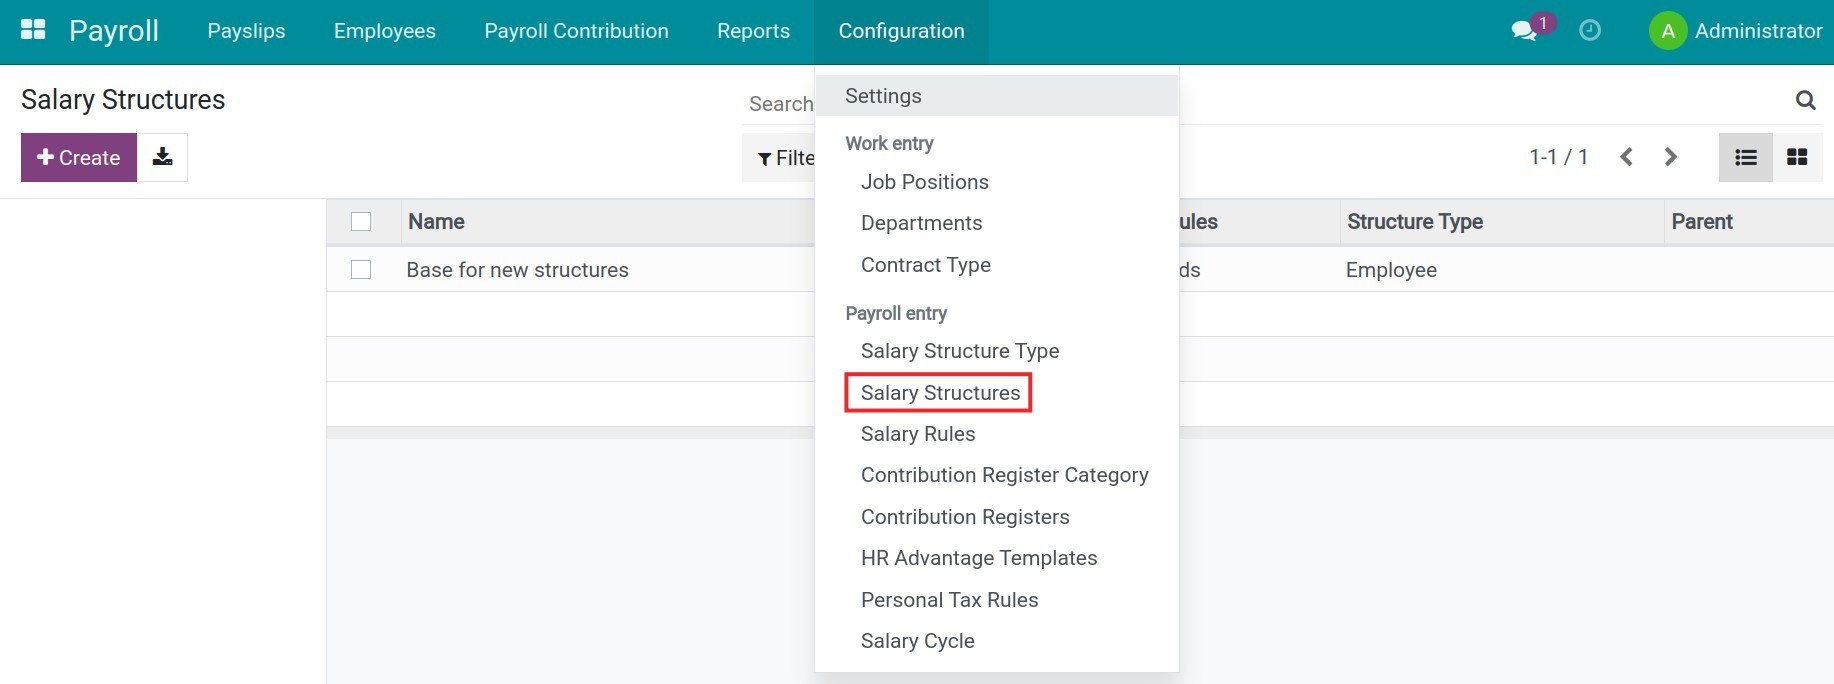
To show the salary structures type in the system, navigate to Payroll module ‣ Configuration ‣ Salary Structures Type.
A basic salary structure type is automatically suggested by the system, click on it to edit or create a new one:
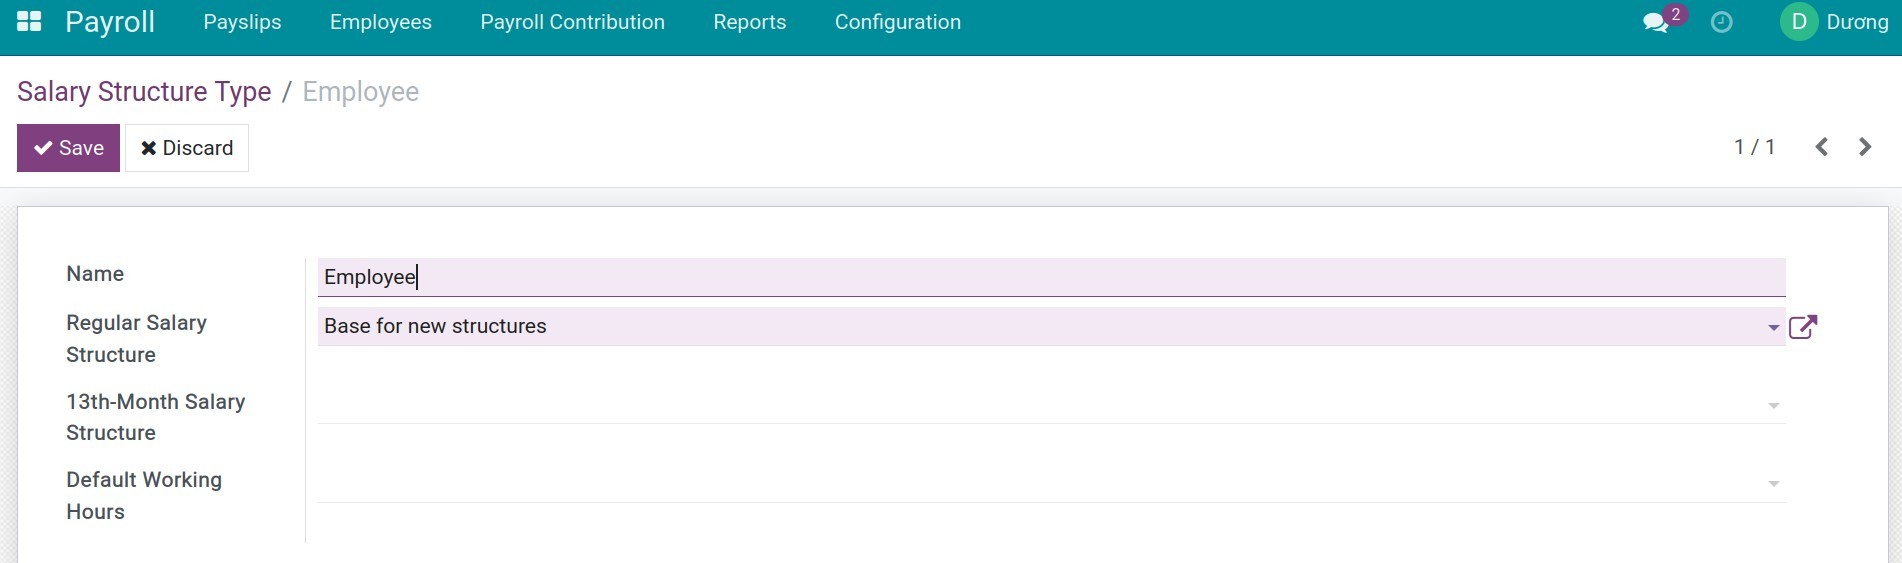
Name: The name of this salary structures type according to your classification purposes.
Regular Salary Structure: The default salary structure that will be used for regular salary computation on the HR contract document. E.g: For monthly payslip.
13th-Month Salary Structure: The default 13th-Month Salary Structure that will be used for the 13th-Month Salary Structure field on the HR contract document.
Default Working Hours: The Working Hours that will be used by default on the HR contract document.
Salary Structures
To show the salary structures in the system, navigate to Payroll module ‣ Configuration ‣ Salary Structures.
The system will auto-suggest a basic salary structure with the following salary rules:
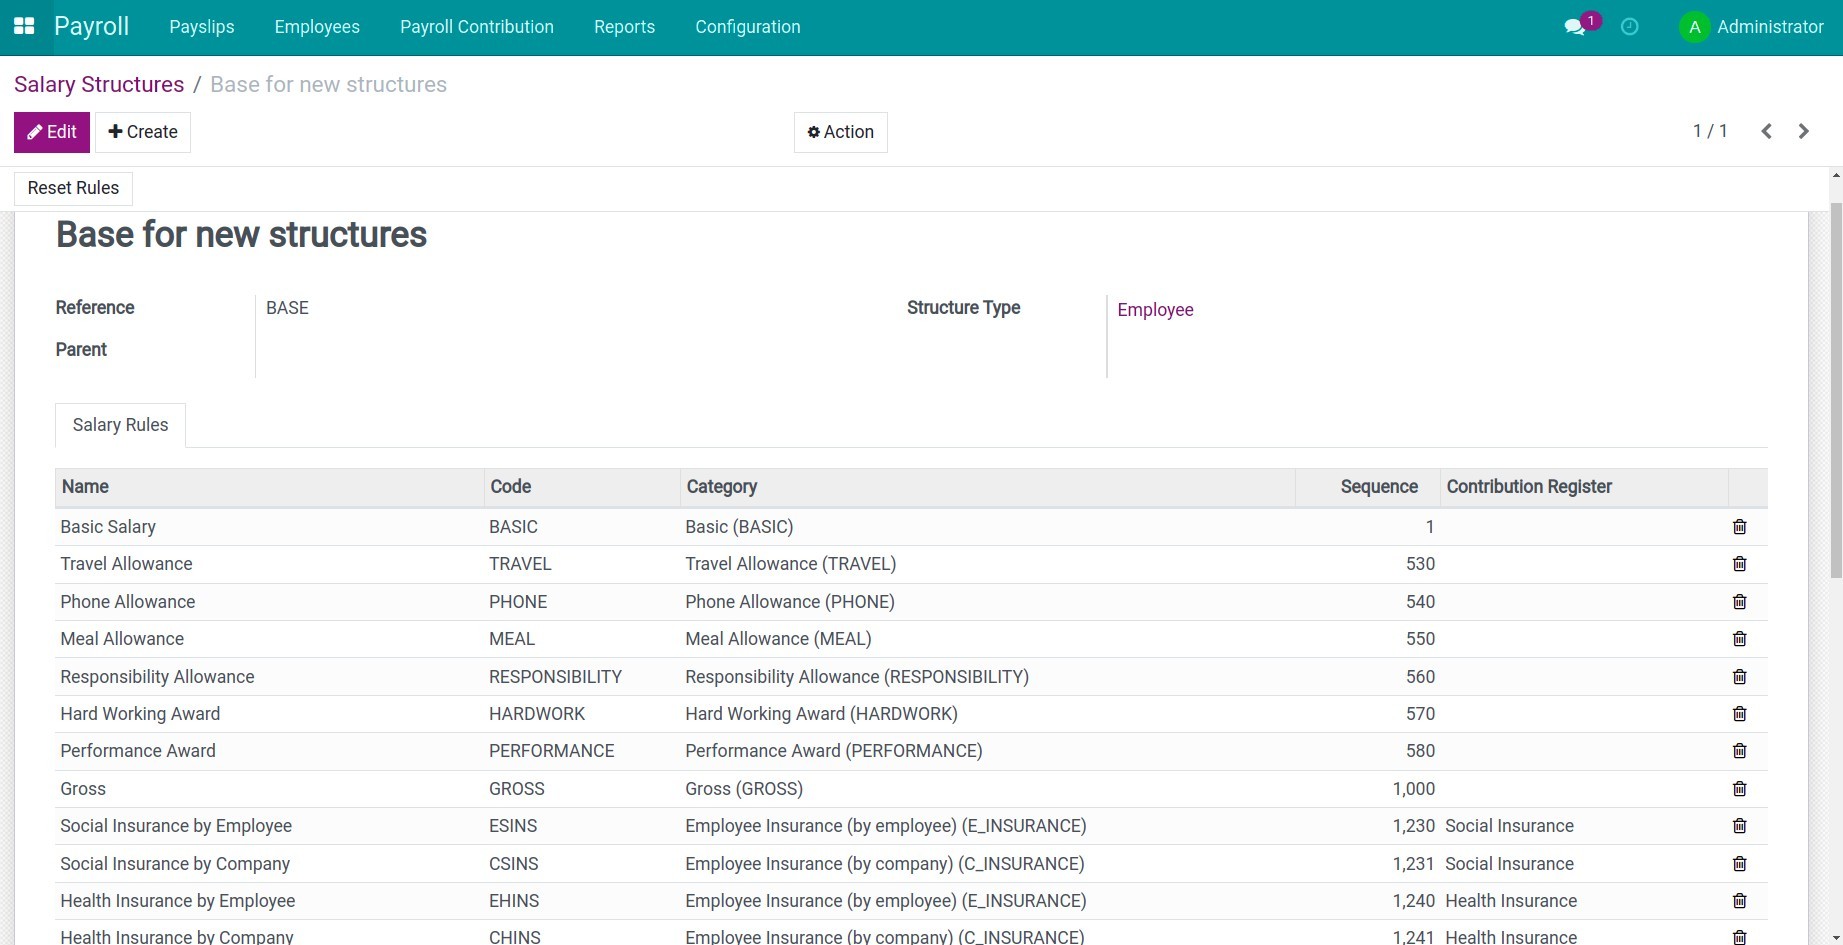
Awards;
Net salary;
And others.
Additionally, you also edit the Salary structures in terms of the practical application, reducing or adding more of the salary rules you want.
To create a new salary structures, click on Create button:

Fulfill the following information here:
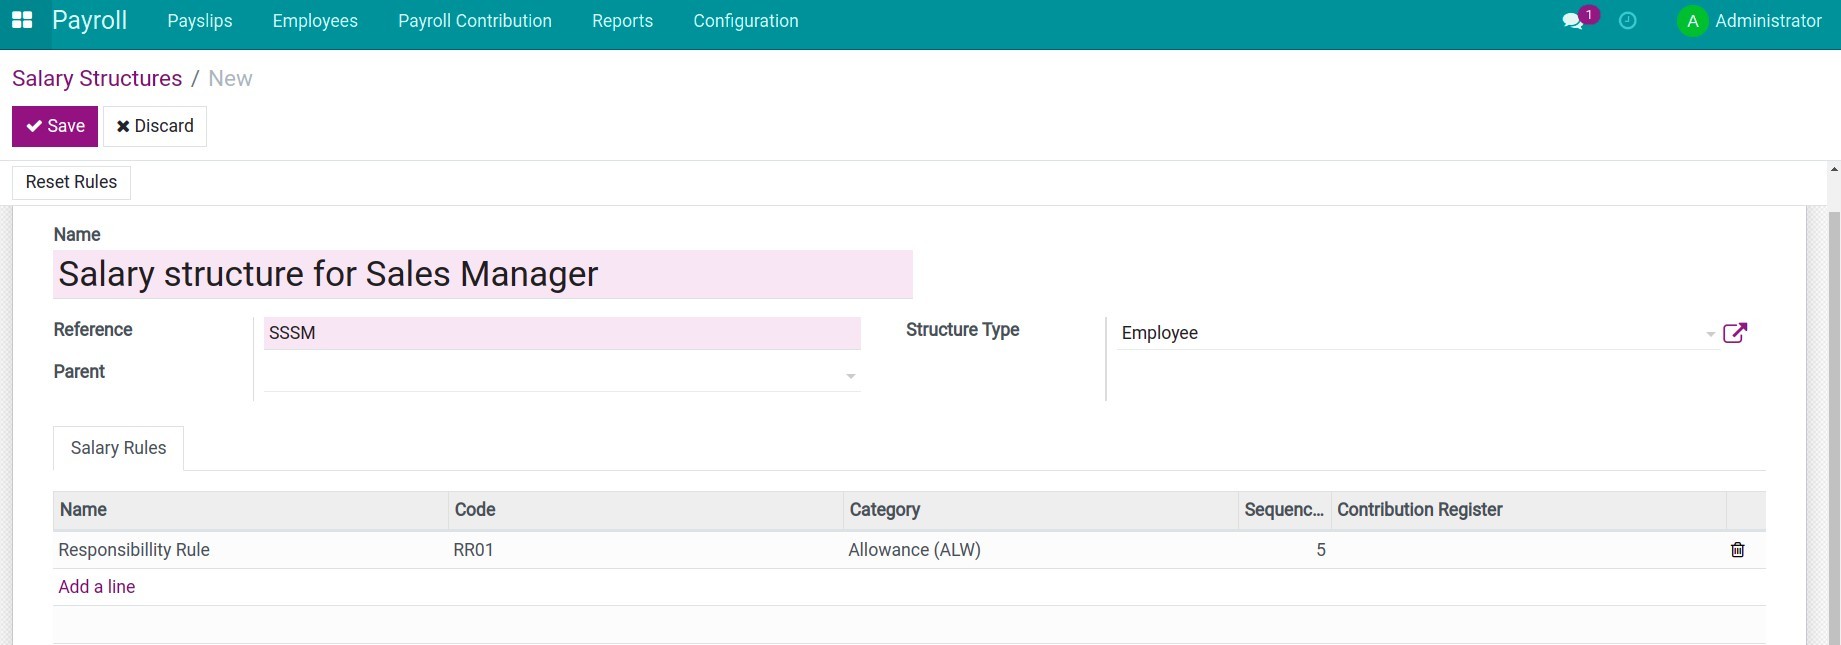
Name: The name of the salary structures. E.g. Salary structures for Sales Managers.
Reference: The reference for the salary structures.
Parent: Select a parent salary structure.
Structure Type: Enter a suitable Salary Structure Type will help you look up and categorize conveniently.
To add another salary rule to the salary structures, click on Add a line, the system will redirect you to a new view-screen to create a new salary rules.
Businesses can organize salary structure in different ways of administration such as: By job position, by department, by employee level, etc.
When you create a new salary structure, field Parent you choose Base for new structures and add new salary rules.
For example: The salary structure for the Sales Manager inherits all parent’s salary rules Base for new structures and adds Responsibility allowance salary rule.
Note
The salary structures based on the parent salary structure will inherit all the salary rules of the Salary structures in the parent salary structures. Therefore, you just add a new Salary rule which applied explicitly to the salary structure in this case.
See also
Related article
Personal tax rules
Salary Cycle
Create Payslips
Create Payslips
To create payslips in iSuite Payroll management app, navigate to Payroll ‣ Payslips ‣ Payslips ‣ Create.

Requirements
This tutorial requires the installation of the following applications/modules:
Payroll
General information
Enter the general information for the payslips:
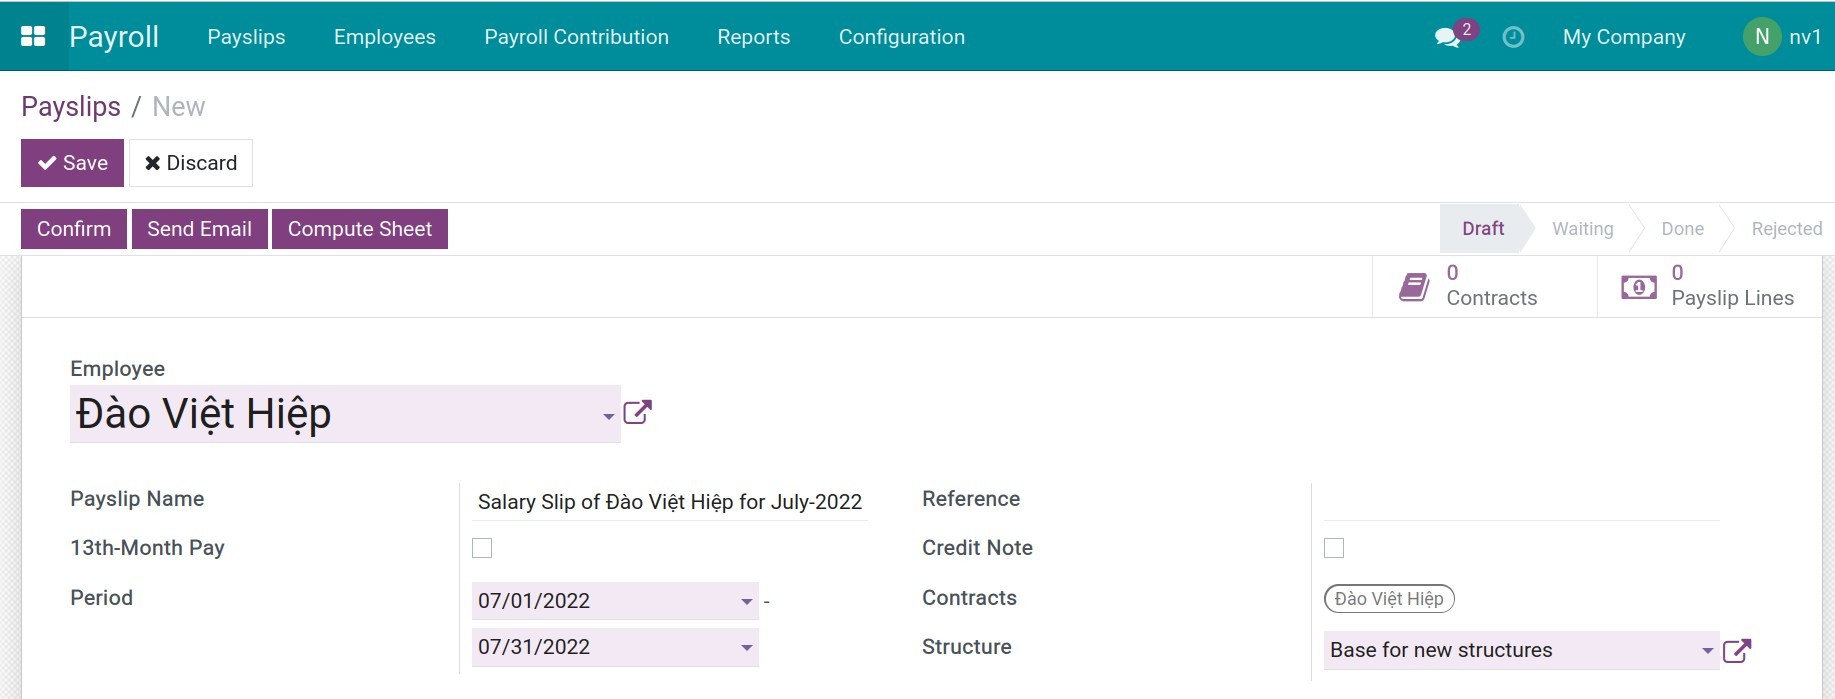
Employee: Select an employee in your company’s employee list.
Payslip Name: The system will automatically suggest the payslip name based on the employee’s name and the payslip period.
Period: The system will suggest the monthly period from the current month. But surely you can change it based on the actual salary period of your company.
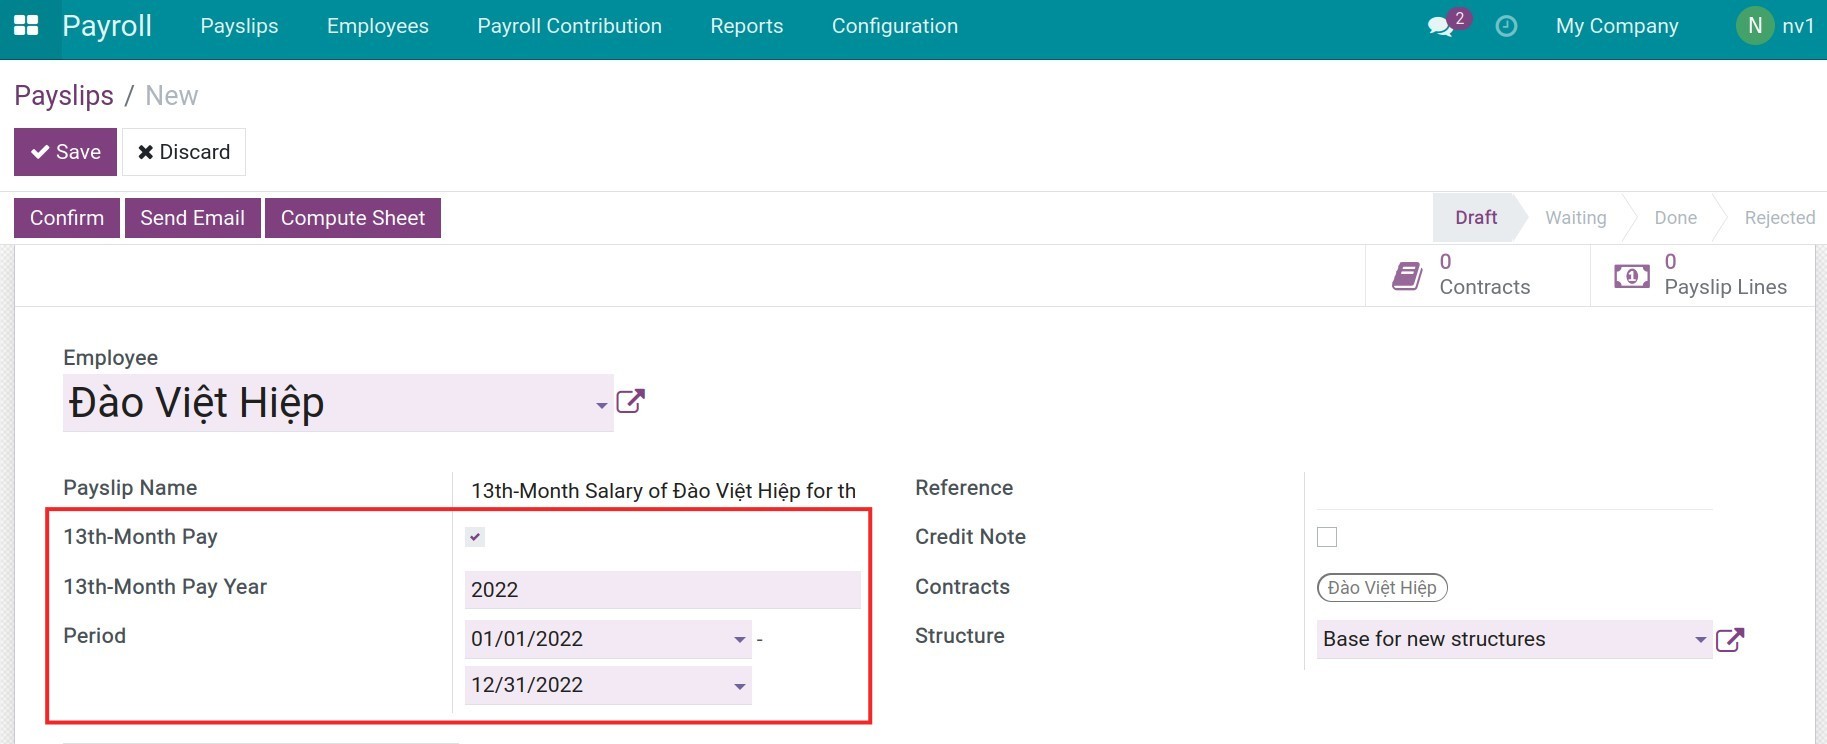
13th-Month Pay: Check if this is the payslip for the 13th-Month salary. You will see other options for the 13th-Month Pay:
13-Month Pay Year: Type the year for this 13th-month payslip.
Period: Yearly period for the 13th-Month salary calculation.
Reference: Record the reference information for this payslip.
Credit Note: Check this option if you want this payslip to be converted to a refund and the entries generated from this payslip will be reverted.
Contract: The system will suggest the valid contract of this employee.
Structure: The system suggests the salary structure configured on the employee contract, you can select another existing salary structure from the list.
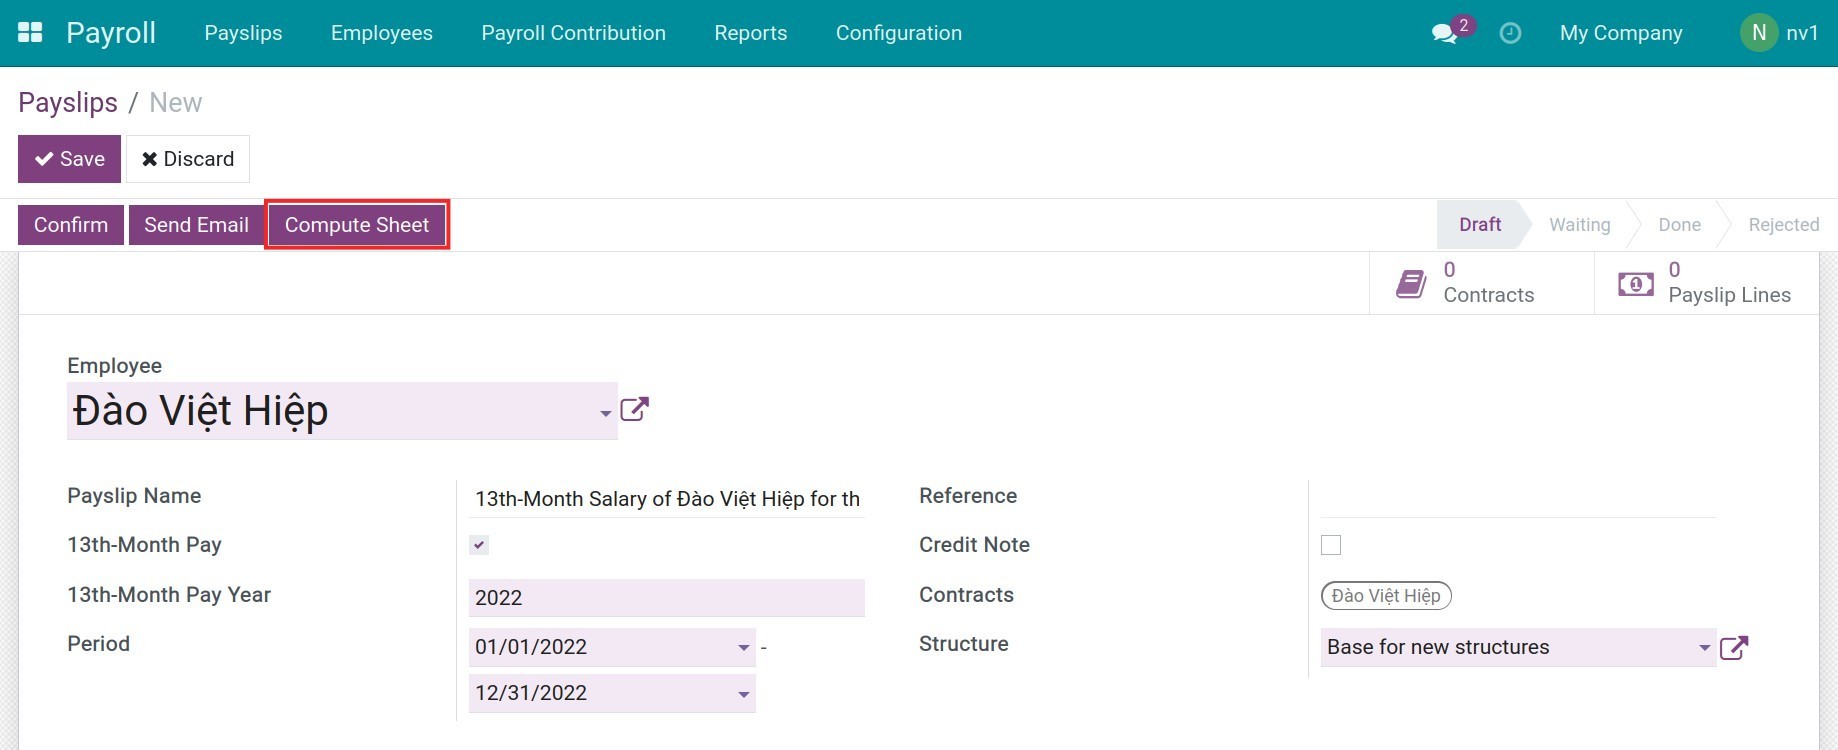
After filling in the information, press Compute Sheet and the system will gather data from the related modules to fill in the payslip.
Payslip detail
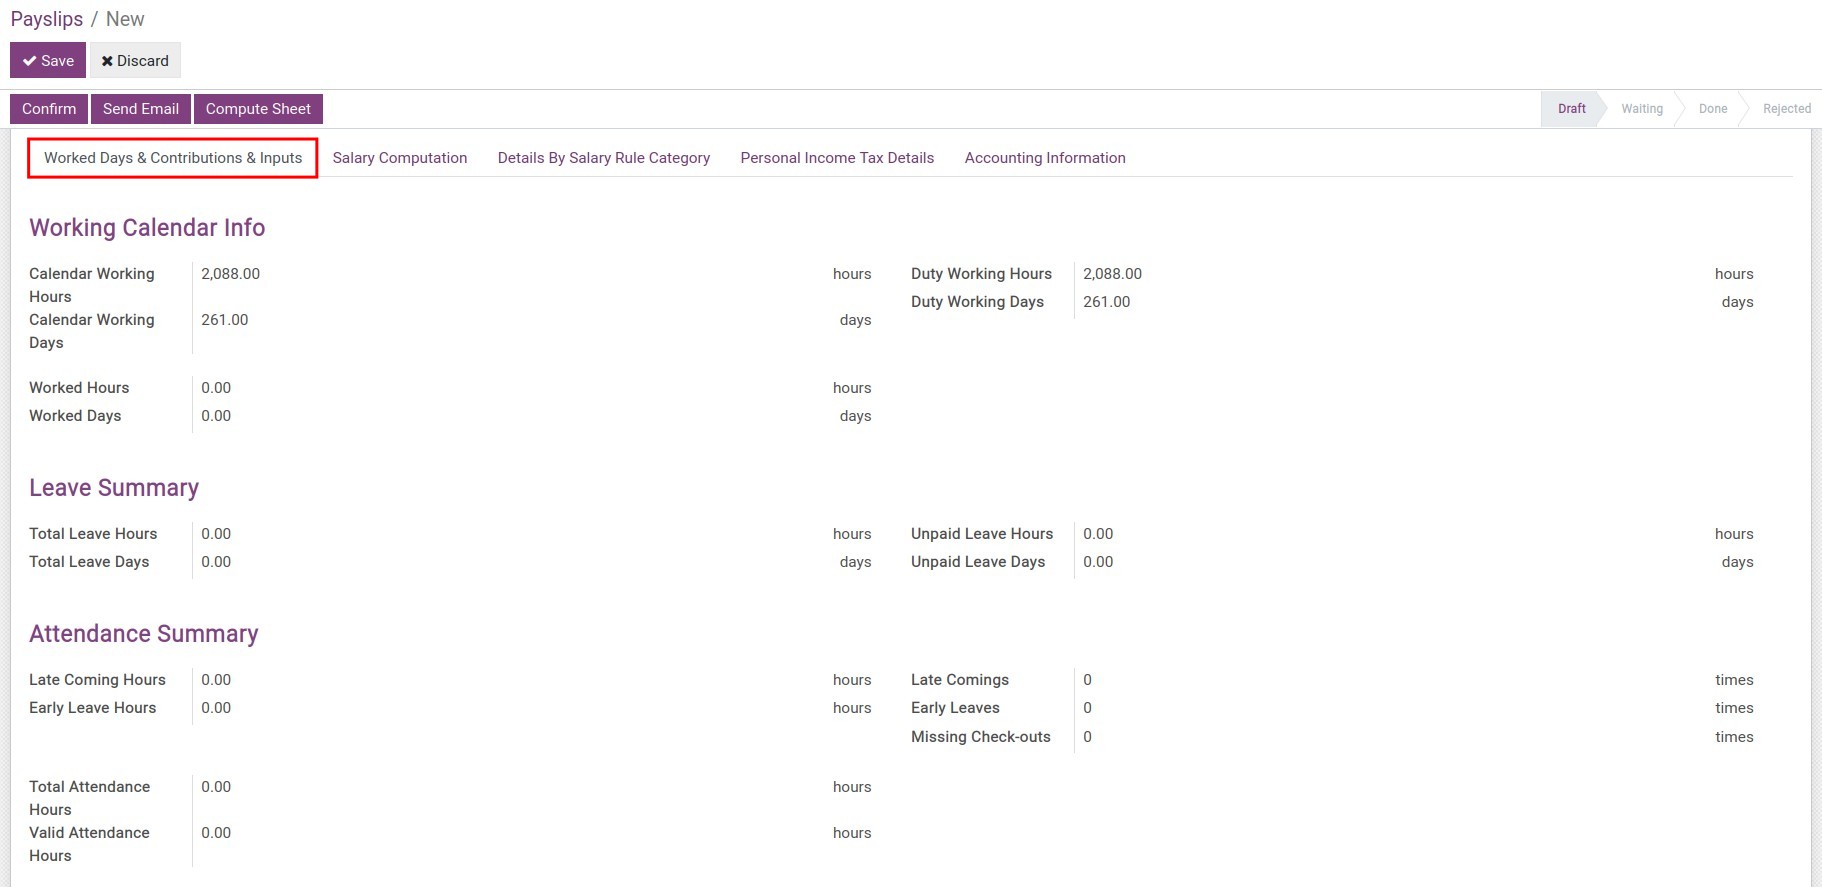
Worked Days & Contributions & Inputs
On the Worked Days & Contribution & Inputs tab, you can also view the other information such as:
Working Calendar Info:
Calendar Working Hours: Record the total working hours base on the working calendar (uninvolved Public Holidays) attached to that employee on the contract.
Calendar Working Days: Record the total working days base on the working calendar (uninvolved global time off attached to that employee on the contract.
Duty Working Hours: The hours this employee has to work based on his/her salary period.
Duty Working Days: The days this employee has to work based on his/her salary period.
Worked Hours: Equal to the duty working hours (-) total leave hours.
Worked Days: Equal to the duty working days (-) total leave days.
Total Leave Hours: The total of the employee’s approved leave hours. Including paid time off, compensatory time off, unpaid time off,… uninvolved global time off.
Total Leave Days: The total of the employee’s approved leave days. Including paid time off, compensatory time off, unpaid time off,… uninvolved global time off.
Unpaid Leave Hours: The leave hours belong to the unpaid time off type.
Total Leave Days: The leave days belong to the unpaid time off type.
Late Coming Hours: The total late hours compare to the specified hour of the work schedule, is calculated based on the attendance data of the employee.
Early Leave Hours: The total early leave hours compare to the specified hour of the work schedule, is calculated based on the attendance data of the employee.
Late Comings: The late times compare to the specified hour.
Early Leaves: The early leave times compare to the specified hour.
Missing Check-outs: The times the employee doesn’t check out.
Total Attendance Hours: The total of the attendance hours, calculated based on the employee’s real-time attendance hours.
Valid Attendance Hours: The total of valid attendance hours, calculated based on the working schedule and the employee’s attendance hours.
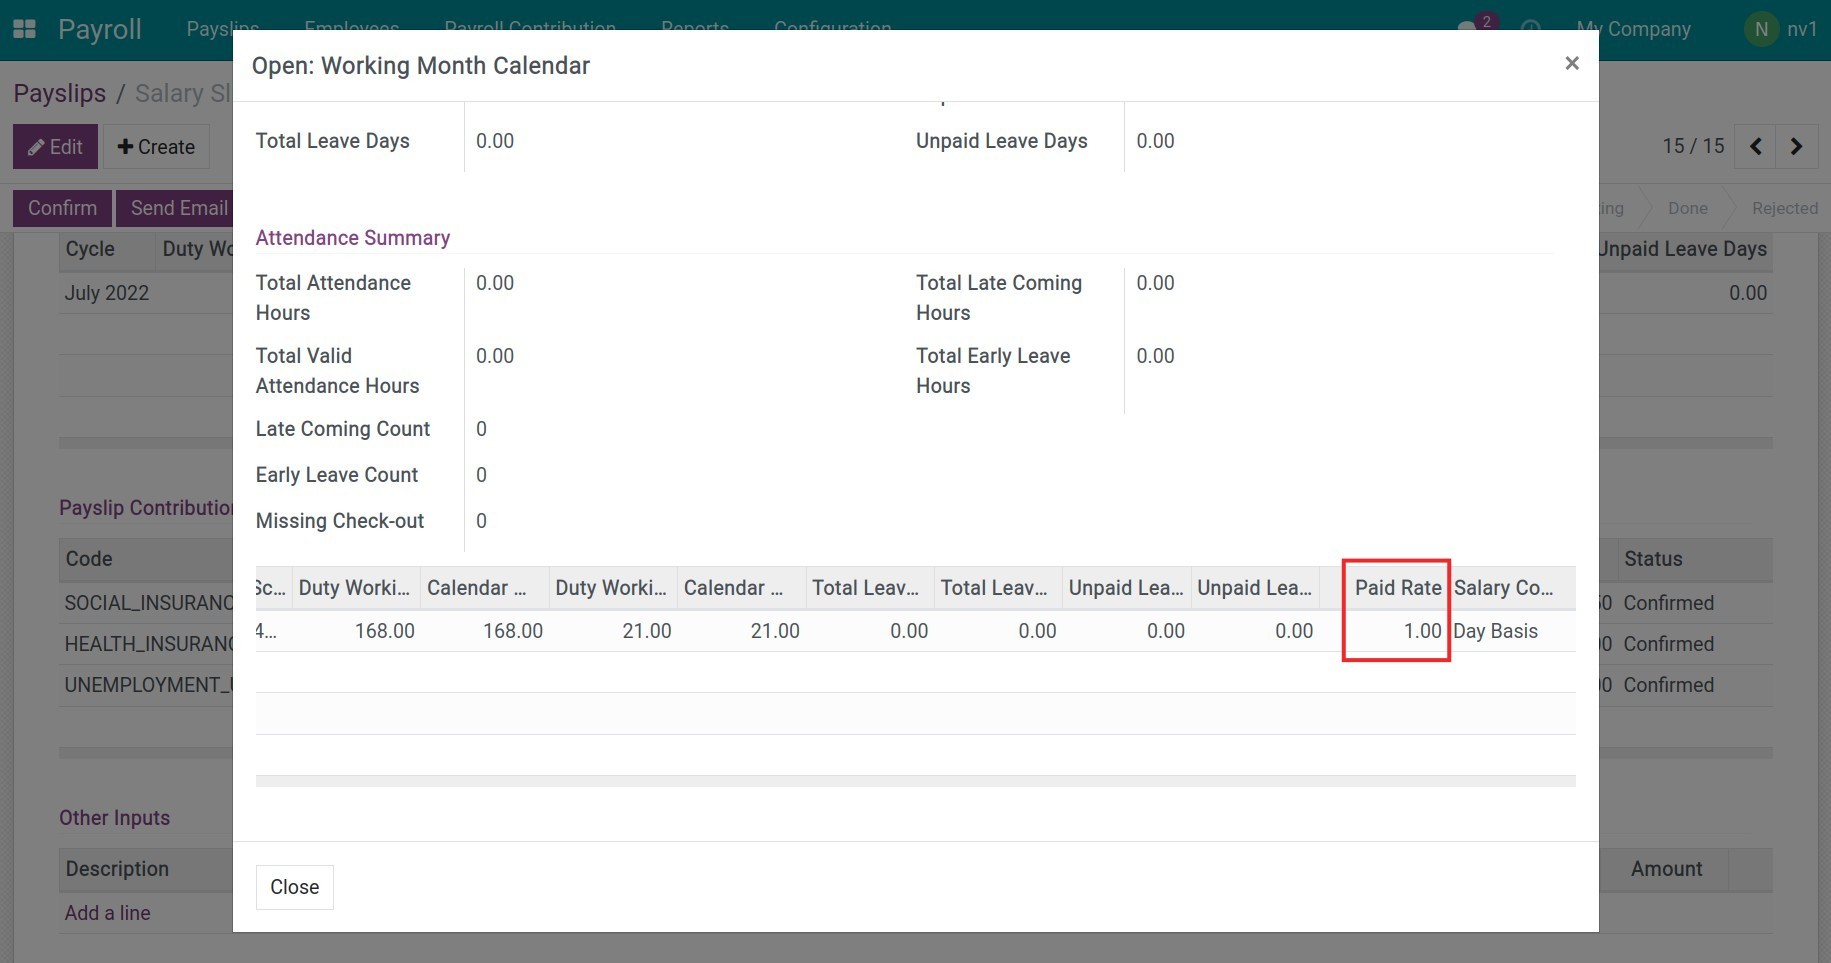
Working Calendar Details: Based on the salary computation mode on the contract. This section will show the following information:
Gather the information about the days and hours that employee’s duty working, total leave, unpaid leave.
After saving the payslip, you click on the Working Calendar Details line, you can see the Paid Rate based on the salary computation mode on the contract:
Paid Rate = Duty working days/hours (-) Unpaid leave days/hours (/) Calendar working days/hours. (This field is used in calculating Amount at Salary Computation tab.
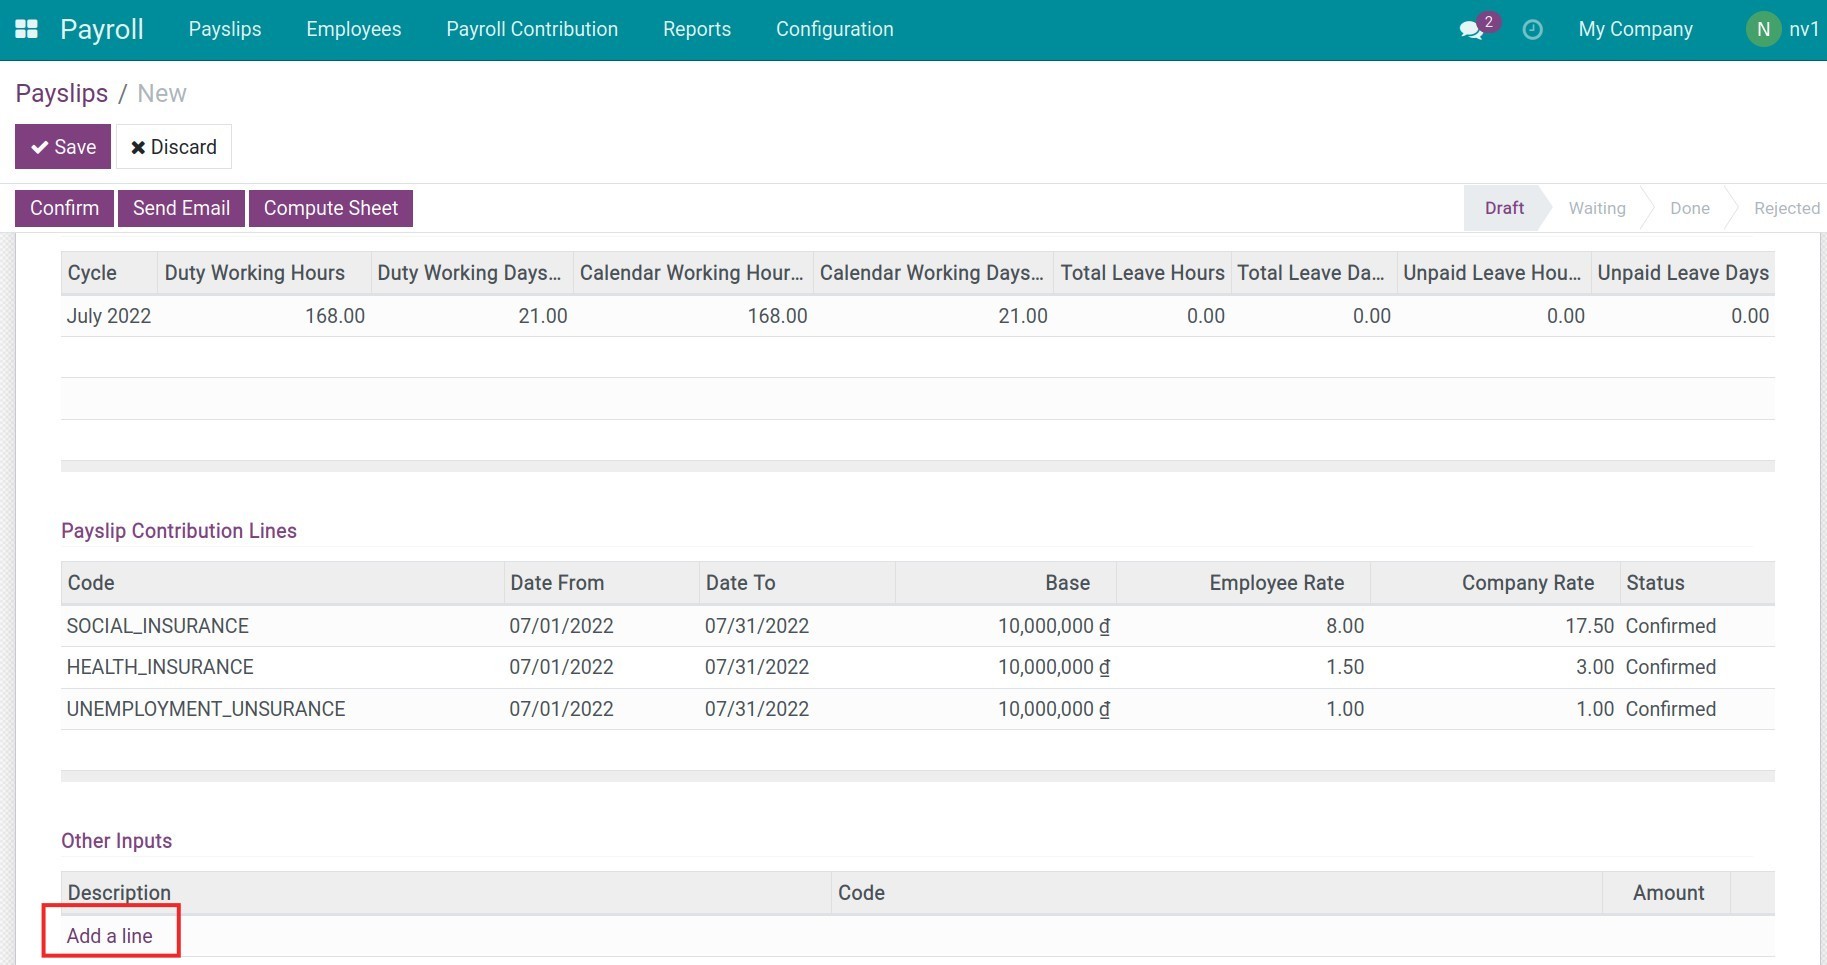
Payslip Contribution Lines:
List the payroll contribution registers in a salary period.
Other Inputs:
Input other amounts that don’t have the automatic calculation rules in the system and need external monitoring such as commissions, sick money paid by social insurance, fines for the rules violation, etc.
Press Add a line to add the description and the amount of the inputs.
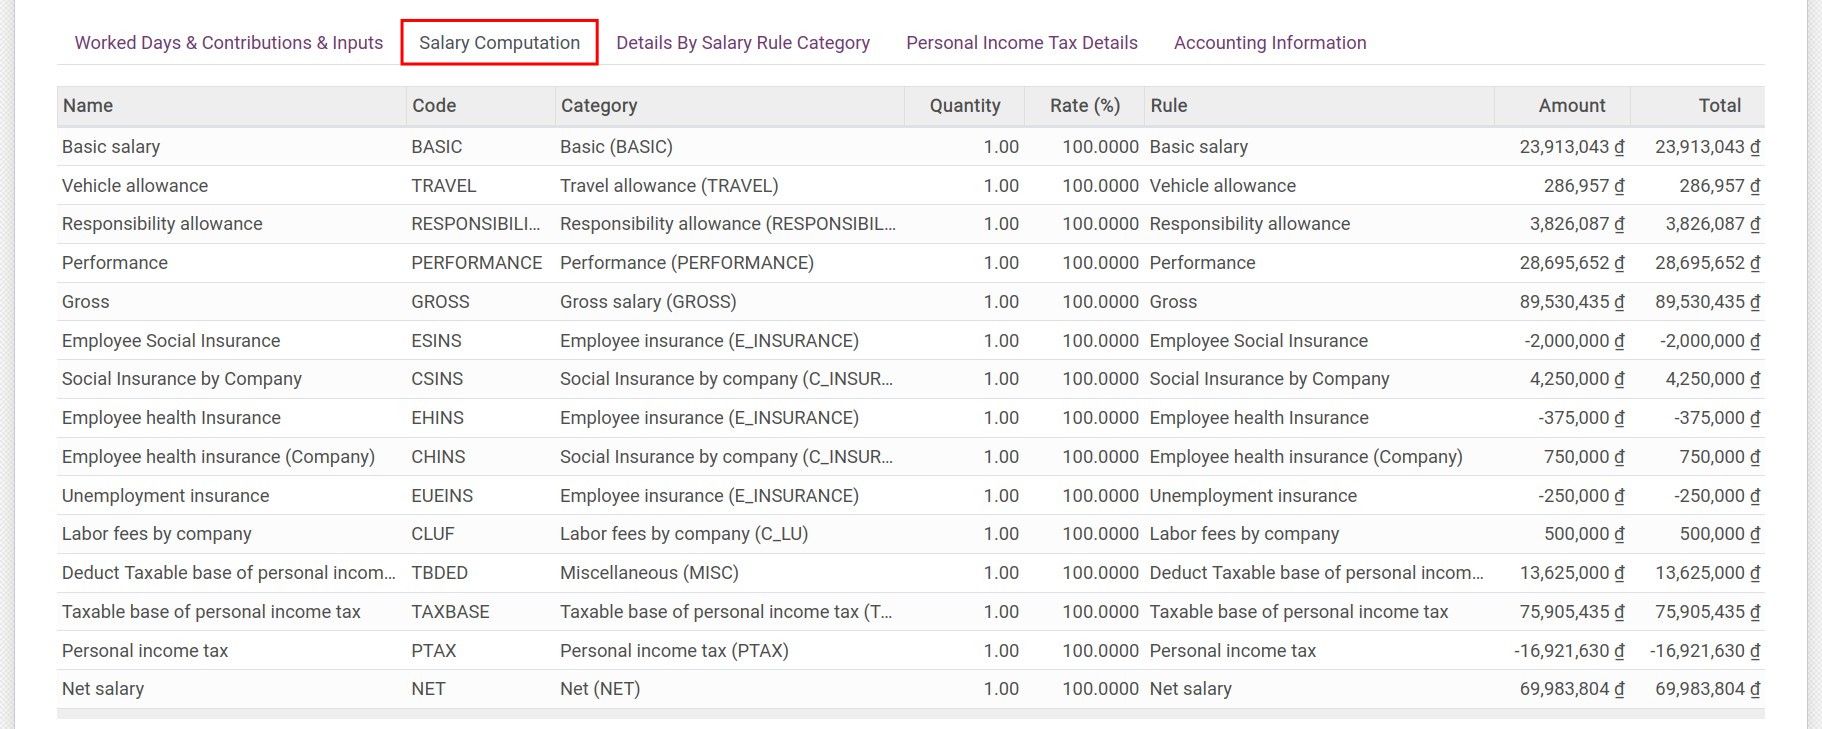
Salary Computation tab
In this tab, you can view the details salary computation of each salary rule applied to this employee:The amount on the payslip will be calculated based on the salary rules set in the selected salary structure:
Rate (%): The percentage rate of the salary rule in case its computation is set as Percentage (%).
Amount: Equal to the salary/benefit on the contract (*) Paid rate (Duty working days/hours (-) Unpaid leave days/hours / Calendar working days/hours).
Total: Equal to Amount (*) Rate (%).
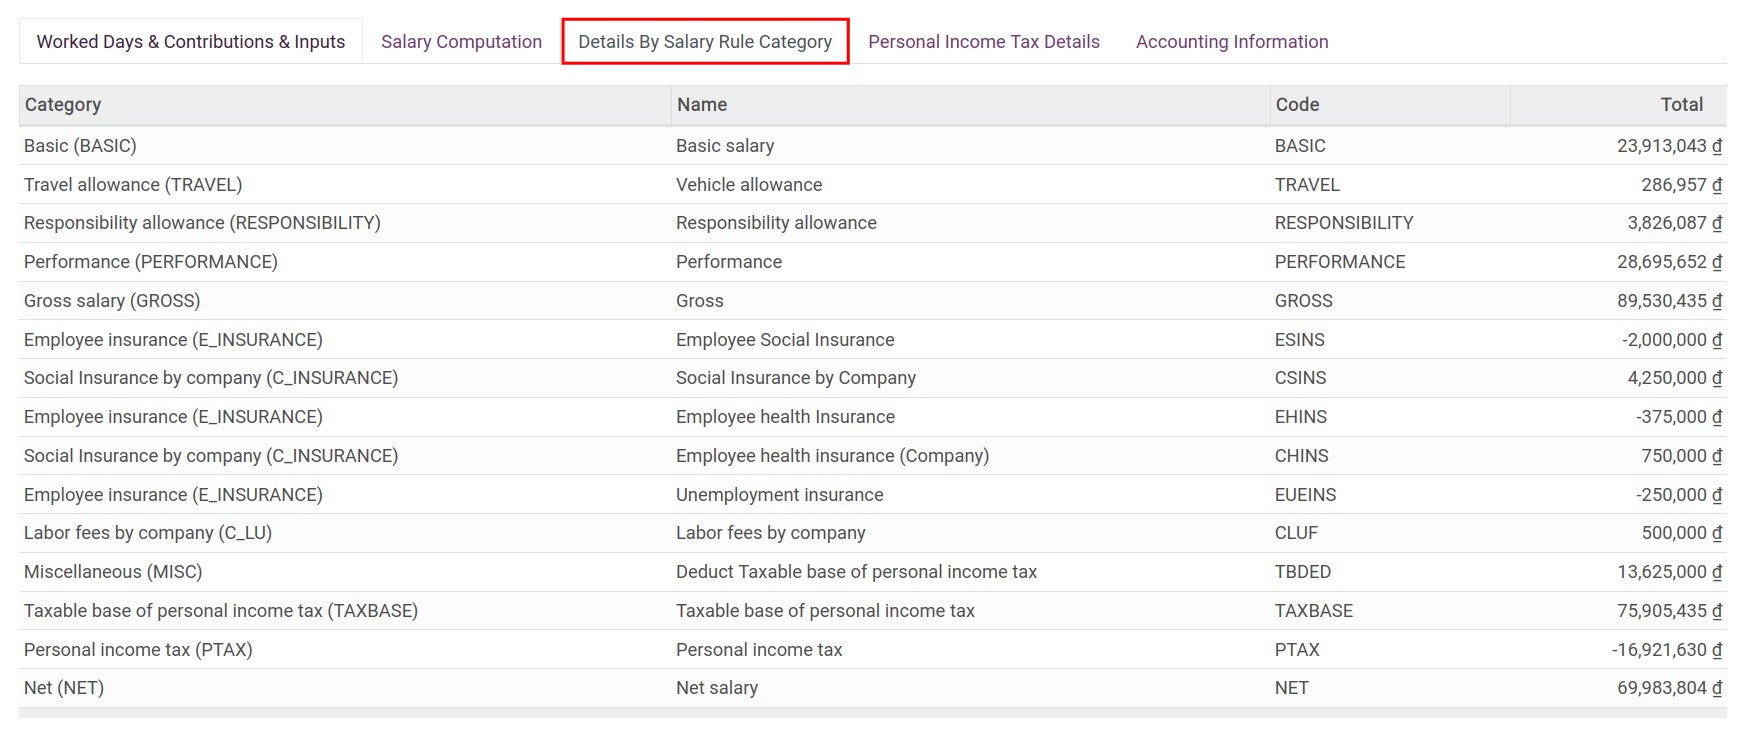
Details By Salary Rule Category tab
The Details By Salary Rule Category tab provides the employee’s salary details according to each salary category:
Personal Income Tax Details
You can view the personal income tax details of this employee:
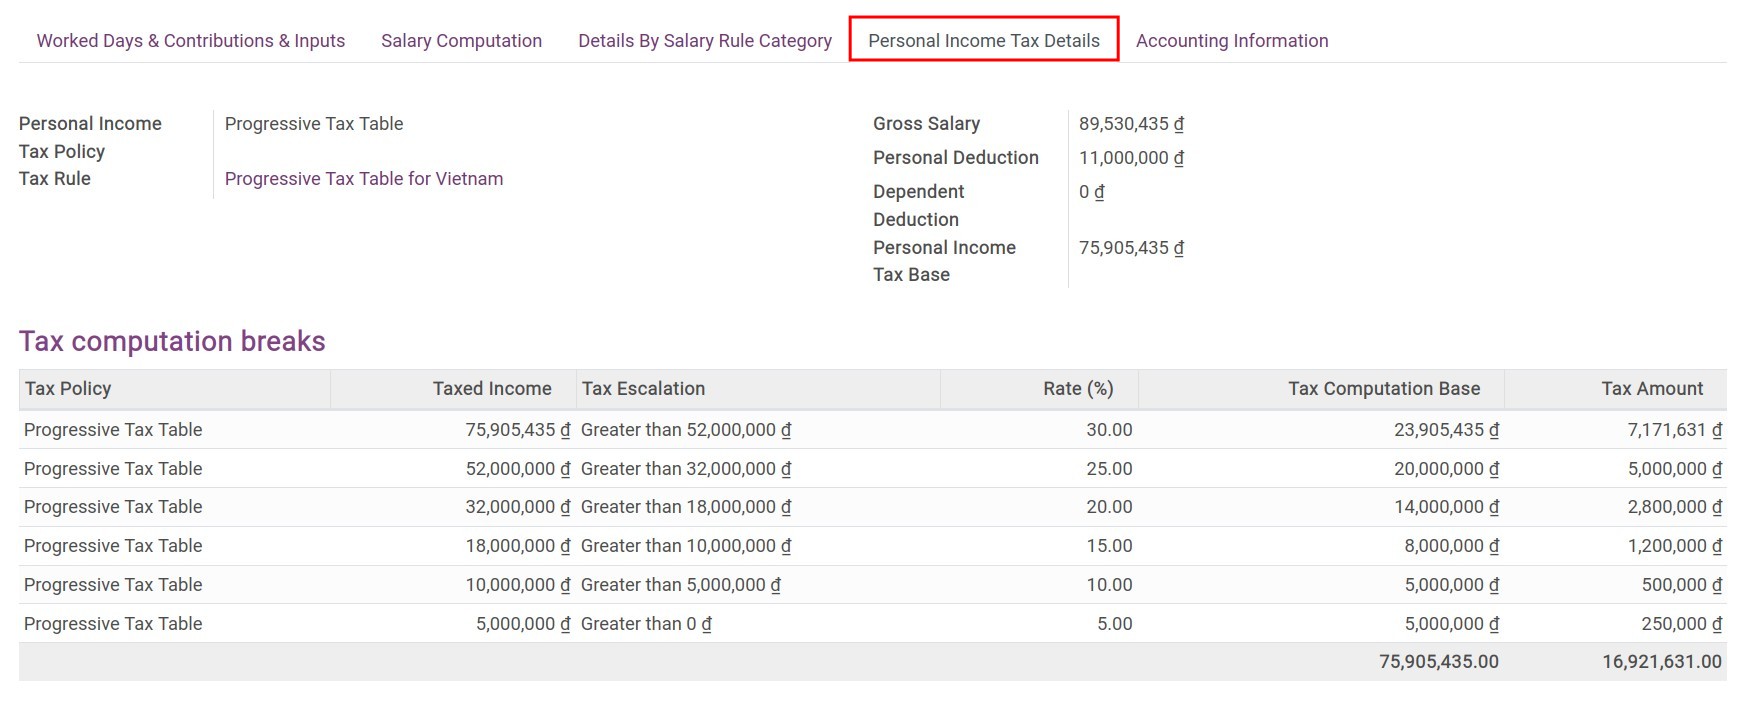
Tax Rule: Is set according to the personal tax rules on the employee’s contract.
Gross Salary: The gross salary before deducting. Calculated based on the Gross salary rule of the payslip.
Personal Deduction: The deduction value declared on the personal tax rules.
Dependent Deduction: Equal to the deduction value for each dependent of the personal tax rule (*) the dependent numbers declared on the employee profile.
Base Deduction on each Dependent: The base value that is used to calculate the personal tax.
Accounting information tab
At the accounting information tab, you can view the following information:
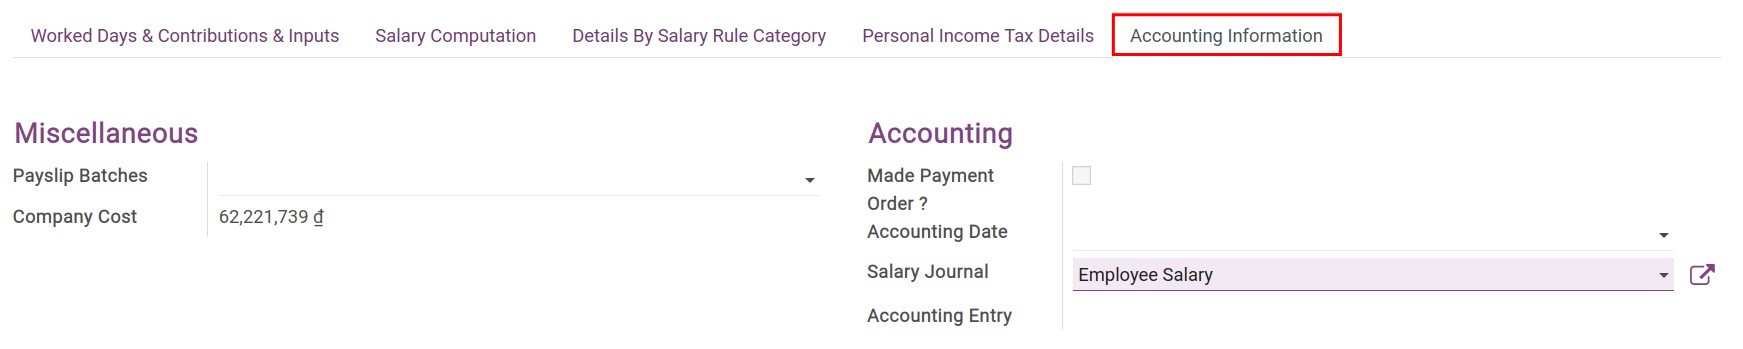
Payslip batches: Select the payslip batch that you want to attach to the employee payslip.
See also
Create Payslips Batches
Company Cost: The total cost that the company needs to pay for this payslip.
Accounting Date: Select the accounting date for the payslip. If this field is blank, the system will auto-select the last day of the salary period.
Salary Journal: Select the journal that records the entries related to the payslip.
Accounting entry: After the payslip is confirmed, the system will auto-generate the corresponding entry for the payslip. You can press the link to view the entry.
Warning
In case the payslip has been attached to a payslip batch:
You won’t be able to confirm the payslip separately, you need to confirm that batch.
The generated accounting entry will depend on the batch’s accounting entry.
In case you only confirm a payslip:
The payslip will be separately accounted. The generated entry will only record the items relate to this payslip.
The features on the payslip
After reviewing the payslip information, you can:
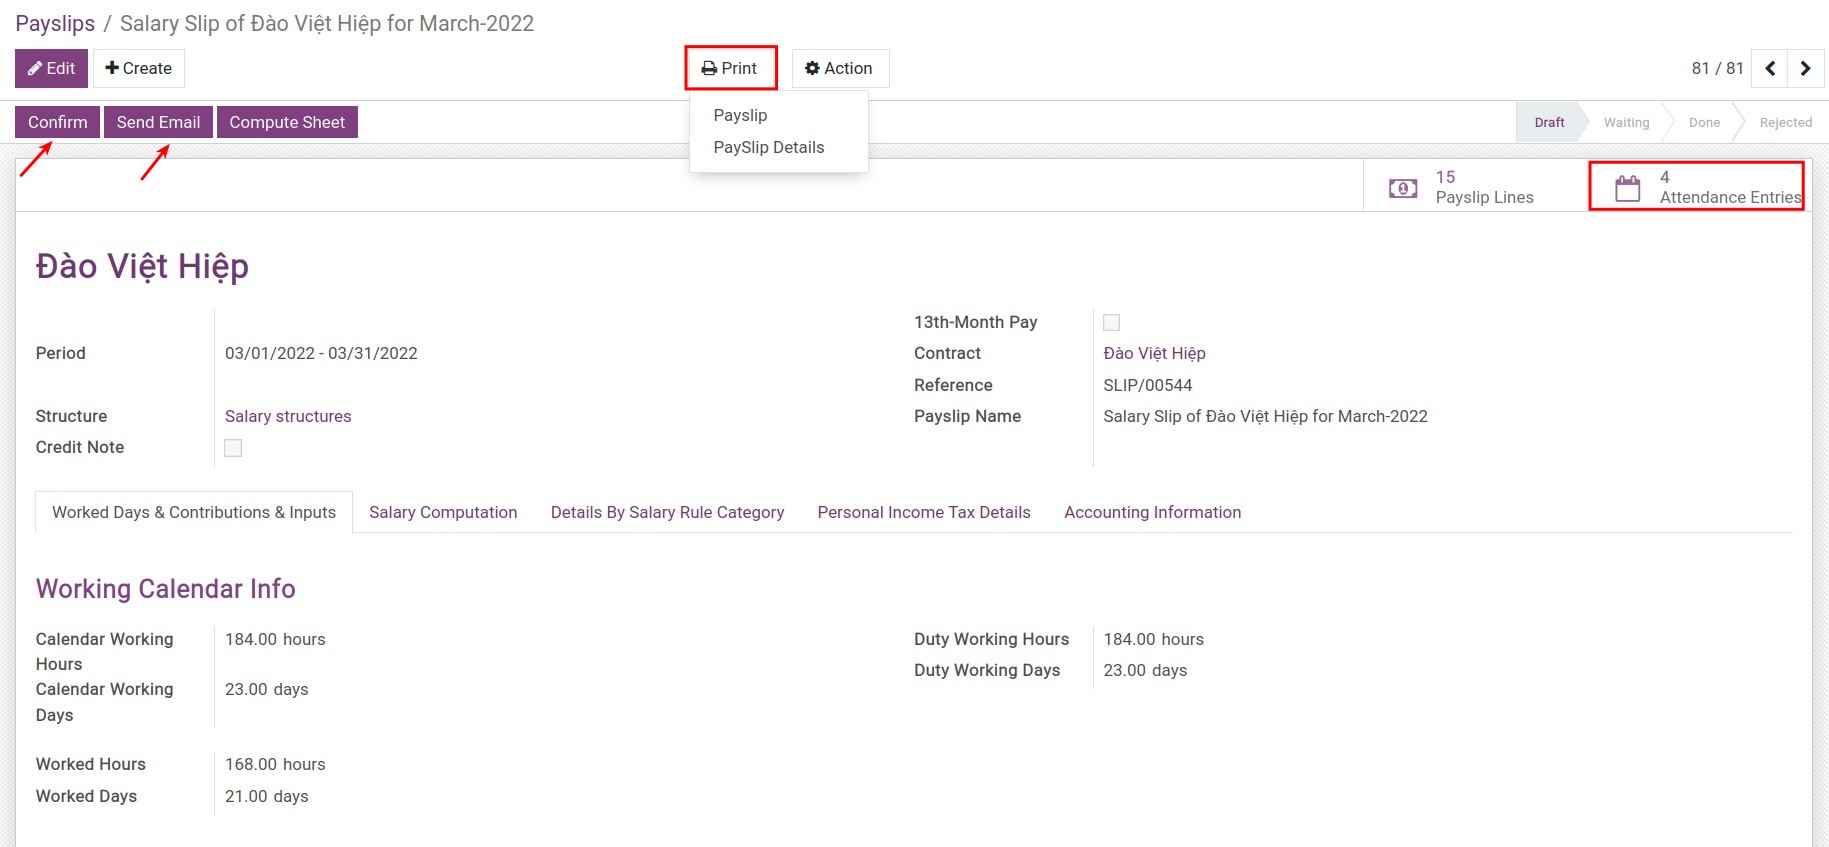
Press Confirm to confirm the payslip.
Press Send Email to send this payslip to the employee.
Press Print if you want to print the payslip or the payslip detail.
Press Attendance Entries to view the employee’s attendance list.
See also
Optional module
HR Payroll Accounting
Create Payslips Batches
Create Payslips Batches
iSuite’s Payroll management app gives you the ability to create payslips in the same payslips batches for all employees in a company or for each department, workshop, etc. depending on the salary structures of the company. To create a payroll, you can choose automatic or manual generation.
Requirements
This tutorial requires the installation of the following applications/modules:
Payroll
Manual payroll generation
To create a payroll, go to Payroll ‣ Payslips ‣ Payslips Batches:
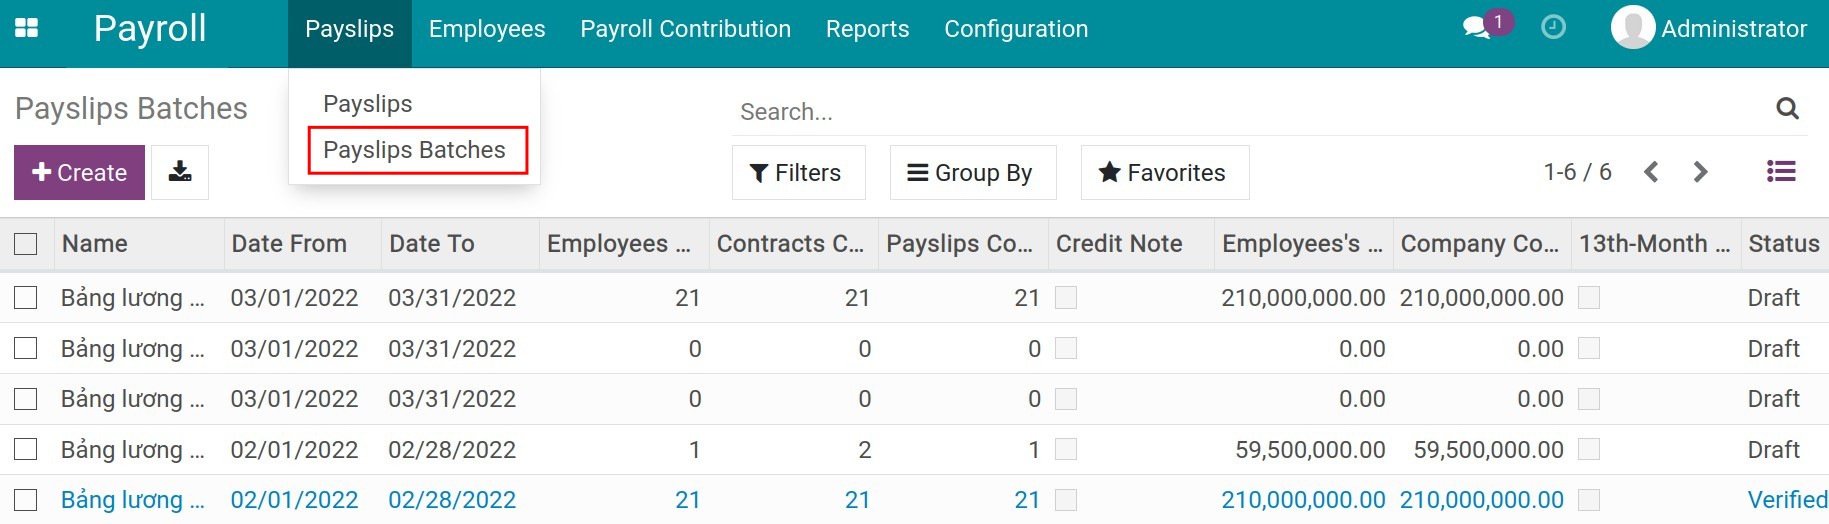
Click Create to open the view of the payroll:
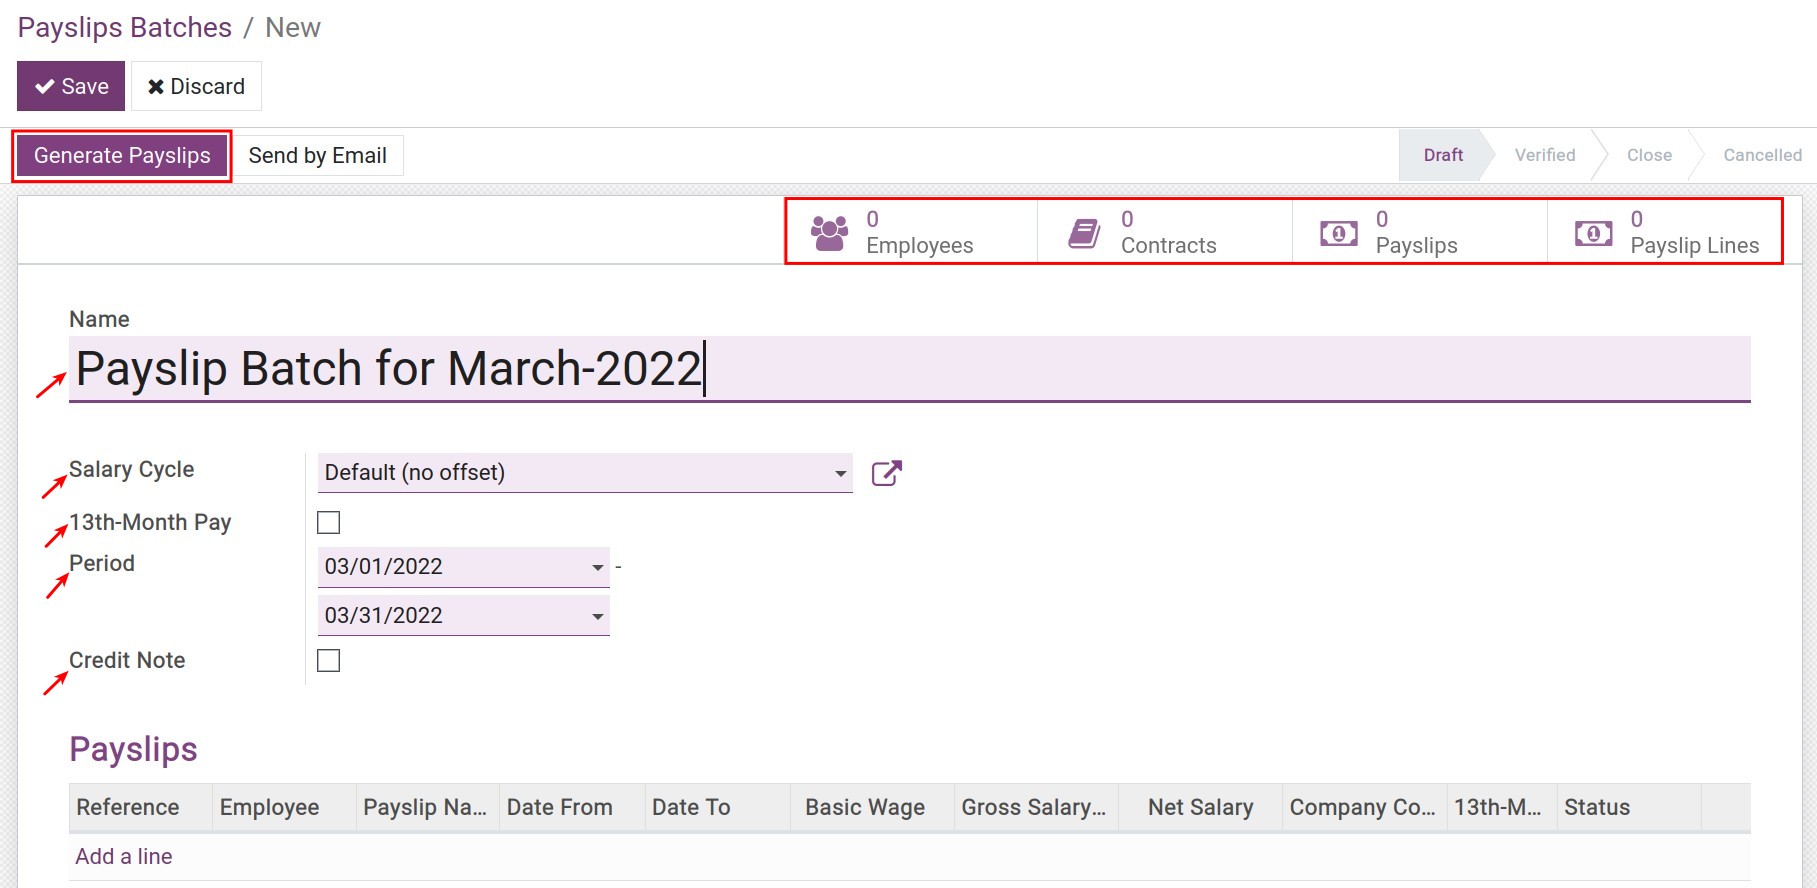
General information on payroll
Name: Name the payroll. The system will suggest to you the name of the current monthly payroll. In case you create the payroll for each department, factory workshop, etc. you can assign the department name on the payroll name for easy lookup. For example: Equipment PX - February 2020 Payroll.
Salary Cycle: Select your company’s salary cycle. The system will automatically suggest the default salary cycle configured in Payroll ‣ Configuration ‣ Settings.
13th-Month Pay: When enabled, you will have more options to calculate the 13th-month salary as follows:
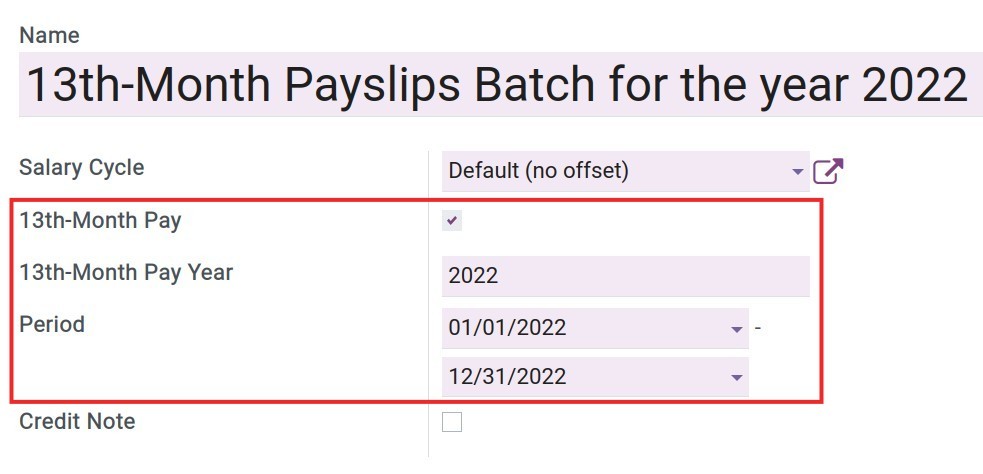
13th-Month Pay Year: Enter the year for the 13th-month salary.
Period: This period will be automatically suggested based on the salary cycle you have set and selected above. You can adjust the time in this cycle according to the actual payroll.
Credit Note: If checked, all the payslips on this payroll will become refund slips.
Payslips generation
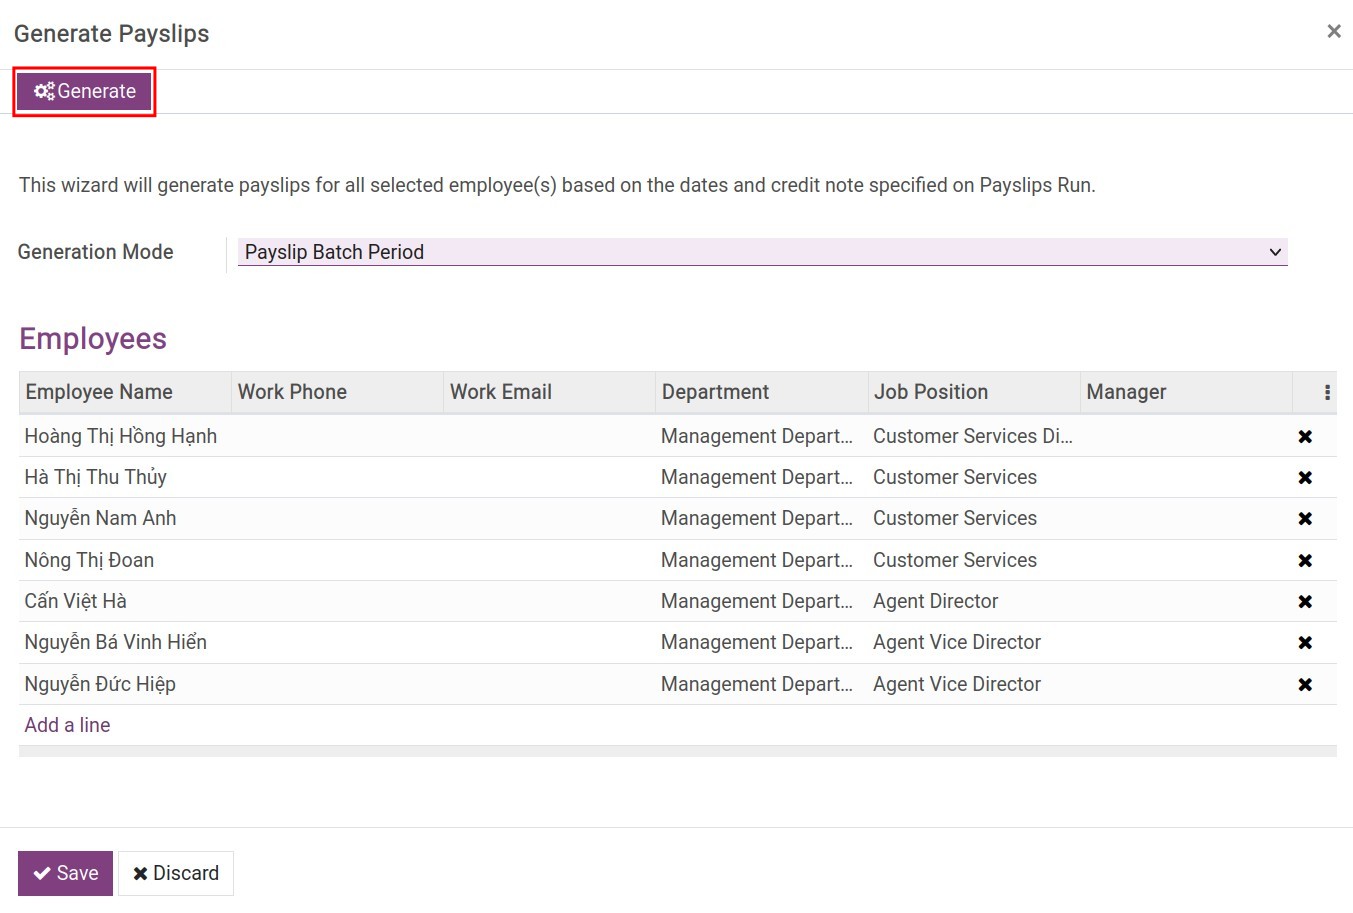
After filling in the general information fields, press the Generate Payslips button to generate payslips batches:
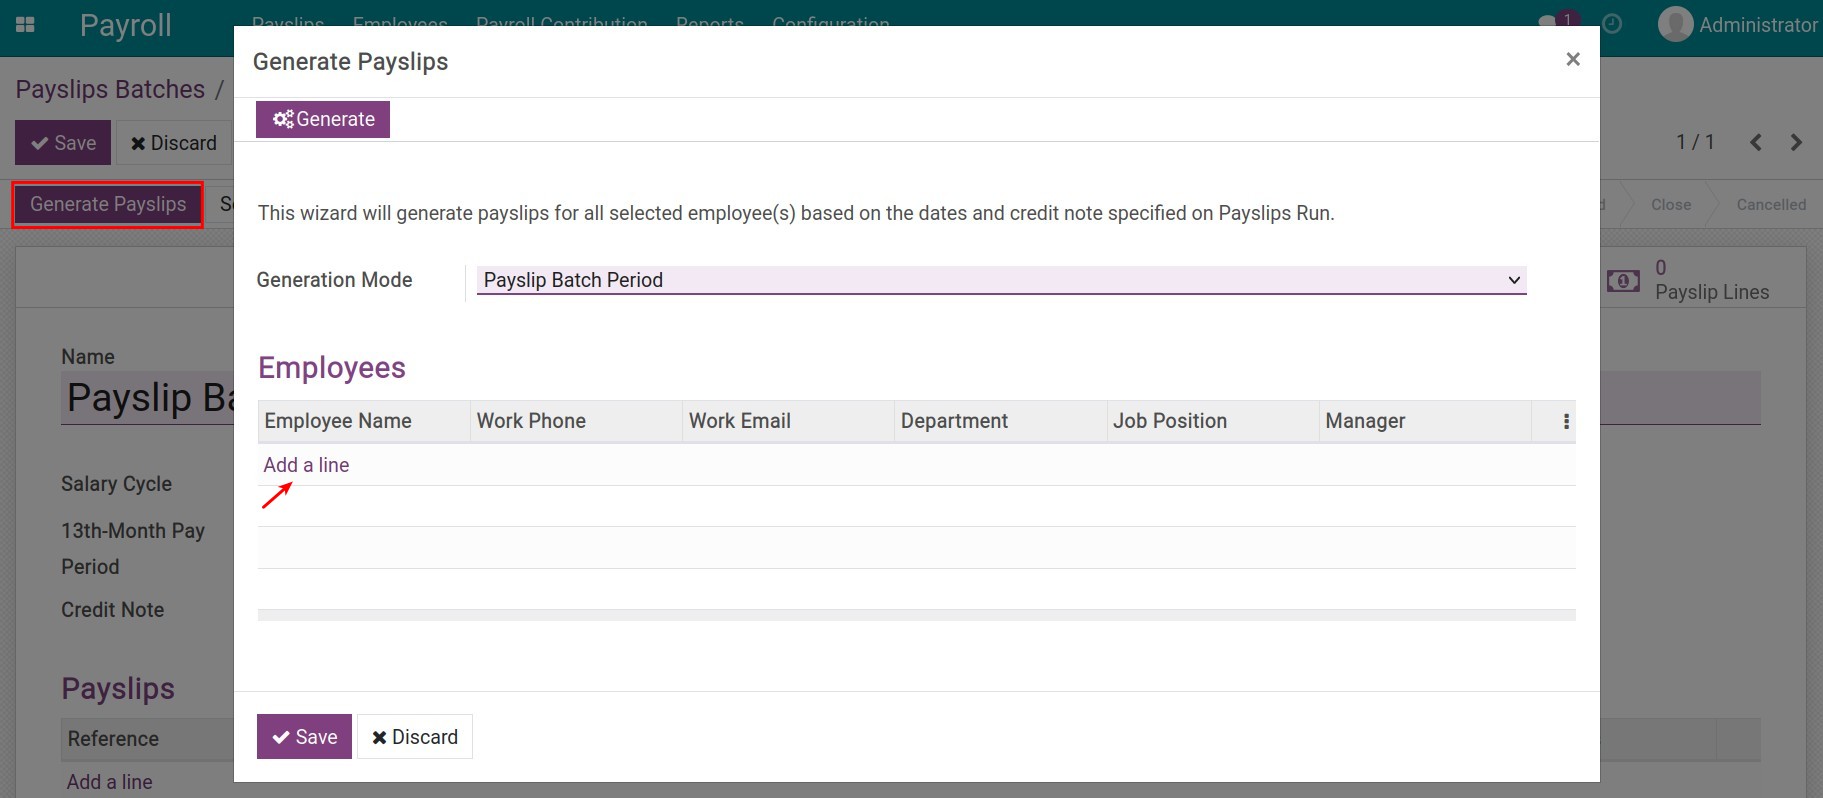
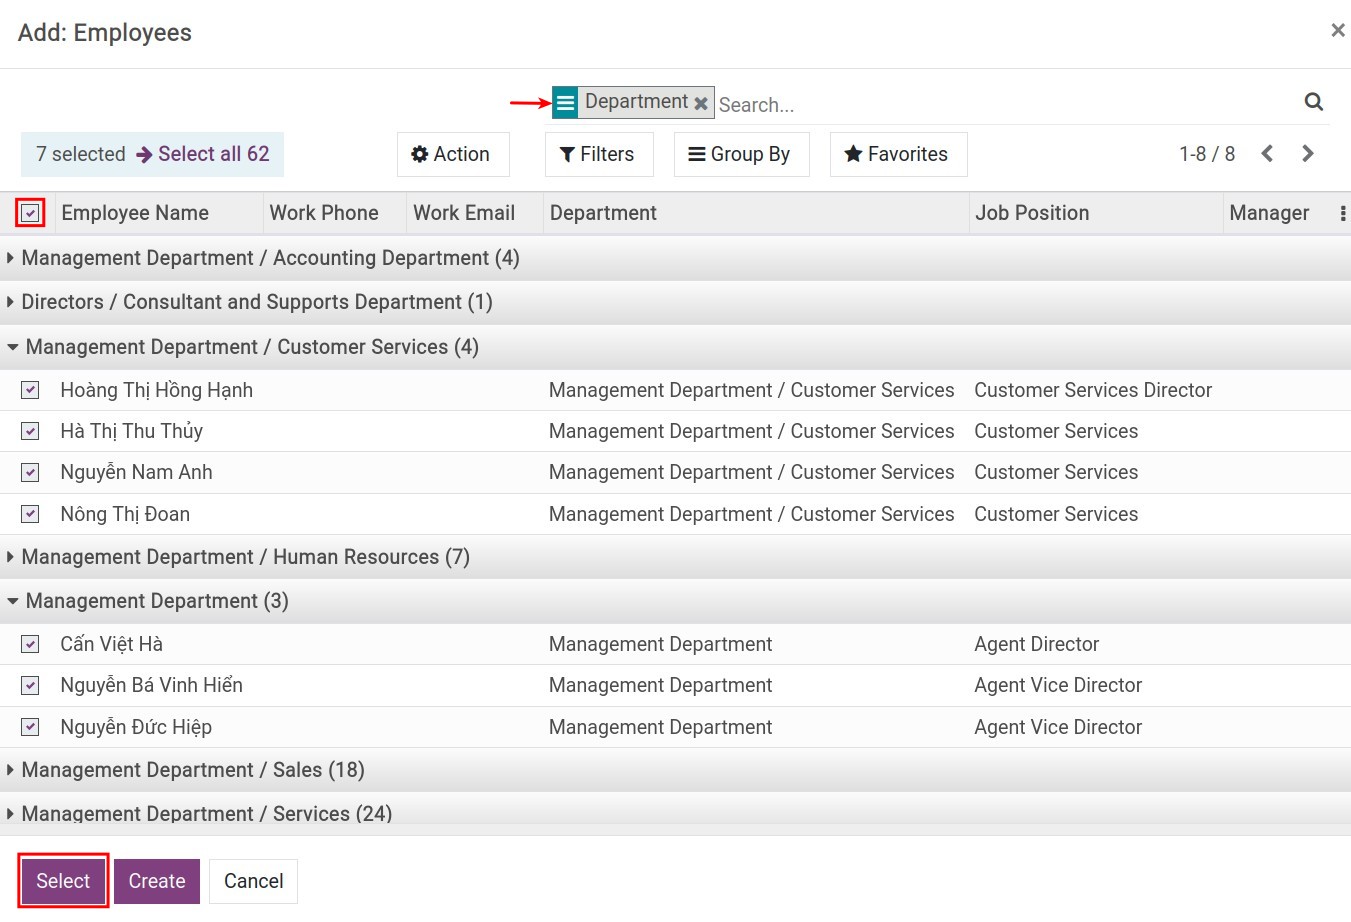
Click Add a line to select employees who need to generate payslips. At this view, you use the group by feature and the filter for this purpose, check batch selection, then press Select.
Click Generate on the payslip generation window to generate a payslips batch:
Note
If in the same salary cycle there are many running/expiring contracts with non-overlapping durations, the software will automatically calculate salary based on all these contracts.
Main features of the Payslips Batches view
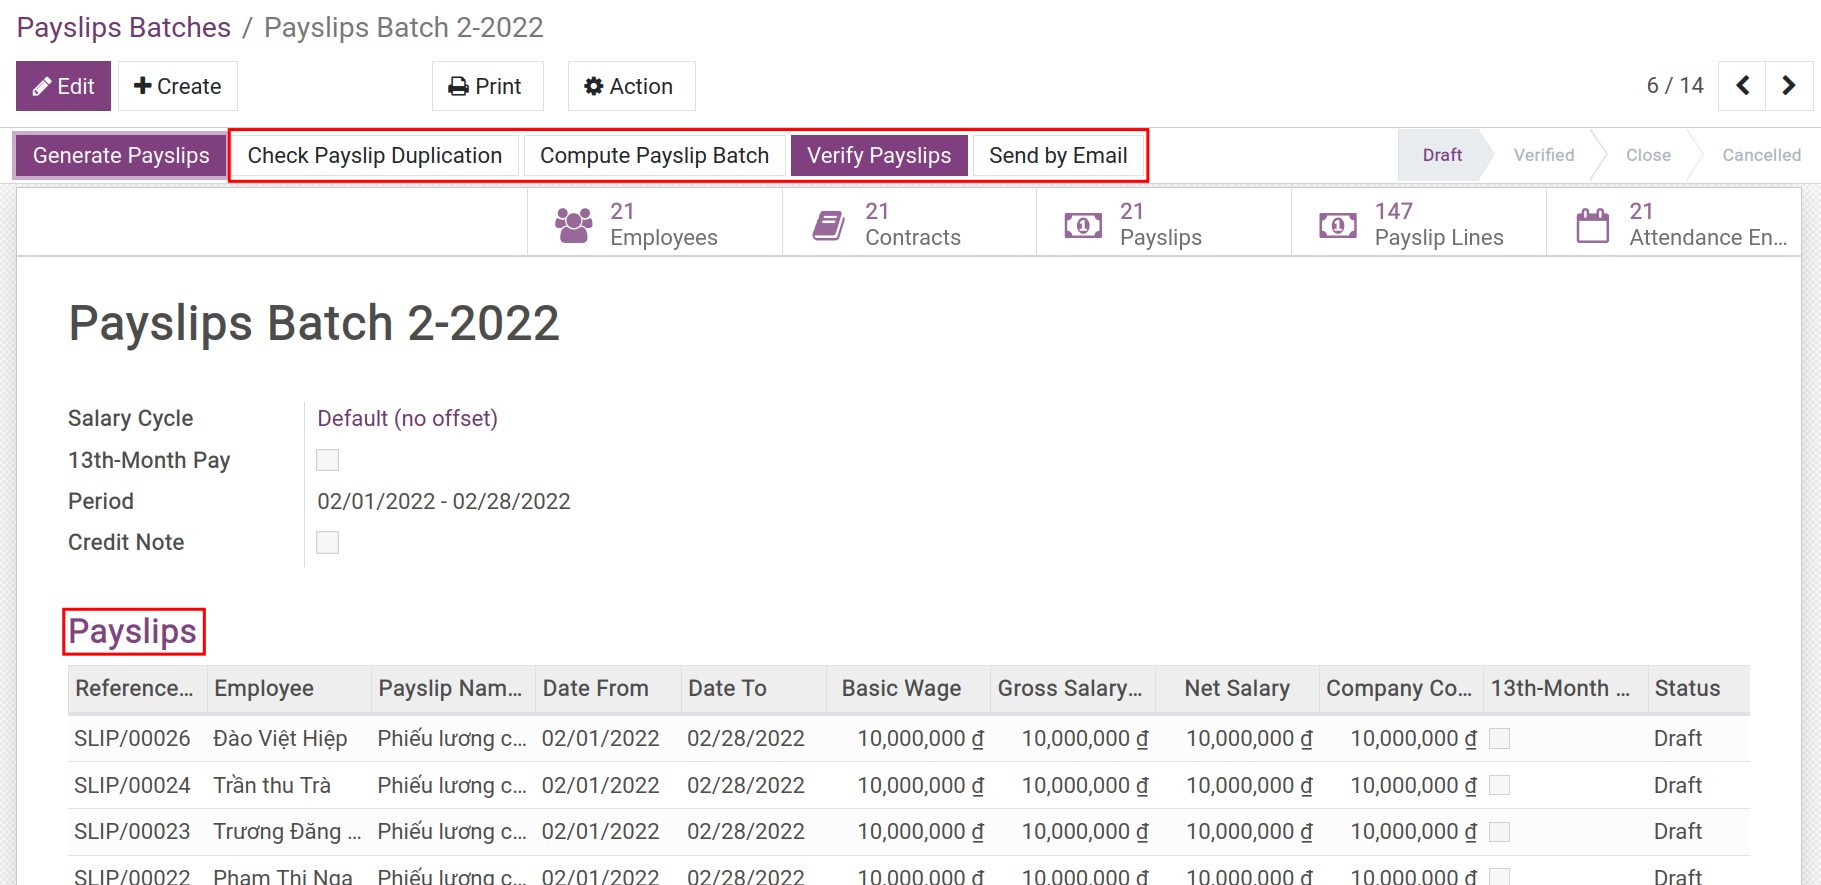
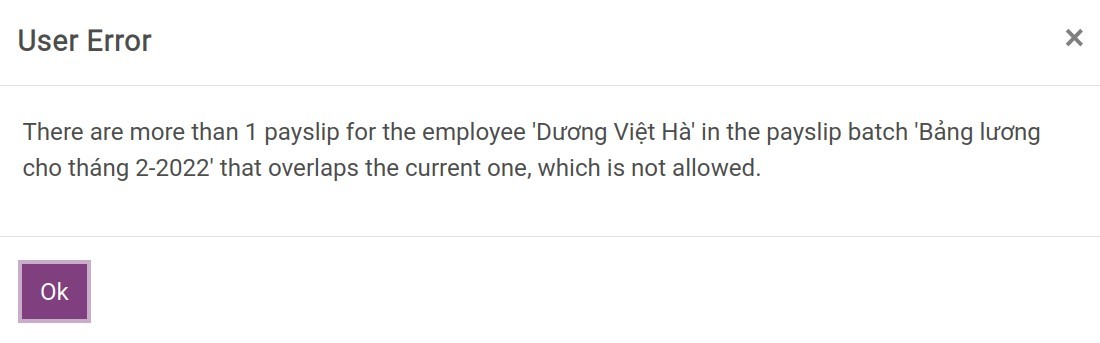
Check Payslip Duplication: In case there are multiple payslips for the same employee in the same period and the same payroll, the system will give a warning.
Compute Payslip Batch: In case your payroll has a lot of data or there is an edition in the general information of the payroll or there is an adjustment in the employee’s contract, etc., you need to hit the button Compute Payslip Batches to compute so that the system recalculates the data for the payslips.
Verify Payslips: After checking the payroll data, click the confirm button to complete the payroll generation.
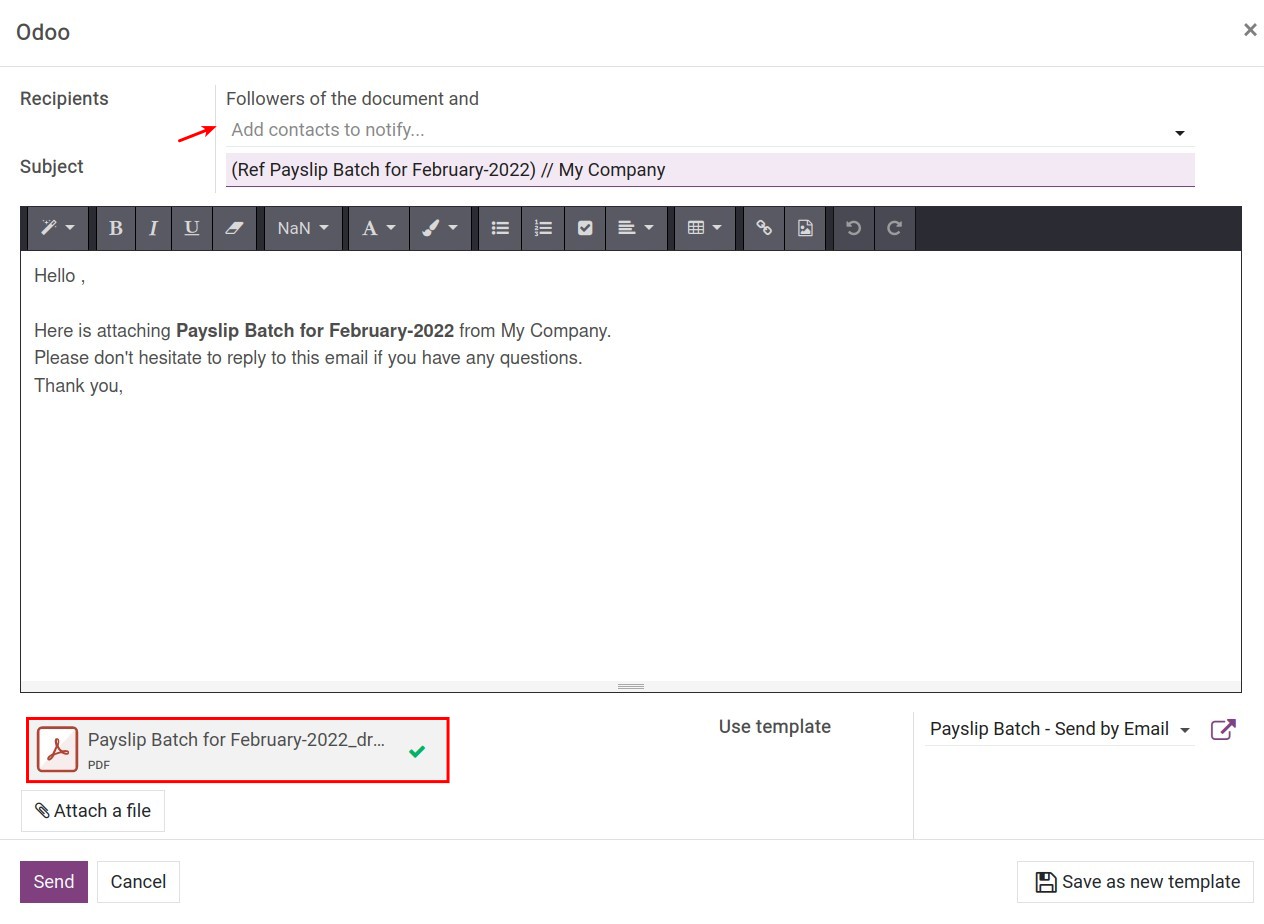
Send By Email: Use this feature to send payroll information to banks or managers by adding relevant emails in the Recipients field on the view:
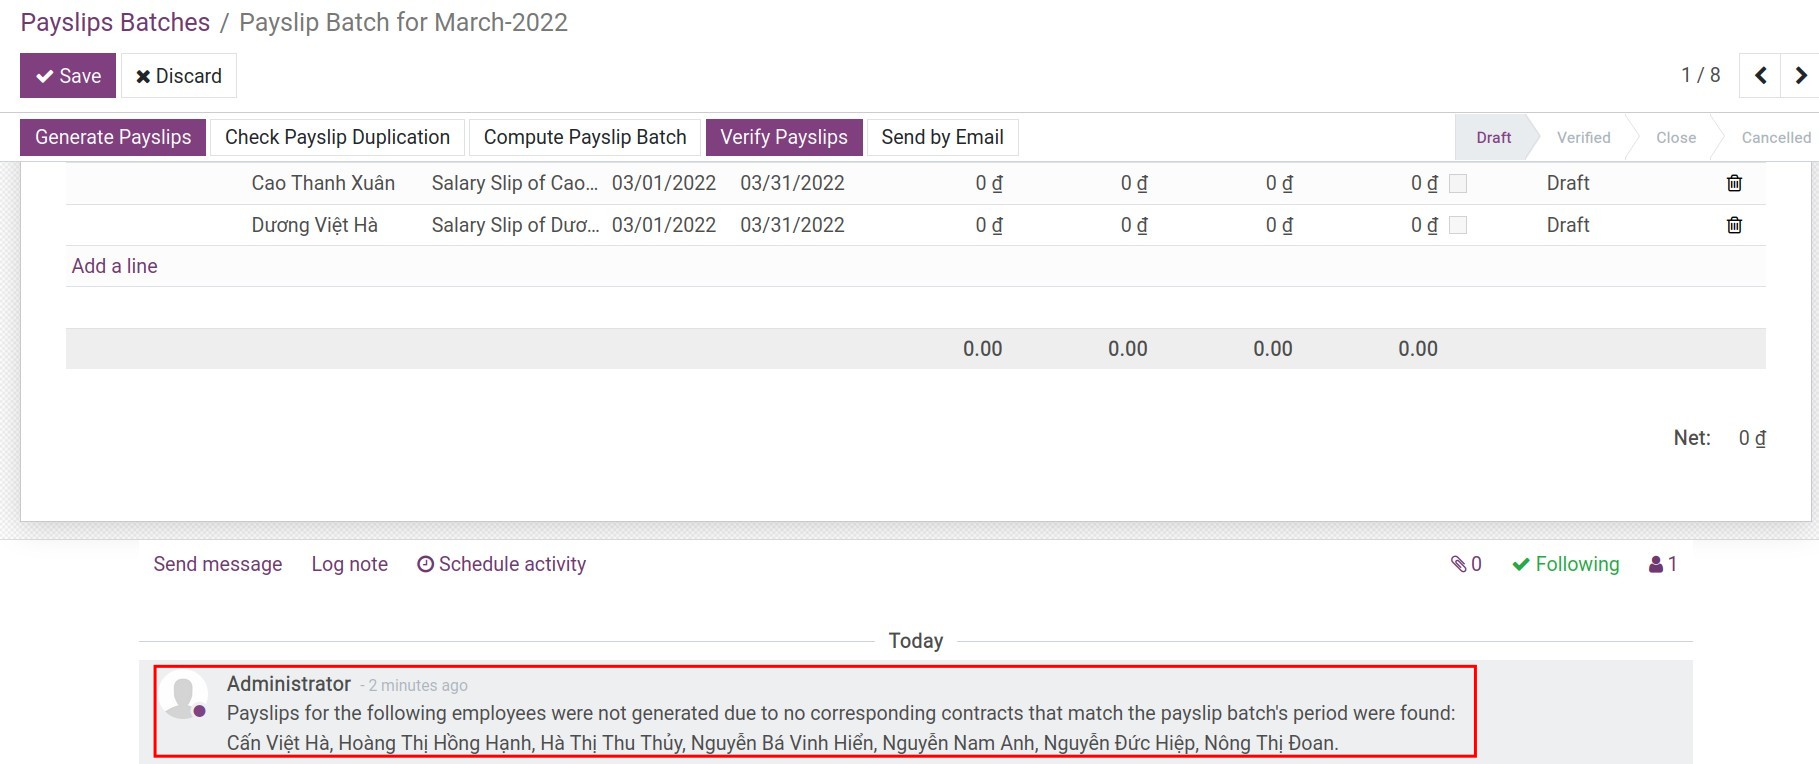
On the payroll will also list generated payslips. For employees who cannot create payslips, the system will notify them in the notes section of the payroll:
Statistics menu on the payroll view:
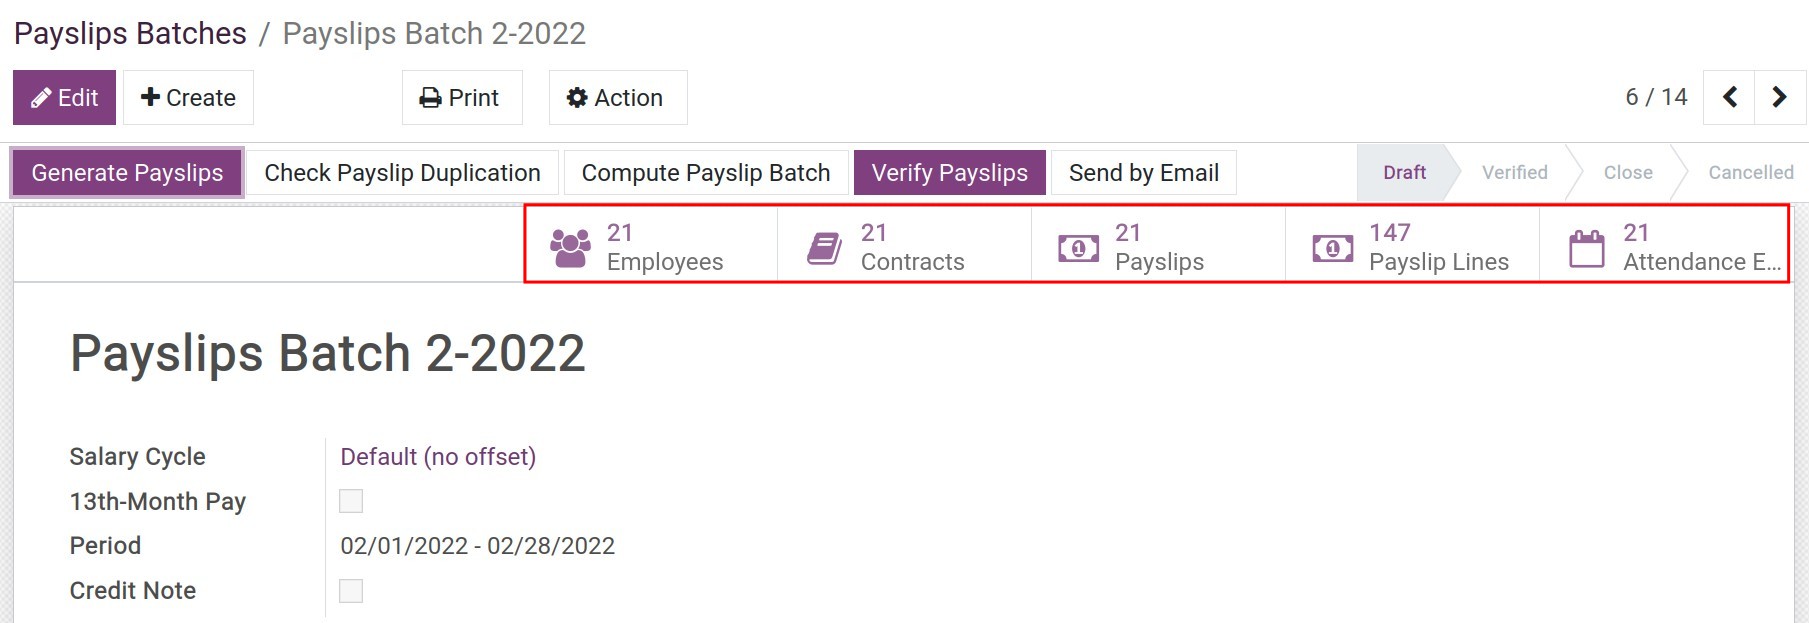
Employees: List of employees who have created payslips in the payroll;
Contracts: The list of contracts corresponding to the employees whose payslips are created;
Payslips: List of payslips;
Payslips line: Pivot analysis report for payslips lines of the payroll;
Attendance Employees: An analytical report on the attendance of employees in the salary cycle.
In addition, you can print payroll in PDF format by clicking Print at the top of the view:

Payslips Automation
To configure automatic payroll generation, you need to enable it first by going to Payroll ‣ Configuration ‣ Settings:
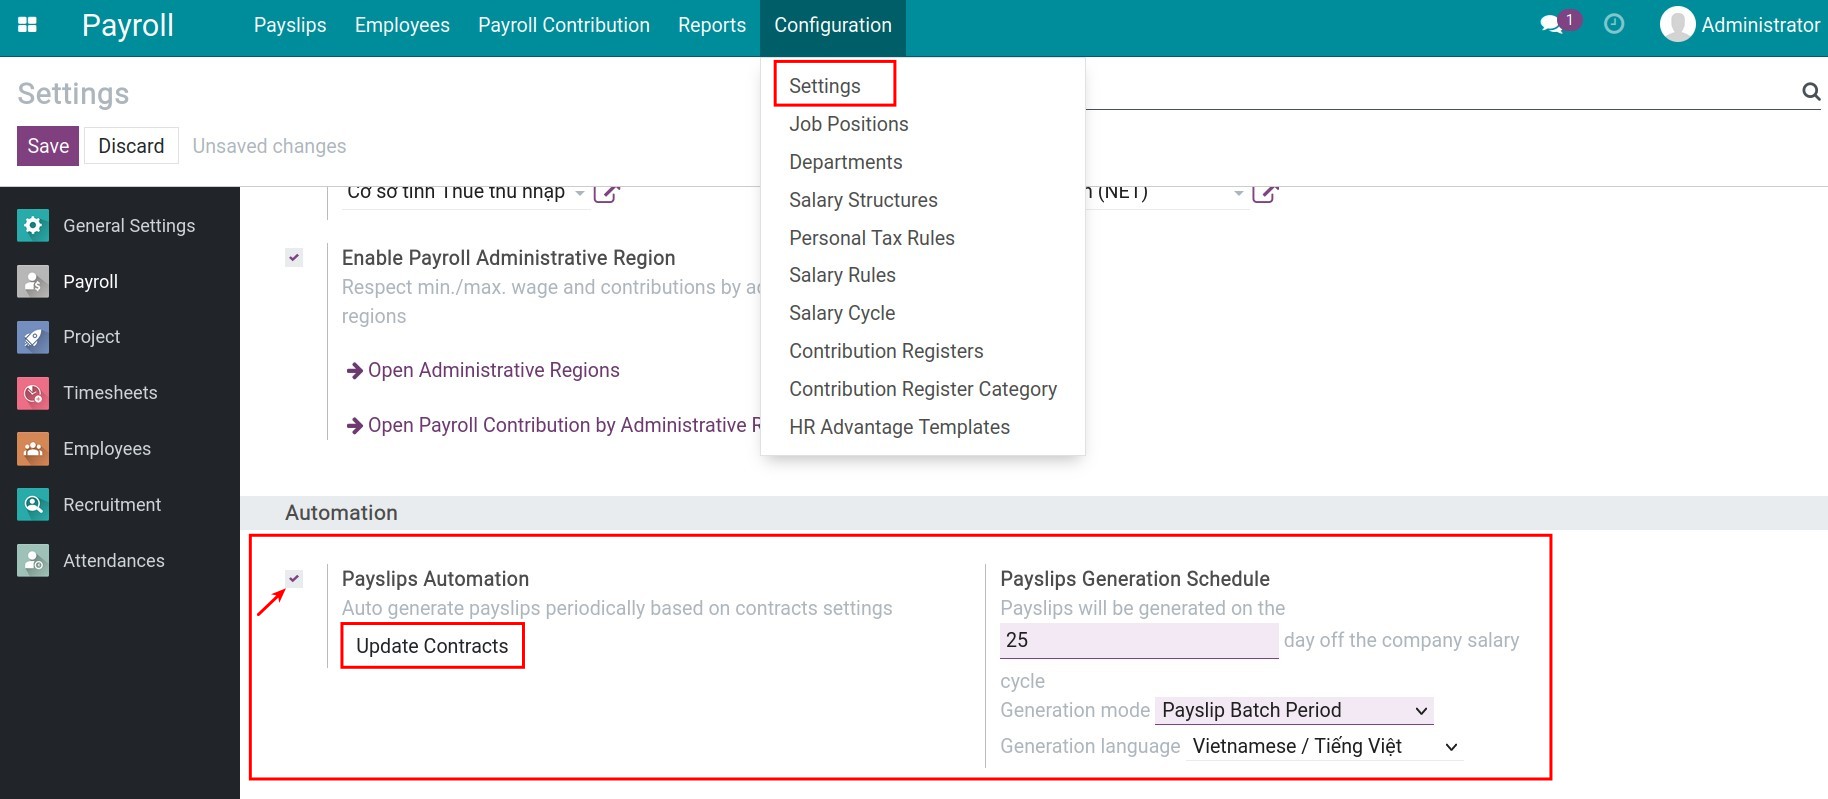
Check Payslips Automation, then click the Update Contracts button to update automatic payslip generation for all running contracts. Besides, you will also be able to configure:
Payslip Generation Schedule: Choose how many days in the salary cycle so that the system automatically generates payslips on that day.
Generation mode: Select payroll generation mode by payroll cycle or by contract term.
Generation language: Select the language for the payroll.
Once the payroll automation feature is configured, on the set date, the system will automatically generate payroll with the corresponding payslips of the employees in the respective salary cycle. Once the payroll has been automatically generated, you can manipulate and use the payroll features in the same way as create manual payroll.
See also
Optional module
HR Payroll Accounting